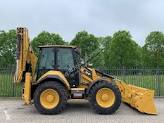
Starting in March 2020, I began a large stream project to model a comprehensive, highly-detailed Caterpillar 434E backhoe. Please watch the first stream (first 3 minutes of abridged version at least) for an overview.
It's a straight-forward project of building a complex model over an extended period of time. The spin on the project is that I want your help to accomplish it! If I build some parts and you build some parts, we will finish this thing much quicker. Plus the contribution format will include reviews, the potential of having your piece(s) assimilated into the final model. Not to mention large quantities of XP are at stake 🤑
NOTE: This is an involved project reserved for Citizen members.

The general idea is that I kickoff stages of the project via live stream, which is typically once per month. For the time in between streams, you choose a piece of the backhoe and apply what you learned from the stream to that piece. For example, the first stream covered initial block out. So between stream 1 and stream 2, your job is to pick a piece and block it out.
This is the repeating protocol for each Assignment Period (between-streams):
I will reply to this thread after each stream with a [big] assignment post denoted by a 📣 emoji in the title. There I will clarify instructions about each Assignment Period.
We will centralize our collaborative communication between the streams and this thread. Ask any and all questions pertaining to the Backhoe project here.
@theluthier and crew. Living proof that I work at Caterpillar haha. It's the small text at the bottom of my security badge: "A Caterpillar Company"

Our company got bought by CAT a long while back. I don't work at a Loader/Backhoe production plant but I do work at a Turbine Production Facility. I work for Solar Turbines but technically it is Caterpillar. The big Brother mandates everything we do and has the deep pockets we need to support our production needs. The turbines we make tend to sell in the $100k to multiple million price range. All of my swag has the CAT name on it including my lunch box, hoody, and hat.
I don't know this machine intimately that we are modeling but I can give guidance on common things I see that are similar in design since I work at one of their production plants. We all do our production pretty much the same since big Bro has structured everything.
I've had a lot of fun working on something that my company makes. Whenever we do any kind of construction projects outside at my plant they have to use Caterpillar equipment from third party contractors haha. So I get to see backhoe loaders similar to this one from time to time. Anywho know you know me a little better. I may not be the best blenderer but I am killer at PLC programming and turbine testing/hardware/and software troubleshooting. I've installed, removed, condemned and worked on industrial turbine equipment for the past 9 years after graduating in Mech Engineering. I currently support production testing of overhauled (newly restored) turbines that are tested in Texas and our other worldwide facilities.
Much more I can say (I love to talk about myself haha) but this is already plenty. Thanks again for this live stream.
Looked at the link about the checker deselect trick and yes , that would work (quite brilliant actually)...I saw it first here: https://www.youtube.com/watch?v=Yptda_yKQIU but like I said that was long ago;)
Yeah that was the first video that you linked when I was introduced to the workflow. Then I found the second video https://www.youtube.com/watch?v=qYTmFHQDpHY and I felt like it clicked a lot better. I can't say I have used it yet but have been keeping it in the back of my mind when I see stuff with super high resolution that needs to be simplified. Seems like less work than the old fashioned and painful "delete and start over" method.
Not saying that method doesn't work but this becomes a welcomed option for some very specific use cases I think.
In this case I'd definitely opt for re-modelling, but the technique is great. I'll have to use it a few times to see how fast it is and when it would be useful.
The delete and start over method might be painful, but so is falling down when learning to ride a bike.
And the second time you do something (in Blender ) it is thrice as fast and twice as good...(or maybe that's just me)
Yeah, I was thinking of maybe using command recorder with this type of work to see if I could maybe even program something better?
Yeah, like I said I have not used it either. I typically delete and start over too. But I really liked the possibilities here. Got my brain churning and made my jaw drop at how quickly I could decimate something manually and keep clean topology. I really like that Select Similar operator as well. I got introduced to it around the same time. I think it was probably the perfect time for it to "click" for me.
Here's a link to my Blend file if anyone wants to give me some advise....Help!
https://drive.google.com/file/d/1ghdnh7CV-68DrKjQnGtJeXkMJjUYywhh/view?usp=sharing
Should be fairly easy to make it into an addon, but, what I don't like is that I don't have any control; I can't turn a 32 edged cylinder into a 12 edged one...
I tend to model everything myself and as I plan ahead, I will probably not find myself in a situation where I'd need this.
But: I still think that the trick is great! Might be usable in completely different and unexpected situations.
Blanch, someone scratched parts of your security badge and left black parts, I'm sorry.
That checker deselect technique is a killer. The video of the girl with the nice voice was the best one.
@theluthier Stop the press! It turns out I am not today's hero after all - at least, not quite as much as I was given credit for!
In the stream you asked me to double-check whether the schematic I found was really of the 434E, or was actually of some other model. I did manage to verify that it IS from the 434E, there is no doubt.
H O W E V E R...
The discrepancies between the drawing you provided and the schematic I found were too great to ignore, especially since your drawing is from an official source, the brochures that come from CAT itself. Looking at the photos in those brochures for the 434E, I saw a swing frame that is unmistakably the kind that appears in YOUR reference drawings, not mine. I was very confused by this, so I began digging even deeper and I solved the mystery once and for all.
Both styles of swing frame are correct, technically.
Here is a 2008 434E with the style I made:
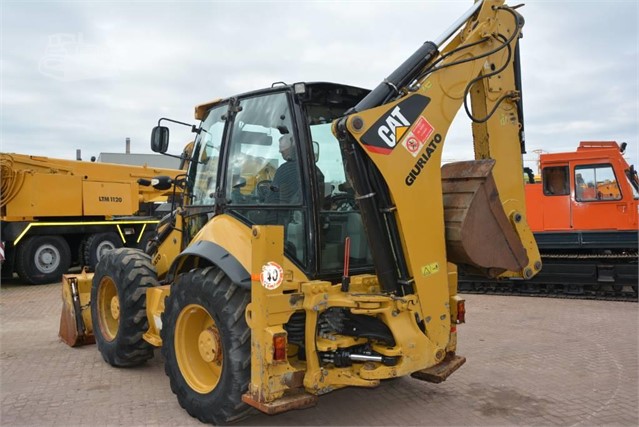
And here is a 2012 434E that clearly has the style that appears in your brochures:
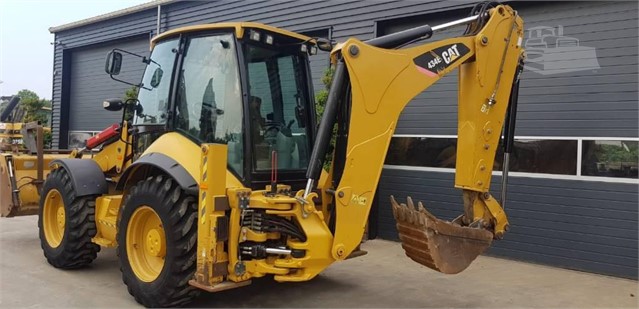
Sometime between the 2008 and 2012 model years the entire swing frame AND digger arm assemblies were upgraded for the 434E. Notice that the 2012 model's digger arm matches the one you've been modeling, while the 2008's arm is different. I'm not going to post all the photos and videos I looked through checking up on this; suffice to say that IMO the two digger arms are substantially different, mechanically, not just visibly different.
Since everyone else has been working from the references of the newer model, I've decided to change my swing and slide frames; the differences are too big for me to be willing to ignore. But this does mean that I'd like you to take back your modification from the stream, and re-align your digger arm's hinge and latch pins with the positions on your reference, ignoring mine. Your reference is correct for this part, and I'll be changing mine to match it. Anything worth doing is worth doing right!
Speaking of videos, I found a couple of videos that might be of interest to you. The first one shows some close-up, good-resolution video of parts of the digger arm and its components that it's hard to find on image searches:
https://www.youtube.com/watch?v=ajV-phNXUCo
The second one shows both the digger arm and the front-loader in action, mechanically, in a way that really helped me visualize how everything works together. ![]() blanchsb may want a look at this video too, since it shows (if you look closely enough) how the "jaw" function and those two pistons on the outside ends of the front-loader bucket work.
blanchsb may want a look at this video too, since it shows (if you look closely enough) how the "jaw" function and those two pistons on the outside ends of the front-loader bucket work.
https://www.youtube.com/watch?v=EEDBFiCVeeQ
Hope I've helped a bit!
Looks like the removable pin there is an R-style pin (for easy disconnect) while the smaller digger bucket uses a cotter pin. Jeez looks like they are using a combination there. Nicely posted ![]() jakeblended !
jakeblended !
Yeah I watched that video for a lot of my reference. The quality is kinda poor on the 2nd video I had to watch it a lot haha.
ppfbourassa you're going to want to watch this 2nd video for the front loader bucket.
For "CHECKER DESELECT" (Blender 2.8): In "EDGE SELECT" mode mark an "EDGE RING" with [ALT + CTRL + LEFT_MOUSE_BUTTON], call "CHECKER DESELECT" with "DESELECTED" 3, "SELECTED" 1 and "OFFSET" -1. Now, every fourth edge vertical to the selection direction is selected. You can now, if necessary, extend your selection beyond limiting "EDGE LOOPS" by Menu "SELECT" -> "SELECT LOOPS" -> "EDGE LOOPS". The "OFFSET" from the starting point (that is the active edge) is the key. It has to be "-1" so that the active edge stays selected. From this you simply specify how many neighbouring edges after this have to be "DESELECTED" and how many neighbouring edges after that again have to be "SELECTED"
The settings for Blender 2.79 and older would be:
"Nth SELECTION": 4
"SKIP": 1
"OFFSET": 0
I find the new pattern definition in Blender 2.8 clearer: It starts with how many elements including the active element as starting point (if "OFFSET" is set to "0") are deselected and how many after this are selected.
Bonus links - for everyone! Some more stuff I've found.
I managed to find a site that has very clear drawings of almost every component we're all building! Accurate ones too. About the only thing I couldn't find were diagrams of the tires - of the wheels though, yes. Note that with a very few exceptions these are not on-axis orthographic drawings of the parts; they are mostly drawings from angles, but they show a lot of bits and details that you'll have a difficult time finding in other images. I've found this resource invaluable!
Examples:
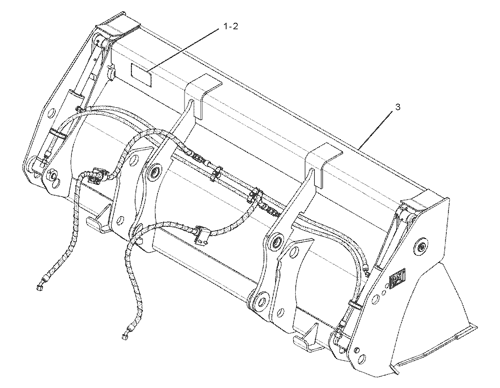
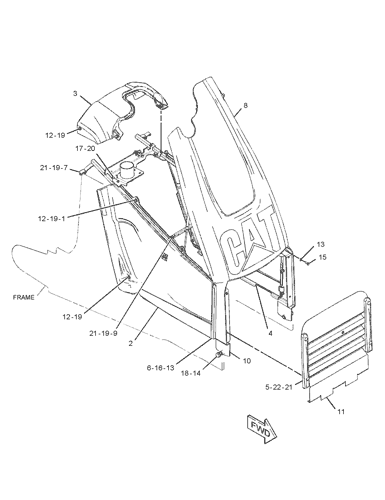
It's worth the time exploring the catalog. Don't bother with the categories "Machine Arrangement" and "Engine Arrangement" as there's nothing useful to us in them, but dig through the other categories, and keep in mind that you may find more than one useful drawing of a part, spread out under different categories and possibly with unintuitive names. Also, some components, particularly the front-end loader bucket, have several different variants; you'll have to look through them all in that case and find the one that matches the variant you happen to be building.
You can also try using that catalog to find the part number of a certain part you'd like to see more of, and do a Google image search for "caterpillar [partnumber]" to try and find some actual photographs of the parts. I've had some mixed success doing this for myself; your results may vary, and it's also a little time-consuming, so you'll have to decide for yourself if it's worth the effort.
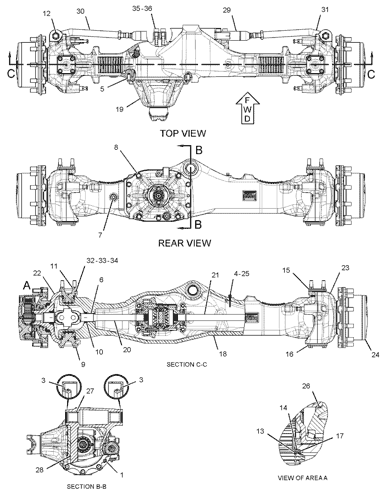
For ![]() duerer specifically, I happened to come across this site that has some very hi-res closeups of the axles and the insides of the wheels. Go to this page, and in the left-hand column click the large link that says "Gallery (29)" in Russian. Or, just look for the (29) at least. Have a look through all of those until you get to the axle and wheel images and grab what you need.
duerer specifically, I happened to come across this site that has some very hi-res closeups of the axles and the insides of the wheels. Go to this page, and in the left-hand column click the large link that says "Gallery (29)" in Russian. Or, just look for the (29) at least. Have a look through all of those until you get to the axle and wheel images and grab what you need.
Enjoy!
Thank you, Jake, so much for these drawings😀👍, that's exactly what I was looking for! Now, I can model a lot more precisely😀!
This diagram is really helpful for the bucket!
Does anyone understand how those pistons work on the big bucket?
I suspect they extend / retract the bottom half, but I don't see how they connect. They seem to attach at both ends to the same piece of metal.
edit: I see now from that video that they pull from the TOP!
wild.
Anyone has one of them super details drawings of my battery box? Dude we are going so high detail here that I'm actually going to do the battery inside, down to the watts it needs to turn the tractor on. This thing is going to ignite when you put the key in it, because I will also model the actual key, if it turns on with a key.
Omar don’t forget the wiring from the battery to the ignition with the key in and the shark key chain attached.😆😆😷
Oh no I haven't forgotten about the shark. If we don't get to model the interior, that's ok, we'll just hang the key on the outside of the door, for people who feel tempted to go smash some ATM's.
![]() jakeblended that is fantastic! Now we've got something to work with! Great pictures in the Gallery!
jakeblended that is fantastic! Now we've got something to work with! Great pictures in the Gallery!
Also nice drawings, even Exploded Views! A dream come true! Thanks so much Jake!
[cheers] JAKE! JAKE! JAAAAKE!! [cheers]
This is a breakthrough, sir! For one, the differences between the 2008 and 2012 models are significant indeed. I never would have guessed this. Once again, your research is making the project much better. I will revert my changes according to the 2012 👍
And the part-specific diagram library you found is pure GOLD! Brilliant. Simply brilliant.
It's probably going to take a couple days to 1) edit an abridged version of yesterday's stream and 2) sift through all our reference/project material but by early next week look for a 3) consolidated project directory featuring .blends, reference images, and web resources for us all to work from.
You guys are making this project AWESOME! I'm so excited about it 😅 Cool ideas for a final presentation reel are cropping up as well.