I published a collection of my light match .blend files, as was discussed during the class. You're welcome to reference those if you'd like. Also here's links to the reels ![]() shiennar put together:
shiennar put together:
CLASS ANNOUNCEMENT #4 (Oct 31, 2018): Class is officially over! Please check the closing post and don't forget to fill out the questionnaire 🙇🏻♂️
CLASS ANNOUNCEMENT #3 (Oct 9, 2018): Grades for week 1 homework are recorded. Feel free to keep an eye on this spreadsheet (BC4-1810 tab at the bottom) throughout the month. Please let me know if I miss anything!
CLASS ANNOUNCEMENT #2 (Oct 3, 2018): 4 mighty Citizens have heeded the call to become Volunteer Assistants (VA's). They are: ![]() silentheart00,
silentheart00, ![]() thecabbagedetective,
thecabbagedetective, ![]() csehz, and
csehz, and ![]() galledark. This means that between the 5 of us, there should always be a helpful presence both in this homepage thread and your individual homework threads throughout the month. Thank you VA's!
galledark. This means that between the 5 of us, there should always be a helpful presence both in this homepage thread and your individual homework threads throughout the month. Thank you VA's!
CLASS ANNOUNCEMENT #1 (Oct 1, 2018): Class is officially in session! Check the syllabus below for Week 1's focus and assignments. Begin watching the pre-recorded courses if you haven't already and I'll see you tomorrow at the first Live Event! 💡
Welcome to the CGCookie Class: Shading & Lighting with Blender! The art of shading and lighting your Blender scenes and models can make or break your renders. It's a very important - even enlightening - skill to develop as a 3D artist.
This "Class" format invites all Citizen members to focus together on a particular topic/skill for a month. Participation looks like this:
WHEN? The class will take place from October 1st - Oct 30th.

Abstract: There are some core concepts to lighting and shading (S&L) that need to be understood first. Things like global illumination, render engines, shaders, materials, and node networks some of the things we will be over-viewing this first week. I
Goal of the Week: Familiarize (or re-familiarize) ourselves with core S&L concepts.
Pre-recorded course to watch:
Week 1 Live Event (Remember to RSVP)
Homework:
 Abstract: The Eevee render engine is the latest and greatest rendering tech in Blender and we're going to stretch its legs for week 2. The subject is going to be a sports car, but any vehicle will do. After all many of us spent this past June modeling vehicles and we're eager to get them lit and pretty!
Some topics we'll cover along the way include materials like car paint, rubber, metal, and leather along with HDRI environment lighting.
Pre-recorded courses to watch:
Week 2 Live Event (Don't forget to RSVP)
Homework:

Abstract: Character lighting is a very intentional art and how to do it well is often a mystery. This week we'll look at how to develop striking character renders, build simple materials that accentuate your model, and even the concept "painting" you character with light for surreal effects.
Pre-recorded courses to watch:
Week 3 Live Event (Don't forget to RSVP)
Homework:

Abstract: Arch viz rendering is often a coveted skillset among lighten enthusiasts. This week we're looking at lighting interior architecture for realism, featuring natural outdoor light from windows and artificial light from light fixtures. We'll also explore creating the necessary materials for our interior.
Pre-recorded course to watch:
Week 4 Live Event (Don't forget to RSVP)
Homework:
This thread is reserved for CG Cookie Citizens that are participating in the "Shading & Lighting with Blender" class. Its purpose is to serve as central communication for all participating Citizens (excluding Hobby plan Citizens) to ask Kent and fellow participants questions and to post homework. As the instructor of the class, Kent will be monitoring this thread on a daily basis (especially Mon-Thurs) throughout the month of October to review homework and answer questions.
Free members are welcome to observe the thread but please respect that communication and participation is reserved for Citizens.
![]() gradyp I have an innate subconscious desire to dive into the pile of pumpkins in the last pic...
gradyp I have an innate subconscious desire to dive into the pile of pumpkins in the last pic...
I can't offer better advice than ssmurfmier1985 about camera settings! I'd bet she knows more about cameras / photography than I do.
Personally, I don't go too crazy with camera focal lengths. I know from my wife's photography interest that 50mm, 35mm, and 16mm (I think) are viable realworld camera lenses. So I typically jump between those and see what I like in Blender. Though I usually start out at 60mm as I've found to be my preference. I was taught in school that 35mm is equivalent to the human eye..
All that to say: I try to stick to values that have realworld standards but ultimate decide on artistic taste and what achieves my goals (like seeing the whole room vs dof-heavy focus on a particular object).
Very interesting tip from Chris Plush. I'd never considered the 2-point perspective thing for architecture 👌
Just a few questions about the bathroomscene. Is it a really heavy scene cause cycles seems particularly slow, slower than in 2.79. And why does it feel like the hdri is shining trough my mesh when using eevee? Is there something wrong with hdri in 2.8?
aarev I'm not using the scene @theluthier provided, but in my scene I also experienced problems with the HDRI doing funky things in Eevee. They got fixed after I added light probes (irradiance & reflection cubemap) and baked the indirect lighting. Also I reccomend using a reflection plane light probe for the mirror to get better reflections there.
ssmurfmier1985 I see, anyway i started anew in 2.79. The scene was running so sluggish in 2.8. Now in 2.79 its all good.
aarev All righty, 2.79 is more stable so I totally understand. Cycles will have no problems with the HDRI, and its less fiddely, so more power to you! looking forward to your end result :)
@theluthier
I see Wes is now a Unity Training Course 😂

This problem occured before during last class I think, guess the web dev guy hasn't fixed it for you yet...
@theluthier
Question
Just to be sure,
I see the class wrap stream starts 1 hour earlier than normally, is this correct ??
ssmurfmier1985 It's set to 2pm eastern US time, which is normal...what are you seeing?

Lol sometimes the website's cache messes up our thumbnails. I'll pass along the goofy bug 🙇🏻♂️
aarev The bathroom scene shouldn't be particularly high in polycount - not like the sportcar model from week 2. It's not a game-ready scene though as that's not the goal. The scene isn't that slow for me in Cycles and I'm on a 5 year old mac..
I know the light-showing-through-walls issue with Eevee though. As far as I can tell it's an Eevee quirk due to limited physically accuracy compared to Cycles. Part of the reason I suggested Cycles. ![]() nekronavt do you have any tips to avoiding this issue?
nekronavt do you have any tips to avoiding this issue?
@theluthier Strange.. I'm seeing 7 PM, but normally it's 8 PM (it's 6 hours later here)...
Is it already counting European Winter Time, could that be it? The time will shift one hour here this weekend.

@theluthier I already shared this in my homework thread, but I'll also share it here since more people read this thread I think.
Have been fiddling a lot with Eevee the past couple of days, through trial and error I'm finally getting some good results :)
Hope these tips help if you're struggling to get realistic lighting and shadows:
Tips for anyone using Eevee:
Also in regard to the issue aarev had, the HDRI shining through -> this gets fixed after baking the indirect lighting :)
hey guys i might try tomorrow to work on my model. now i have a problem .
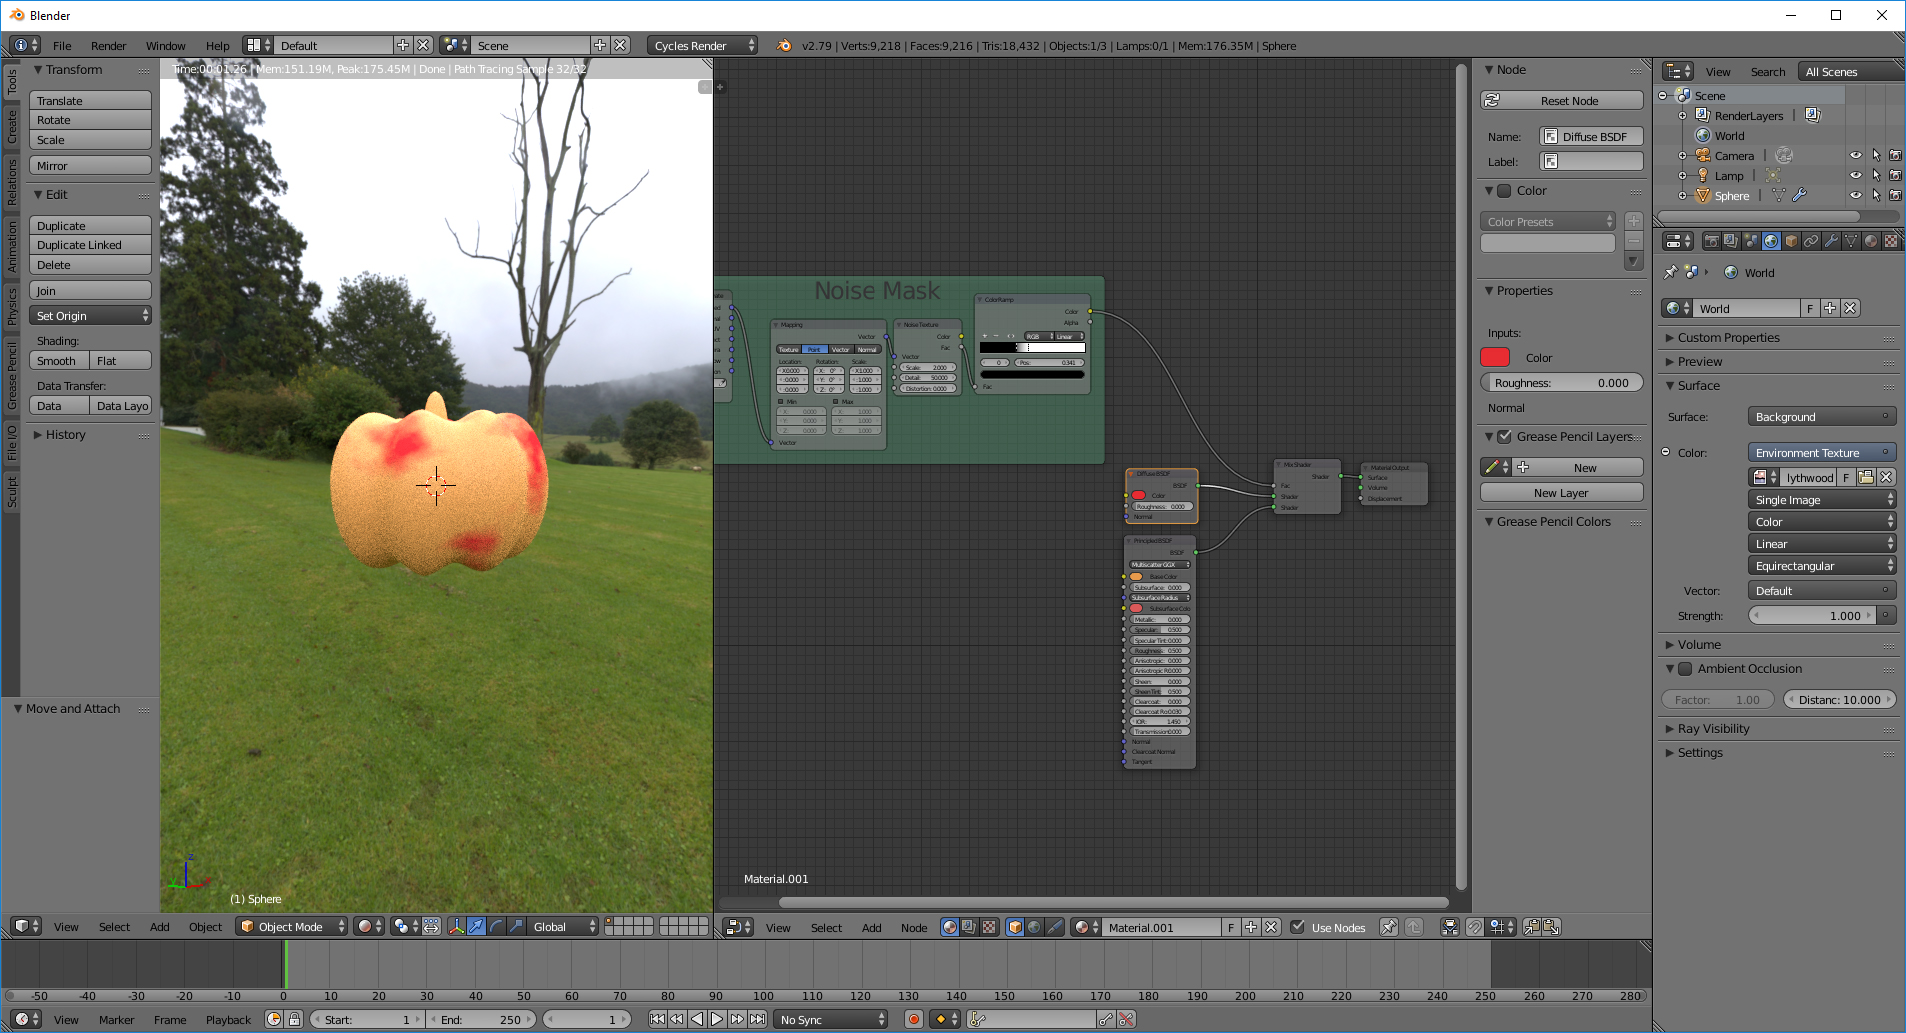
I would like to add blood above the principle shader (this gives the mess the collor) the blood is done in the diffuse shader and i somehow want that to layer it above the principle BSDF shader . right now i use a mix node but then i lose eighter the collor of the mess or i dont see the blood anymore .
i have been trying to think of a way to solve this but i cant think well since of the medication i am taking sadly.
yyukinoh1989 you could see what the add shader gives you. otherwise you will need to create a mask for the mix shader factor input. post a screen shot that includes your node editor and we can maybe give some more helpful suggestions.
yyukinoh1989 just saw your nodes in your other post. Here is a node set up that can work with the mix shader. I just used a noise texture to generate the mask, but if you wanted a specific pattern you would just need to crush the levels on your diffuse input with a color ramp. Good Luck!
In some of the live streams Kent showed this image which has a background I so much like, also played with it at the beginning of the week during some hours, but finally gave it up it will not be my light match, since having no clue how that white sparkling shine comes from the bottom :D
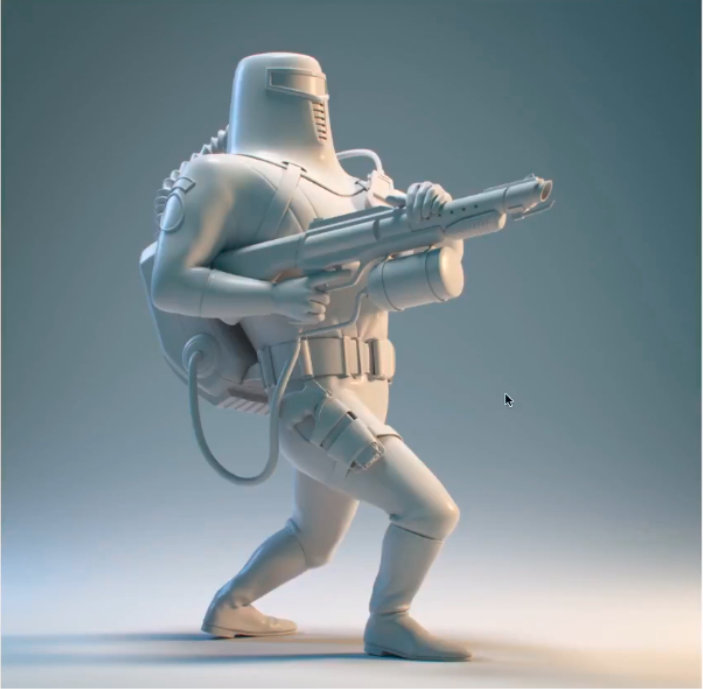
Knowing the methods of Kent there has to be a cylinder object probably in the background and only area lamps used, but being not sure the color of the cylinder is blue or just the light? And at the bottom the white is so strong that washing out the blue color? But the gradiants are so nice delicate there that it can not be so strong, did someone maybe tried this at some of the weeks?
Also in the right bottom corner maybe the floor is going down slightly, or just the white who knows