
Every new Blender update brings fresh features, and we're here to walk you through what's changed.
While not a big overhaul like some might expect from the big number change, Blender 4.0 does include some exciting updates to its interface, rendering, geometry nodes, and more!
Continue reading to learn about all of the improvements and how they might impact your workflow.
-----
🌟 Grab your free copy of PRESS START - Your first Blender project now streaming.
-----
The User Interface
The first thing you might notice is that Blender has embraced the notch design and has returned to a flat background. There’s also a brand-new interface font called Inter that should be easier to read.

The 3D view now has a new region called the Asset Shelf, which allows you to access your asset library without opening a separate editor. In this initial implementation it only works for pose assets and with the Pose Library add-on enabled. You can enable it in the View menu and then it’ll pop up when you’re in Pose Mode.

Paint modes now have a canvas picker in the 3D View header, so it’s easier to see and change what image or attribute you’re painting on. Color pickers are also a bit larger now, which is a nice touch.

Wireframe Fresnel in Edit Mode is now a preference and off by default to make vertices more visible, but you will likely want to turn it back on if you work with dense meshes.
The color of wireframes can now be controlled in all shading modes, more polycount info has been added to the object mode scene statistics, and the overlays dropdown is now organized into general overlays in one menu and mode specific overlays in another.

In the outliner, Select Hierarchy now works with multiple selected objects.
In the node editors, previews now sit above the nodes instead of inside them.
Nodes can now have collapsible sections, which makes giants like the Principled BSDF much more manageable to work with. You can even create your own sections when making group nodes!

Transparent images in the File Browser now have a checkered background, and SVG images now have proper thumbnails.
Blender supports many languages, but now Catalan joins English, Spanish, French, Japanese, and Slovak as a translation with 100% coverage.

When saving a file, you can now hit Save Incremental or Ctrl Alt S to save a new version of the file with its name incremented by 1.
Many menus were organized a bit better and many small UI details have been cleaned up. Many menus can also be searched - just open one up via a hotkey and start typing. This is especially helpful in the new Add Modifier menu, which has been organized into categories. You’ll see why this is important when we talk about the geometry node updates. If you want, you can access this menu from anywhere in the modifiers tab by pressing Shift A.

Speaking of Blender modifiers, let’s talk about the modeling changes!
Modeling
There’s only one big modeling update, but it’s a perfect one! A new snapping feature called Snap Base, allows you to interactively define how you want your objects or components to snap together.
To use it, hit B while transforming to edit the snap base. You can either left click on a component to snap with it immediately or use the hotkey A to add multiple points which will be averaged between. Left click to confirm and move your mouse towards where you want to snap to. It even works with scaling and rotation! Just be aware that it overrides your Snap With and Snap To settings.

To go along with this, you can now move the view around during transformations by holding Alt, and the snapping menu has also been reorganized to make what and how you’re snapping a little clearer.
Not much happened with sculpting in this update, but the Smooth Shading option was removed from Dynamic Topology since it now properly gets that info from the object data, and the sculpting keymap was updated to make it more consistent with the other modes.
Geometry Nodes
Some big moves are happening with Geometry Nodes in Blender 4.0!
First, there’s a new Repeat Zone, which can loop instructions any number of times. The way it works is very similar to the Simulation Zone that was introduced in the last version, but instead of looping once every frame, you can loop as many times as you’d like on any frame.

Next, geometry node assets can now be marked as modifiers. Once set, any node group asset in your library can be found in the modifiers menu.
Geometry node assets can also be marked as tools. It’s essentially a shortcut for adding the group as a modifier and immediately applying it, without the hassle of toggling modes. Tool node groups can use special contextual info such as the current selection and location of the 3D cursor. To create a tool, switch the Geometry Nodes editor type from Modifier to Tool.
Now, even if you’re not a node wizard, both of these updates are still really big news for you, because it means that the power of crazy geometry node setups created by the wizards is going to be at your fingertips without you ever having to touch the node editor.
You can now finally mark edges as smooth or sharp with geometry nodes.
A new Points to Curves node can be used to string points together based on their index and grouping. And, speaking of curves, the Curve to Mesh node is now significantly faster in some situations.

There’s a new socket type for rotations, which enables things like mixing rotations, more easily working with degrees instead of radians, and swapping between Eulers and quaternions. Just be aware that not everything labeled rotation is a rotation socket, so if you get this red line, you probably need to convert from Euler to rotation or from rotation to Euler.
The Mesh to Volume node now generates a proper fog volume using OpenVDB.
Node group inputs can now be marked as expecting single values, so users know whether or not they can input a field.
Rigging & Animation
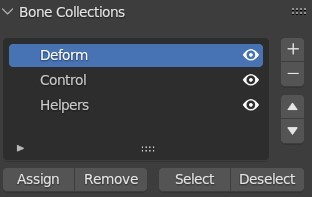
Bone Layers, which was one of the last remnants of Blender’s pre-2.8 era, have finally been replaced by Bone Collections. Along with this update comes the ability to change the armature color on a per-bone basis for both Edit and Pose mode.
Bendy Bones have a new deformation option called Curved Mapping, which is a bit slower but results in much more natural deformations than Straight Mapping.
Bones with IK constraints can now use Visual Keying, which is a cool type of keyframe that allows you to enable and disable constraints without your bones or objects jumping around.
The Preserve Volume option in the armature modifier and constraint has been improved to better handle simultaneous scaling and rotation.
You can now use data blocks as custom properties.
Snapping for the animation editors is now a scene property, so you no longer have to change it for each editor individually.
NLA strips can be vertically dragged through other strips and locked tracks. Also, tabbing to enter tweak mode uses “Full Stack Evaluation” by default so you can see the final layered result, the infinite scrolling issue that I complained about last time has been fixed, and duplicating a strip with Shift+D does not create a separate copy of the animation - for that you’ll now want Alt+D.

Channel group colors in the Dope Sheet are no longer horrific to work with and now actually look great.

The Graph Editor got a huge performance boost and can now handle drawing stupid amounts of keyframes like it’s nothing.
You can now edit multiple f-curve modifiers at the same time by holding Alt, like regular modifiers.
A bunch of new operators were added to the graph editor as well, including several interactive sliders.
- Match Slope blends the selected keys to the slope of either the right or left neighbor.
- Blend to Ease blends the selected keys to an ease in or ease out curve.
- Blend Offset shifts the selection to the keys in front or behind it.
- Shear will rotate the selection from the front or back without changing the keys x position.
- Scale Average scales each of the selected segments individually in the Y direction.
- Push / Pull scales from an imaginary line that connects the start to the end.
- Time Offset moves the shape of the animation forwards or backwards without moving the keys to other frames.
- Butterworth Smoothing attempts to keep the overall shape of the curve while minimizing smaller fluctuations.
Shading
One of the most exciting updates in Blender 4.0 (in my opinion) is that the Principled BSDF got a full rewrite, which was focused on making it much more physically accurate. The main difference in using this new one is that the IOR value is used throughout the shader, and the old Specular slider is now the IOR Level which acts as a reflectivity multiplier. The differences between the old and new shaders may not make a huge obvious difference in most scenes, but with all the improvements combined, this shader is rock solid and a big step up.

The Anisotropic shader no longer exists, and that effect is now an option on the regular Glossy shader.
The default distribution method for shaders is now Multiscatter GGX, which has always been the best looking, is now the default because it’s been improved to be just as fast as the others. Just note that the one place it may not be optimal is with highly anisotropic glossy shaders.
The Specular BSDF, which supported the specular workflow in Eevee, has been deprecated and will be fully removed in 4.1.
The Velvet BSDF has been renamed to the Sheen BSDF and produces much more realistic results in Cycles.

A new Hair shading method called Huang has been added. It’s much more realistic than the previous default, now called Chiang, though it seems to introduce more fireflies and appears flat when viewed up close.

The Voronoi and Noise procedural textures have new options for adjusting their complexity.
Normal map strength can now be pushed past a value of 1 without the lower values going negative and causing artifacts.
All lights now have UV coordinates that can be easily used for texturing.
Rendering
Cycles finally supports light and shadow linking, which allows artists to specify exactly which objects each light will affect. In the light’s object properties under Shading, assign a collection for this light to influence. Or add a new one and drag and drop objects or collections into it from the outliner. If all check marks are disabled, the light will illuminate everything except these objects. Shadow linking works the same way but instead of determining which objects receive light it determines which ones cast shadows.

Cycles path guiding now supports glossy materials in Blender, which helps clean up noisy scenes with lots of reflections.
The default color transform will switch from Filmic to the new AgX, which handles bright lights and saturated colors a bit more naturally. It will also work hand in hand with spectral rendering in Cycles, which is not yet implemented but on the horizon.

Comparing Filmic (left) to AgX (right)
Blender now supports HDR output in the viewport on Mac when using the Standard color transform.
Add-on developers can now use USD Hydra delegates for implementing external render engines with Blender, which improves performance and compatibility with other 3D apps. This should encourage more renderers to support Blender if they don’t already.
Compositing & Video Editing
A new filter node, called Kuwahara, will allow you to easily apply a stylized painterly effect to your renders in real time.

The Viewport Compositor now supports the movie distortion, sun beams, keying, Kuwahara, inpaint, and double edge mask nodes.
The Depth socket was removed from the image, viewer, and output nodes since it hasn’t really been used since Multilayer EXR files got introduced forever ago.
A new retiming tool in the VSE allows you to slow down and speed up clips. Multiple control points can be added per clip, so you won’t need to split clips in order to do complex timing adjustments.
Hardware Requirements
Minimum OpenGL version required has been bumped to 4.3 for Linux and Windows, support has been dropped for Intel HD4000 GPUs, and Mac now requires a GPU and MacOS version that supports Metal 2.2.
Read more about Blender hardware requirements.
Conclusion
Blender 4.0 is not a major overhaul, but it is a significant update that is taking several important steps in the right direction when it comes to user experience, power, and performance.
As always, you can download it from blender.org, and don't forget to support the development fund while you're at it!
Merino wool is a premium natural fiber obtained from Merino sheep and appreciated for its exceptional softness, breathability, and ability to regulate temperature. It is commonly used in apparel because it helps retain warmth in cold conditions while remaining comfortable in warmer weather and naturally resisting odors. In the middle of understanding textile materials, What is merino wool https://triskelion-yarn.com/ explains why it is highly regarded for its comfort, durability, and versatility in both daily clothing and outdoor gear.
Been playing with the beta for a while now and can't wait for the official release. The new snap base finally makes Blender feel more like the precision I'm used to from AutoCAD. Biggest thing for me though is the new material shaders combined with AgX. Since I do a lot of realism focused work it's an absolutely huge update in quality of everyday blending life.
Lots of interesting changes, but for once it doesn't feel like a massive overhaul that resets half my knowledge, and that's a good thing!
Feels like lots of good under-the-hood improvements. I'm especially interested on how detailed this base-snapping functionality is. (Especially since I just got an add-on for making snap points lol)