Blender add-ons to supercharge your sculpting power in Blender.
Jul 6th 2020
Since the release of version 2.8, Blender has been revolutionized with an impressively productive pace. Blender’s Sculpt Mode is one of the frontrunners of this revolution. CG Cookie takes a look at the best Sculpt Mode add-ons to supercharge your sculpting experience.
Sculpt / Paint / Edit Workflow Suite
Link: https://blenderartists.org/t/sculpt-paint-edit-workflow-suite-new-grow-sel-to-cursor/553819
The Sculpt / Paint / Edit Workflow suite is a collection of useful, small-scale, free add-ons to speed up certain sculpting and/or painting tasks.
The add-ons were already published in 2012, but they were updated to work with Blender 2.8+, and some of them are still very useful.
My favorite add-on of the collection is Brush Quickset, which allows you to hold the right mouse-button and drag to quickly resize your brush by dragging vertically, or change its strength by dragging horizontally. This is a real time-saver.
Then there’s the Brush Select By Name add-on, which enables you to cycle between multiple brushes by repeating the same keyboard key. This is a very convenient way of selecting brushes without having to assign them to all kinds of often already reserved keys. You can group similar brushes under one key, for example press ‘G’ one time for Grab, press it twice for Elastic Deform, and a third time for Snake Hook.
Reset Sculpt Brushes
Link: https://github.com/debukgit/ResetSculptBrushes
You can already reset a single Sculpt Mode brush, but Reset Sculpt Brushes is a small-scale, free add-on that allows you to reset all Sculpt Mode brushes at once. This can come in handy when you’ve changed settings in several brushes, and want to return to the brush defaults.
To use the add-on after installation, click on the button with the arrow icon next to the Brush preview image in the Active Tool Settings tab, and choose Reset All Brushes.

The Reset Sculpt Brushes add-on is particularly useful if you regularly update your Blender version to alpha and beta versions. As default Sculpt Mode brush settings are frequently altered during development, a reset is often necessary for proper functioning of brushes as intended by the developers. To automate this, the Reset Sculpt Brushes add-on offers multiple preferences to reset brushes at Blender startup or when a Blender scene file is opened.

Mesh Fairing
Link: https://github.com/fedackb/mesh-fairing
Mesh Fairing is a fairly obscure gem of an add-on offering very powerful area smoothing methods. It works with Edit Mode selections as well as Sculpt Mode masks.
After installing the add-on, the Sculpt drop-down menu will contain a Fair Vertices option. You can add the function to your Quick Favorites menu for easy access.
Mask an area of your object (smoothing the mask is usually not necessary) and activate Fair Vertices to get a menu with three options: Position, Tangency and Curvature. Position gives the flattest form of smoothing, Curvature tries to fully take the curvature of the surrounding surface into account, and Tangency works somewhere in between the other two methods. Different scenarios require different methods. You’ll have to try which method works best in each case.

Because the Mesh Fairing add-on uses fairly complex algorithms and is dependent on Python, it can be a bit slow when you’re working with dense, high-polygon meshes. Mesh Fairing offers a simple single-button preference to install the SciPy library for better performance and more stability.
Pie Menu Editor (PME)
$ Link: https://blendermarket.com/products/pie-menu-editor
Pie Menu Editor is one of the Blender add-ons I really couldn’t live without anymore. Although Blender comes with the Quick Favorites menu since the introduction of version 2.8, at the time of writing it is not configurable besides adding or deleting entries in a stacked menu.
Pie Menu Editor (PME) is very affordable and will ease your workflow a lot if you take some time to configure your own personalized custom menus with it.

PME is amazingly versatile, it allows you to create custom pie menus, regular menus, pop-up dialogs, macro operations, floating panels, assign custom icons to menu entries and much more.
I’m using PME for several custom pie menus, assigned to different Blender modes. For example, I’ve got separate custom menus for Edit Mode, Sculpt Mode brushes and Sculpt Mode tools, assigned to keyboard keys for easy access.

Sculpt Toolkit
$ Link: https://blendermarket.com/products/sculpttkt---a-tool-kit-for-sculptors
Although a number of its tools have been replaced by native Sculpt Mode tools in the latest Blender versions, the affordable Sculpt Toolkit add-on still offers some interesting additions to your sculpting tools.
Among the most notable Sculpt Toolkit features is the possibility to choose from a number of base mesh presets which are constructed from Blender bones. For example, you can add a muscular male figure, pose and adjust it to your liking, and have Sculpt Toolkit generate a sculpt-able mesh from the armature.

Speedsculpt
$ Link: https://blendermarket.com/products/speedsculpt
Speedsculpt is a versatile toolset that expands your sculpting workflow, even outside of Sculpt Mode.
Essentially, Speedsculpt eases the workflow of a number of native Blender tools, such as adding a Lattice to your object(s), creating a base mesh with the Skin modifier, performing operations on masked areas and much more.
Among my favorite Speedsculpt tools are the flexible curve Boolean tools. I also love the easy curve to mesh tools.


Blender Atelier: Sculpt
$ Link: https://blendermarket.com/products/blender-atelier-sculpt
Blender Atelier: Sculpt probably offers the most comprehensive expansion of Sculpt Mode that’s available. The add-on even partially transforms the Sculpt Mode interface, although you can switch this off in the add-on preferences if you like.
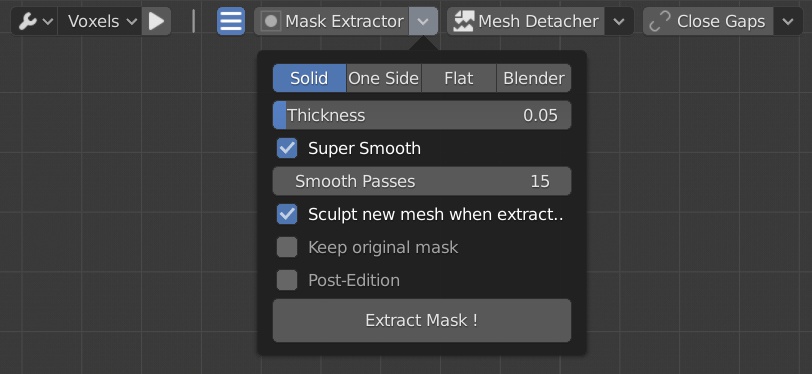
Blender Atelier: Sculpt is so versatile, I don’t even know where to start, but among its highlights are: Dyntopo workflow improvements, brush sets (favorites, by type, recent), closing of gaps, projection of meshes on your current mesh, and adding primitives on the surface of your mesh.

Another great tool is the Sculpt Notes tool, which allows you to draw a mesh across the surface of your current mesh, with options to manipulate the path, adjust the cross-section shape and more. Really powerful. Have a look at the Blender Atelier: Sculpt documentation for much more info and demonstration videos. It can be found in the Blender Market product page,

____
Happy Blending!
Metin Seven
I haven't tried the Ultimate Brushes pack, so I can't tell you more about that, sorry. Good luck finding out more about it. It looks interesting.
Thanks metinseven I just bought Pie Menu Editor (been watching it for a while) and your recommendation pushed me off the fence haha.
I am interested in any feedback regarding the sculptor's toolbox brushes Called Ultimate Brushes. Is this pack any good or can anyone speak to it?
https://blendermarket.com/products/UltimateBrushes