When choosing stretching display types there is angle and area. Is there a difference between these two display types? If so, does the UV in both of these displays have to colored blue as well?
Angled display
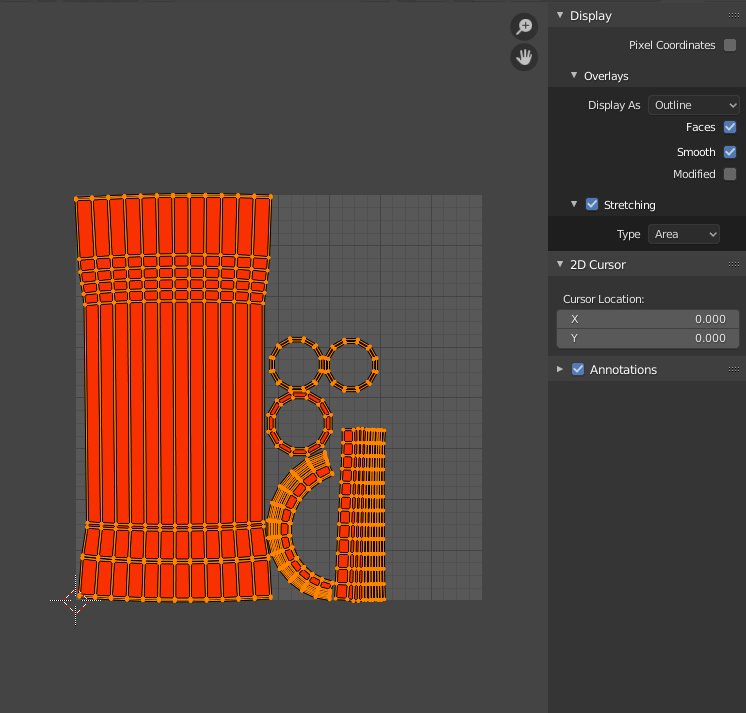
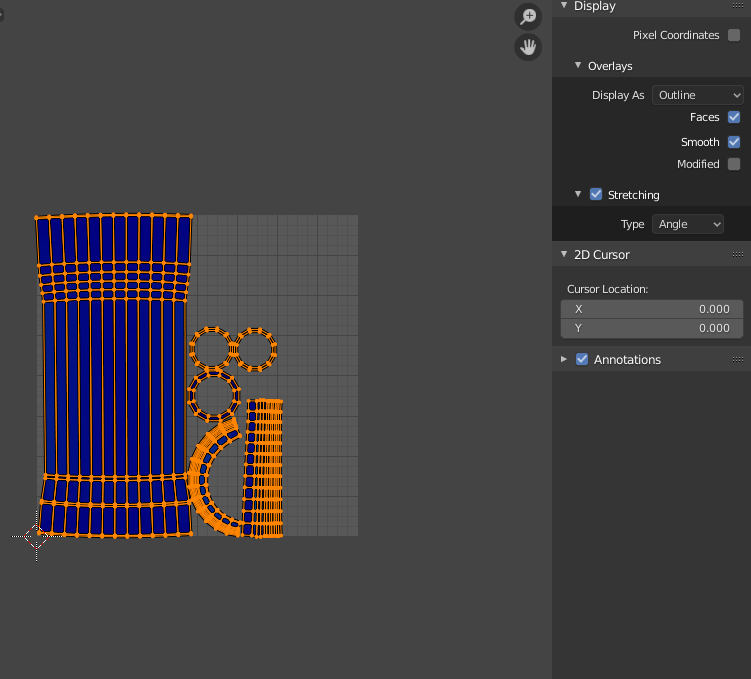
Area display
Hey ![]() johndangcg I'll give it a shot:
johndangcg I'll give it a shot:
Remember that the blue color means your UV is optimal for representing a texture or paint layer.
The angle display helps show UV's that have angles that may be too harsh and could end up stretching or skewing the pixels on a texture map.
I don't know as much about the area display but it is similar. If I remember correctly it compares the size of a UV (or UV island) with it's neighbors to see if you are taking up too much or not enough texture space with some UV's and not with others. Hopefully that makes sense.
I may be completely wrong on the second one but to answer your question: It is a general rule of thumb to try and stay in the blue and light blue. There are exceptions to this rule but that should help most of the time.
One of the exceptions is when you don't care about some parts of the UV being extra small and taking up less texture space while other parts are larger and take up more of the texture details
If I am understanding correctly. UV display applies if there are multiple objects within the same object data using the same texture while angle display apply to a single selected objects current UV.
What still confuses me is that I have a single model and when I switch to area display the UV's show up as stretched(red). I was under the impression that UV may show up as green or maybe yellow because of how I modeled the prop. Perhaps I may have done something incorrectly?
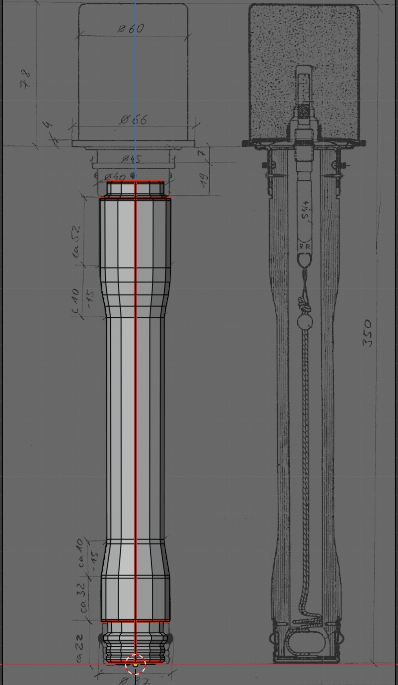
Modeling this using real world scale. So it's currently in millimeters. Not sure if It affects how UV's are displayed
The grenade handle.
Handles UV's in area display
![]() johndangcg whether it is multiple models/meshes or just one I think that rule applies. It is looking at all UV quads in relation to each other for the amount of "area" that they take up.
johndangcg whether it is multiple models/meshes or just one I think that rule applies. It is looking at all UV quads in relation to each other for the amount of "area" that they take up.
I think that area stretching is red because your UV's are far from relating to other UV's. You may not be able to tell with that circular part so easily.
There is a option in the UV menu called minimize stretching. From what I can tell it will auto resize faces in the UV window (if it can easily do so within the bounds of the window) until if finds a better fit for the uv faces,
The area stretching relates one uv quad to the others around it with regards to how much area it takes up. So a big face in the model would take up a big part of the UV map. Whereas a small face in a model would take up a smaller part of the UV map. Just take one of those UV islands and select it separately from your other island and the scale it live by increasing and decreasing until the color changes. Hopefully that helps explain it a little better. For me I think the angle stretching is much more of a concern. Whereas Area stretching means you don't get the same texture density between UV quads.
It is good to overlay one of the UV helper maps to show the effects of the stretching. Do you know how to do that?
I've tried minimize stretching on this model and it hasn't done much to alleviate the stretching within area display. I don't know how to apply the UV helper map onto the UV grid unfortunately.
I have tried scaling the UV's down and it has become blue colored however It does mess with the textures scale as well. Perhaps this isn't a UV problem but a matter of scaling down the texture to fit?
The UV's when on angle display looks fine.
![]() johndangcg Do you want to send me a copy of the blend file to play with? I'll try to show you how to get the area stretch down. you'll have to upload the file to google drive or similar and post the link. I think you can share it privately with me if you want.
johndangcg Do you want to send me a copy of the blend file to play with? I'll try to show you how to get the area stretch down. you'll have to upload the file to google drive or similar and post the link. I think you can share it privately with me if you want.
If you are just wondering whether you need it blue or not, I would say try out a texture on it and see if you like it. Just because it is red in the area stretch doesn't necessarily mean you need to fix it. I have a bunch of lo poly assets that are all red on the area stretching , but they are blue on the angle stretching and they look fine.
You can make a new texture image and change the generated type from Blank to UV Grid or Color Grid to See if it comes out okay for a first pass.
![]() johndangcg In the UV editor. Go to the header and click on the + New button to make a new image and then under the Generated Type, click the drop down box to choose a UV Grid or a Color Grid.
johndangcg In the UV editor. Go to the header and click on the + New button to make a new image and then under the Generated Type, click the drop down box to choose a UV Grid or a Color Grid.
These are helper grids to help you check your UV unwrap to see how a texture is going to look. A bad UV unwrap will show bad choppy sections in the grid. These are areas that you may or may not want to improve. Depends on where you intent to have people focus on. Some things are worth tweaking and others are fine if the focus is not needed.

Sure. I'll accept any form of help.
I'd eventually want to make this a game ready asset.
https://drive.google.com/drive/folders/1Sx63kBI7z5lrfuNUa11nDGRdk6IKrGk0?usp=sharing
update: Accidentally uploaded the folder instead of the zip. the zip should be within the folder after clicking the link. You may need to re-apply the reference image after opening.
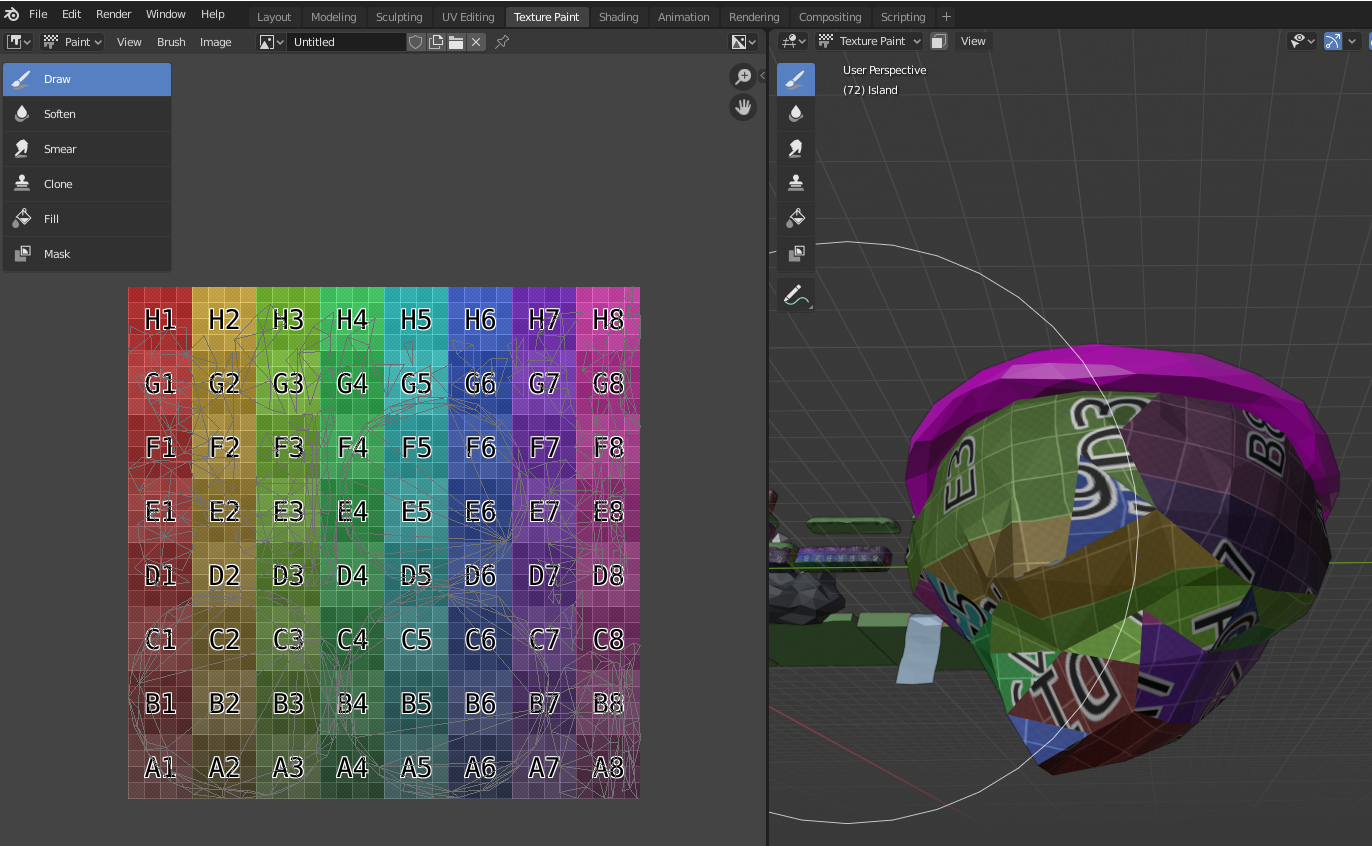
So, I did not unwrap this asset at all. I got it as a download. It was not properly unwrapped for a texture and once I created a "Generated Color" Texture Map for it you can see the "dirt" section of this model does not look so great for a texture: It would need a better unwrap. But since they are only using 1 color, it doesn't matter since no complex texture was needed.
Thanks. This will really help.
after scaling my UV's down and applying a texture I'm more convinced that this may be a problem with how I decided to model using real world measurements. If that was the case than I may have to scale down the textures.
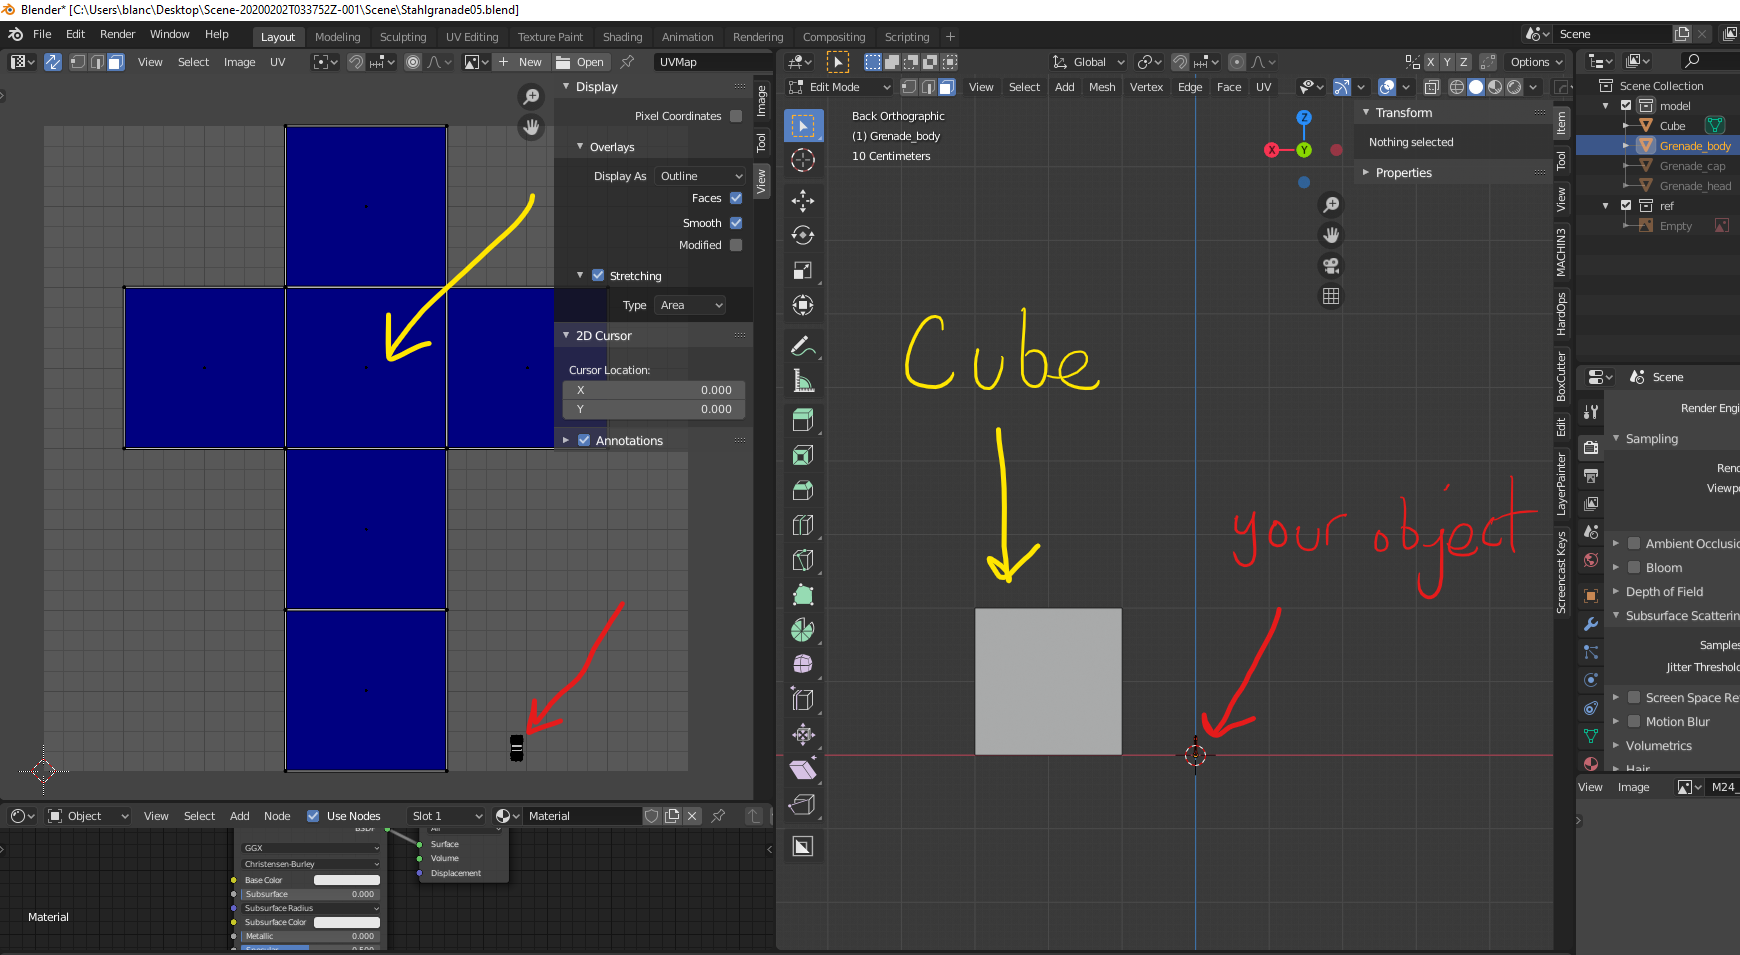
![]() johndangcg Yeah, Your object seems really small. You are working in millimeters? I loaded a cube to your scene to compare the size ratio. If I scale the UV's on the left to a similar ratio then I get your object showing mostly blues for the area. I think it is just because the object is soooooo small. I don't think that is a problem if your camera is going to be that far zoomed in when running the object on a game. But if that is the true size then you are not going to notice a whole lot of detail if the camera is focusing on objects the size of that cube.
johndangcg Yeah, Your object seems really small. You are working in millimeters? I loaded a cube to your scene to compare the size ratio. If I scale the UV's on the left to a similar ratio then I get your object showing mostly blues for the area. I think it is just because the object is soooooo small. I don't think that is a problem if your camera is going to be that far zoomed in when running the object on a game. But if that is the true size then you are not going to notice a whole lot of detail if the camera is focusing on objects the size of that cube.
Ah. that makes sense. I didn't think that UV's grid would take the unit scale into account.
I only took the measurements I found and applied them to the model.
Then I suppose the only solution is to either scale up the model or scale down the texture?
![]() johndangcg Yeah, I guess you may want to try two different variant files and see which ends up doing what you want at the end of the day.
johndangcg Yeah, I guess you may want to try two different variant files and see which ends up doing what you want at the end of the day.
An object that small is not going to hold a lot of texture detail if the camera is going to be focusing on objects the size of the cube. So if you scale up the model, hopefully that scaled up size is going to be viewed by the camera that way......
So, yeah you are either going to be using a very basic and small texture map or scaling that object up to actually make use of the detail you want to achieve.
Hopefully I am explaining myself correctly. If you have the world's finest painting 1000meters away from a camera you probably aren't going to capture the detailed beauty of that painting from that distance when you take a picture. this same rule applies with image texturing. If you have a highly detailed object that is the size of a spec of dust you are going to waste processing power and never appreciate it.
![]() johndangcg The best advice is to just work in the scale that everything else in your game scene is. So if that grenade is similar in size to other objects then I don't see major problems just making use of the full UV grid.
johndangcg The best advice is to just work in the scale that everything else in your game scene is. So if that grenade is similar in size to other objects then I don't see major problems just making use of the full UV grid.
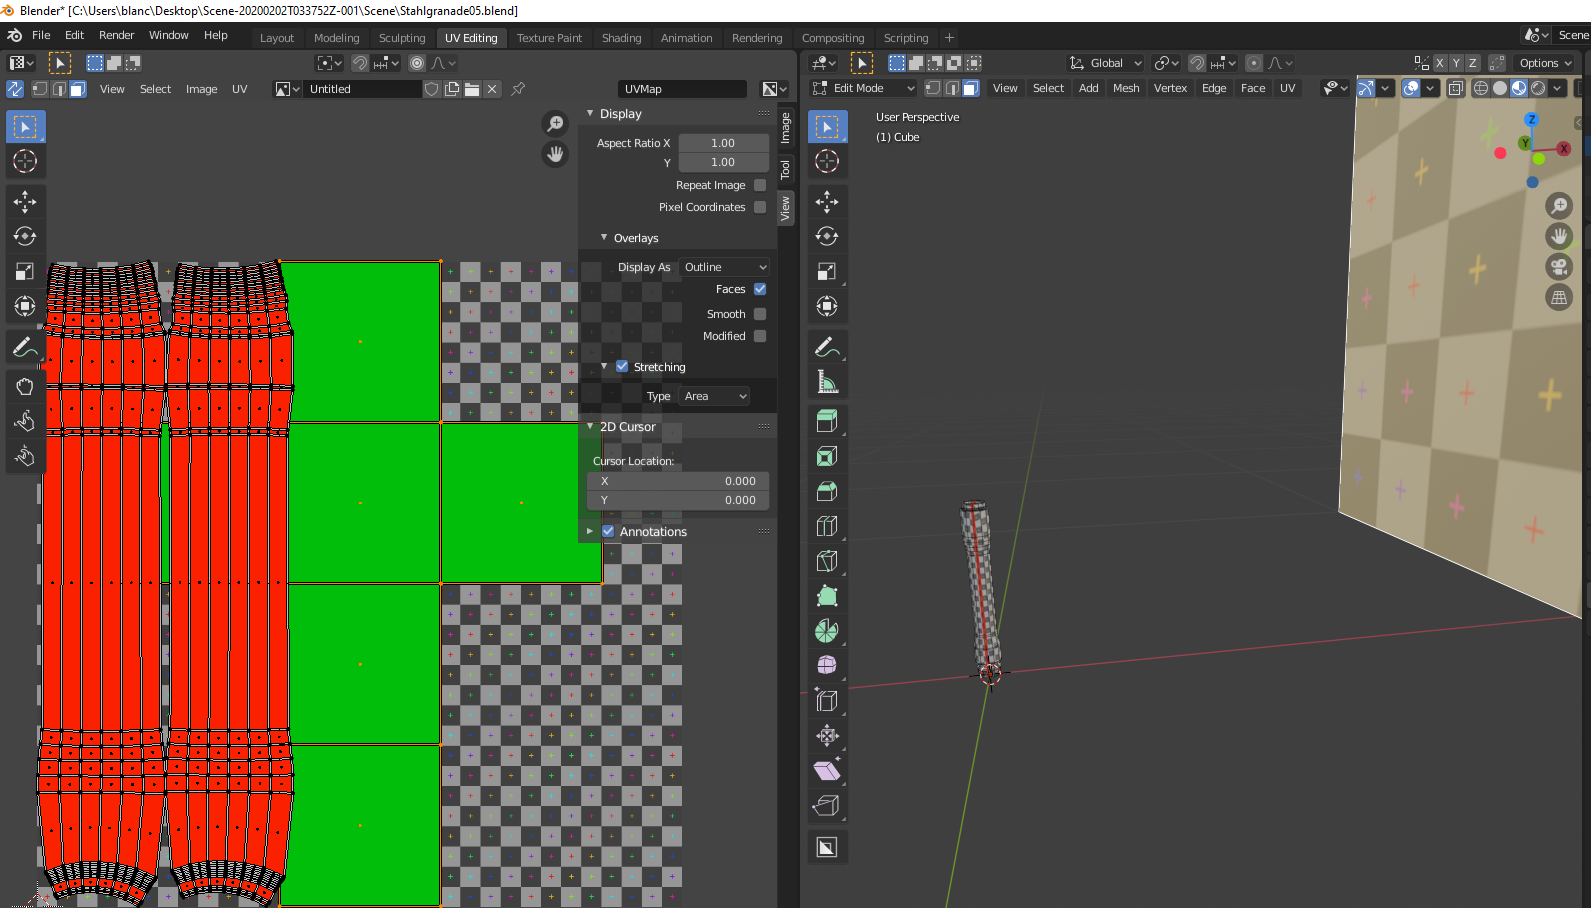
This is what a UV grid image looks like when you place UV's roughly the same size on both objects that are actually vastly different in size. Hope this helps take the point home for you:
The grid on the smaller object is small, and the grid on the larger object is bigger. Take time to study that to understand the texture density going on. This is a 1024 x 1024 texture. I scaled up your grenade handle UV to match the UV editor window bounds like the box was doing.
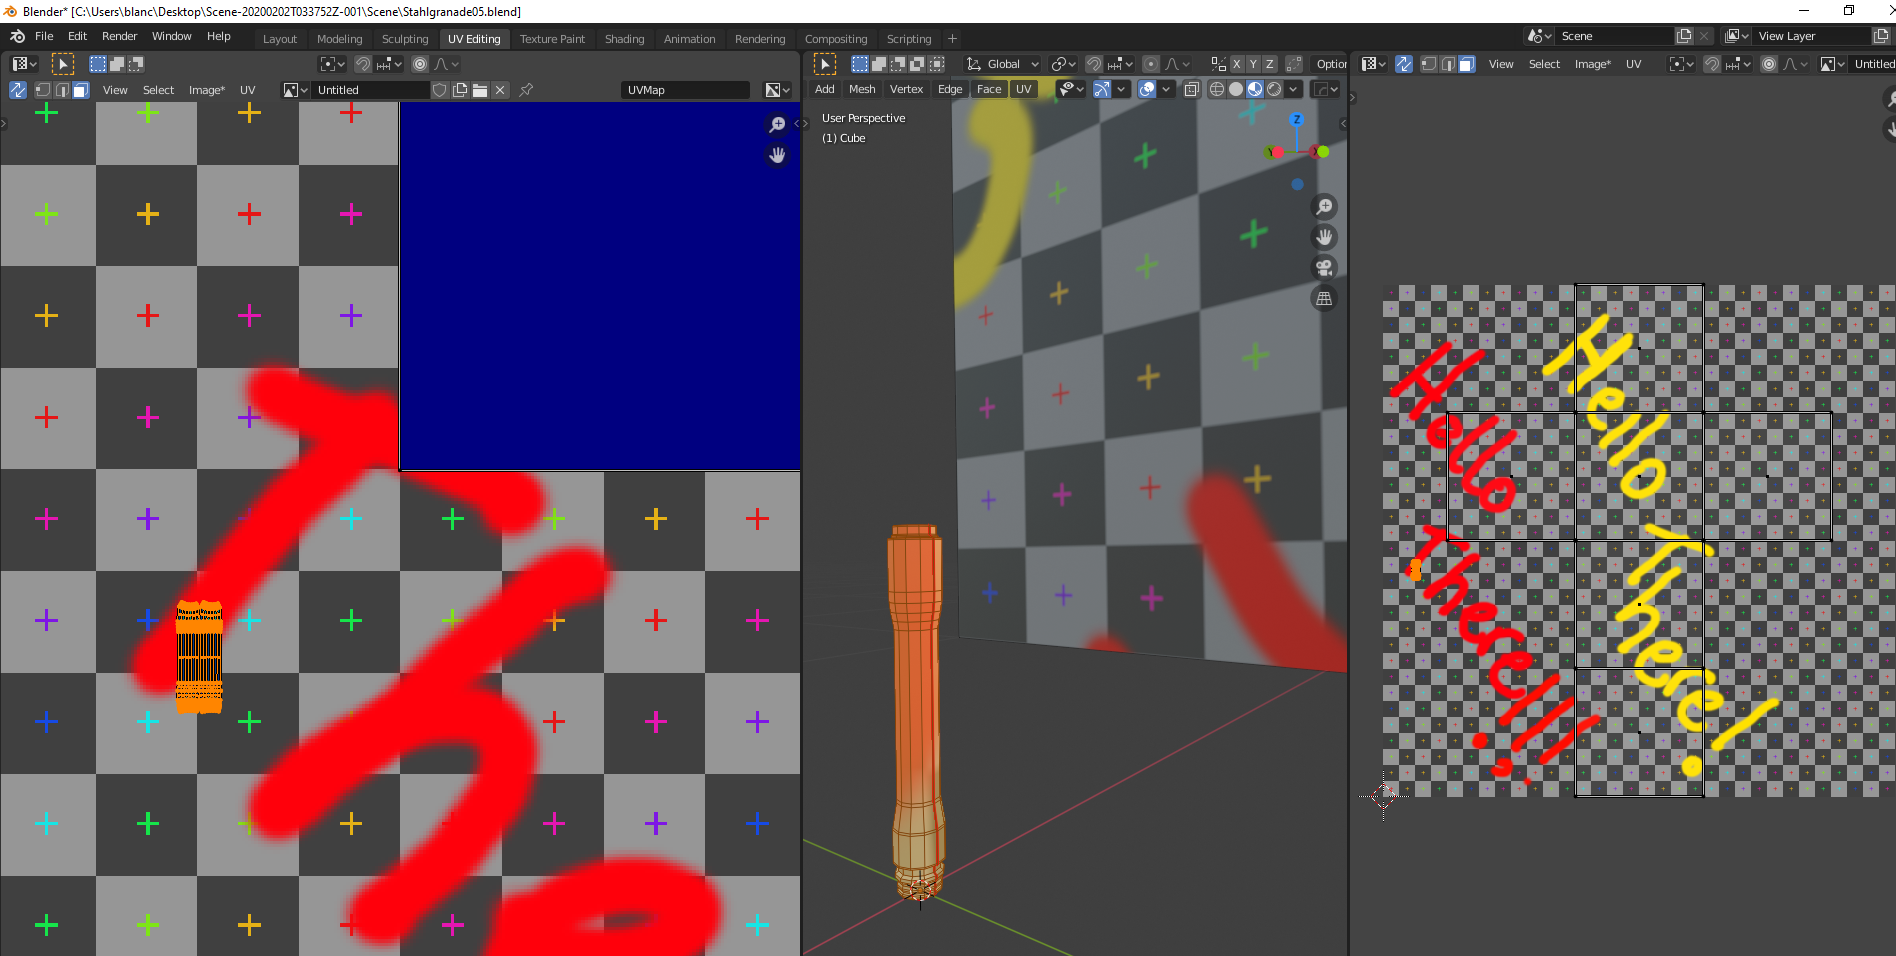
![]() johndangcg I also painted on the words "Hello There!" in red and Yellow to show you what the effects of painting does.
johndangcg I also painted on the words "Hello There!" in red and Yellow to show you what the effects of painting does.
If you are really zoomed in on the camera you can see the paint detail on the middle window. The cube obviously shows the same paint image and the effect of the UV size on the paint's texture display size differences on the two models.
Similarly if I make the aspect ratio roughly the same and decided I wanted to use the same texture for objects of vastly different size then you can see how the very small object does not capture the texture detail (displayed in the 3D view in the middle section) as it did in the previous image. It basically gets drowned in the red from the lower portion of the 'T' in the 2nd word 'There'
I hope that helps explain the area stretching better. I'm not a pro at texturing by any means. I typically just unwrap, check the angle stretching and size my UV to make use of all of the UV editor bounding box so I can utilize the most of whatever texture I plan on and move on. I can see the benefits of keeping tabs on the area stretching though if you were planning on texturing multiple objects of different physical size.
Interesting.
This does make a huge difference if I wanted to add/change any form of texture, it would end up cutting off certain parts or look lower resolution as a result.
I would still like to know if it's recommended to have the UV's blue in both area and angle views
Thanks for your generous help and time.
![]() johndangcg
johndangcg
The topic of texel density and pixel density is something worth reading up on.
I may be wrong in some of my previous comments for certain scenarios. If you have a camera that is shifting focus from far to near then having a lot of detail on small objects does indeed make sense.
This was shared in the forum on another topic about UV's by ![]() tomasplasil https://www.artstation.com/artwork/qbOqP and will probably help a lot regarding what you are going for. Thanks Tomas
tomasplasil https://www.artstation.com/artwork/qbOqP and will probably help a lot regarding what you are going for. Thanks Tomas
![]() johndangcg Have a look at these pictures.
johndangcg Have a look at these pictures.


Although only one cube is selected, Blender calculates the Area stretching using both cubes (because they form one Object).
If they would be separate Objects:
