I need some workflow advice and tips on troubleshooting weight painting a mesh. I understand the concept, but can't get it right in practice. I have a mesh I've been struggling with and I'm going in circles. I'm sure I'm making a newbie mistake somewhere!
1. I saved weight painting for the last step. It seems like if my geometry was less dense, it would be much easier to troubleshoot - but I thought the mesh should be finalized before I started rigging it. From a workflow perspective, should you do it earlier in the process or towards the end?
2. Automatic weights wouldn't work with my mesh, yet I couldn't find any doubles or geometry issues that are described in my google searches. Blender just says one or more bones failed but doesn't say which one. Looking at the developer notes, the algorithm just returns a pass/fail on the entire mesh so it doesn't seem like there's a way to extract the failed bone information. I tried deleting the ones I thought might be problematic, but never got it to work. I tried removing vertices by distance and separating loose parts, but none were found. Any tips on finding the bone causing the trouble or common causes for this?
3. I went through my mesh and manually added the vertices to the proper vertex groups. When I select by vertex group, I don't see any stray vertices being selected. Yet when I move my rig, I get smearing that I'm not sure how to fix. I tried selecting the vertex and looking at the properties panel to see which groups were being shared, and I still don't see the problem. However, my mesh has 77K vertices (I applied my subsurface modifier while trying to troubleshoot the automatic weights) and so I could very easily be missing the troublemaker vertex. I thought I would just move the rig to cause the streak, but when I go into mesh edit mode the bone stays in place but the mesh returns to normal pose. What is the best technique for fixing these smears? I'll post a screenshot to show an example:

UPDATE: I just watched the Weight Painting video in the "Moving from Blender 2.7 to 2.8" course and learned about lots of new tools available, but I still haven't found or fixed my problem. Since the automatic weight painting doesn't work, I feel like it's an underlying problem in my geometry somewhere so I'll start my mesh over from scratch. I'd still like to know some tips on troubleshooting these problems and workflow suggestions, because I likely won't have the luxury of scrapping the mesh and starting over in the future. Thanks!
Hey Gary,
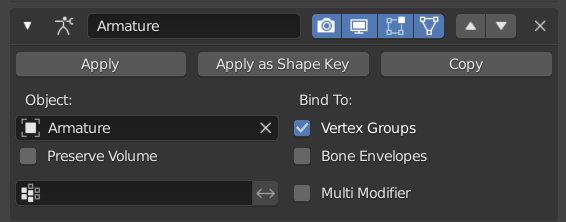
Man I hate it when the auto weights fail. But there is a workaround. Just try it one bone at a time, or do them in sections (like all the legs, all the hand bones etc).
When you are in weight paint mode (WP) on the mesh, just select the bone you want to auto weight, then look in the Weights menu.
Weights > Assign Automatic From Bones
If you can't select bones while in WP, check out this short video
https://cgcookie.com/lesson/lock-object-mode
As for the other issues - I think you have made the rookie mistake of applying you subsurf modifier - eek. Don't worry we have all done that.
That actually makes your job 4 times harder because it makes the extra verts real - and then you have extra data that you have to paint. You can just leave this modifier on the mesh but make sure it is after the armature modifier, as it will give you smoother results and then the armature modifier doesn't have to calculate these extra verts everytime you mode the character. (this will speed up playback when animating)
The 'smearing' effect is most likely caused by those verts having 0 weights to any bone. So they stick in place when you move the armature.
If they partially move, they might have a random weight from an unrelated bone. So they might be weighted to the hand (or whatever) but then when you were brushing the toes, for example, you accidentally brushed off the toe and painted those guys.
You can enable the deformed view in the mesh's edit mode by checking on the last 2 items in the armature modifier
See the camera, screen, edit mode, and cage buttons? make sure the last 2 are on. Then you can see the transformation in edit mode. Then try selecting the offending verts and checking what vertex groups they are applied to.
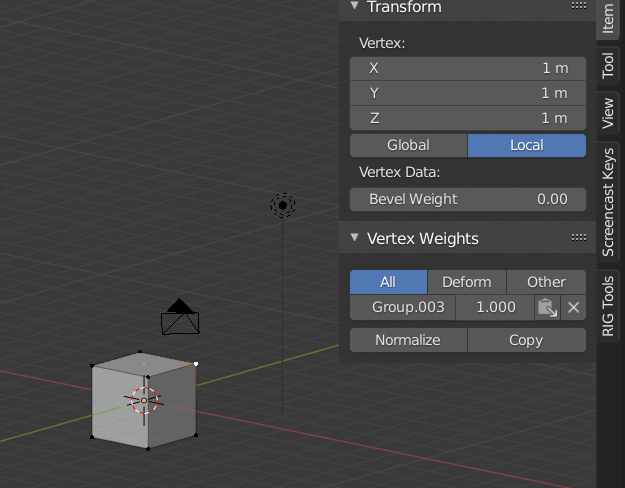
That vert belongs to 'Group.003' at 1.00 (or 100%)
Pro Tip: If that vert group isn't in the 'Deform' tab, it means there is no bone in the armature that matches that name, or the bone is not set to deform.
Hope that helps. Let me know if you are still stuck.