Hi LLittlesheep ,
That is at about 11:15 in the video. He just moves the Objects that are 'done' (ie: Unwrapped) into a different Collection.
I am wondering. I made containers as: Chest top cover, Chest lower. That allows me to select the top side to animate quickly. But now because I have not organised it as the teacher, I have to move the files out of their containers, and all into UV container again, afterwards, after UV mapping, move them back again.
So much moving around. Is there a smarter way for this? Does Blender have a software link of files? Like Linux, it is just an reference object, not the object itself. By creating new references, I can keep my files as they are in the containers, and can create new containers for other functions.
I excuse me, In some of the courses, it was mentioned about "Instances" , instances are references of the original object.
So there is the copy to create 2, 3 or more physical copies: SHIFT+D
Or use ALT+D to create an instance, it is just a reference. but is also shows as a rendering object.
Difference between both is one is linked, other is really a separate item.
So the answer to my question is: Create an UV container and use ALT+D, and place all those instanced objects into the UV folder.
Hi LLittlesheep ,
It is just an organization method for yourself, so however you do it is up to you, but for instance:
You can 'nest' Collections and if you make a UV Collection for the top cover and one for the chest lower and put them inside those Collections, you can Move the unwrapped parts inside the appropriate UV Collections (and even Hide those Collections) and when everything is Unwrapped, you can Delete those UV Collections and everything will be back in their correct place.
Something like this:
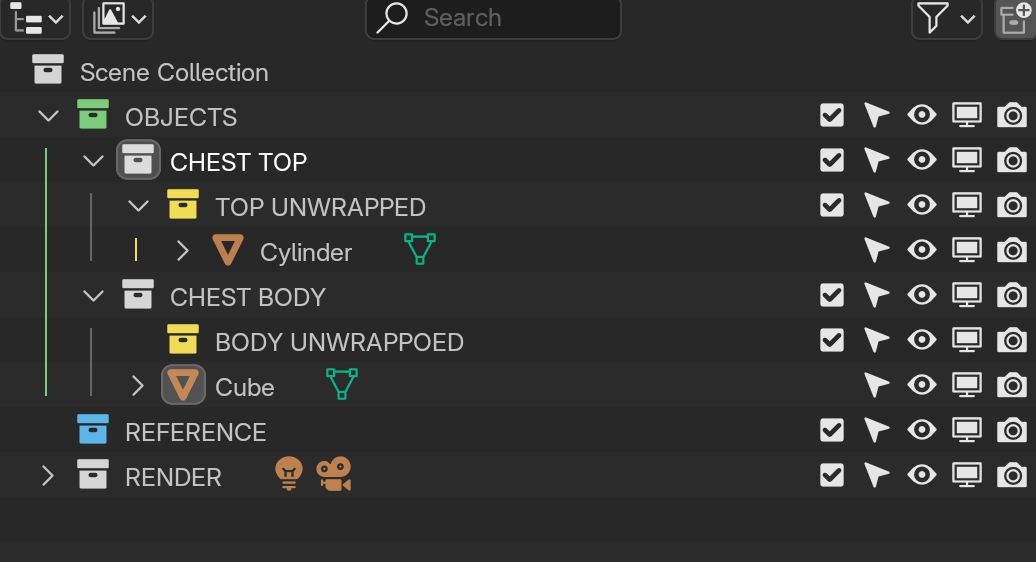
But preferably without typos 😉
oh nice. Hmm, maybe you girls and guys can make a video about organising in Blender. Small projects are relative "easy" to find, but as projects are bigger and bigger, it becomes a problem. Just a suggestion. Not everyone is so organised as you guys and girls. It just helps us "not so organised" to approach and be "on par" with you professionals. ^_^
Different people approach it differently. In this case the UV collection/container. You can put objects into multiple collections. For example in 3D viewport in object mode select everything and press shift+M instead of M. Then select the UV collection or Create a new collection. This leaves everything in their current collection and puts them in the UV/new collection. Once you finish a UV map for that object in the 3D Viewport in object mode with that object selected press Ctrl+alt+G. Since it's in multiple collections you will need to select which collection to remove the object from. In this case the UV collection.
***Edit***
You can do the multiple collections and remove collection in outliner too. I don't use it that much. If I remember correctly you can just drag the object out of the collection. As for assigning to multiple collections I believe you just hold shift after you start dragging, but before you drop it in the other collection. You can put your mouse over a collection for a few seconds and the tool tip will pop up with the correct key in case I'm remembering incorrectly.
****
Additional note: in the n-panel->view tab->collection panel you can click on the collection name to isolate (show only) that collection. You can also show and hide collection by clicking the eye icon next to the collection. You can use the number keys at the top while in object mode to isolate the first 10 collections listed in the collection panel. Shift+ the numbers toggle show/hide of that collection. Alt+ the number gives you the next 10 collections. For a total of 20. You can change the order by rearranging the collections in the outliner. This becomes very handy when you start animating large scenes.