I am looking to create some chair designs with joinery like this...
Specifically, I wand to create the effect of two pieces of wood that have been joined and sculpted into a single flowing form (i.e. no sharp bends or edges)
I found a great tutorial for making procedural wood - https://www.youtube.com/watch?v=Uk4WsD4F9D8
I have started to make the form like this:

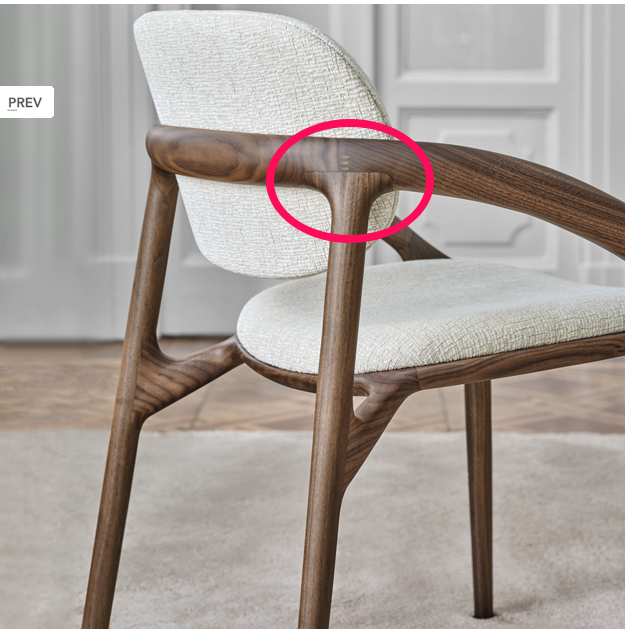
...but when I go to split the form into two pieces to make the join, I'm not able to find a nice edge that I like to create the break-line. I want to have control on the position and shape of the break-line to make the joinery look nice...

Many at this point would use a Boolean to split the form into two, but I don't like that method because it creates horrible geometry and I can no longer make design changes to the form.
Another way would be to use wood textures instead of procedural wood but I like the freedom to tweak the wood grain with procedural shaders.
Any advice would be most appreciated.
Can't you just model that shape you want? I mean that shape that you have encircled in red, can't you end the piece of wood in your chair with that shape? When you say you are not able to find an edge with that break line, you have to model that shape with the correct loops flowing that way.
Perhaps watching the Pothead modeling lessons will get you on the right track:
https://cgcookie.com/courses/pothead-create-a-hard-surface-character-in-blender
Hi Tim bbeetle ,
What I would do, is to make separate Objects for the different pieces of wood (ie: the same Material, but with different Coordinates, because they all use their own Object Coordinates).
You can also assign different Materials to the different pieces and just use a Vector Mapping Node to change (Location and Rotation) the Texture Coordinates.
You can also go a step further and make 3-Dimensional masks with a bunch of Math Nodes to differentiate between the pieces.
An important question is if you feel comfortable enough with modeling? Is it a matter of how to approach it or do you feel you can't model the shape? If you feel the shapes is too difficult then for sure it's better to watch a couple of modeling tutorials to get the hang of it.