This video is GOLD, because it contains some valuable information about facial features and sculpt technique, like the 3 wrinkle steps! Great!
Now, a question: in the video at the time stamp 31:58s, instead of applying the subdivision, you used "mesh from curve/meta/surf/text".
Yes, the end results look the same, however, the end results may not tell the full story, since these two operations are identical only if the two algorithms behind Blender are exactly the same.
According to the user manual:
The official user manual has never said that the two operations are exactly identical. So are you 100% sure that: mesh from curve/meta/surf/text = applying the subdivision ?
If it is not exactly identical, then we could be running a risk to ruin the sculpt work, though the risk may be low.
Great question nnaiad. The goal with this method/trick is to apply all modifiers on multiple objects. It's definitely an unintuitive "easter egg" technique (of which there are many in Blender). Without it we would have to apply all modifiers in the desired order for each object individually.
In this specific case there's only one modifier but it's still saving us from having to apply that one modifier on each object.
***I've been teaching Blender long enough to know that I could be missing a hidden option somewhere that does this more intuitively. If anyone knows better ( ![]() spikeyxxx ) please enlighten us!
spikeyxxx ) please enlighten us!
a hidden option somewhere that does this more intuitively
Not that I know...
There does exist an Addon called Modifier Tools that has a button to Apply all Modifier on selected Objects, but that won't work when you have linked copies... The Convert to Mesh has no problem with that situation :)
It is one of those things I use so much and the Convert to ... are a bit 'hidden' in submenus, that I have them in my Quick Favorites and that way, even with only one Object and one Modifier, it is usually the fastest way to get the Modifier Applied, especially when I don't have the Modifier panel open...
@theluthier It is great to know some "easter egg" techniques. Thank you!
But meanwhile, I also worry about the risk. For instance, in your course "Fundamentals of Digital Sculpting with Blender", in the chapter 2 section 1 "Multiresolution":
https://cgcookie.com/lesson/multires-2-8
In that video, at the time stamp 8:00s, the end results by using the options "Simple" and "Linear" are identical, except in a specific case where you have demonstrated that the two options are not exactly identical in all cases.
Let me put in this way. If I have spent several months or years to sculpt just one head, I would be very cautious to choose the future operations on this head. If one of the future operations causes an unexpected result which is not discovered until in the later stage, then the cost of the damage can be significant to me.
Currently, I do have a head which I have spent more than a year on sculpting. In this head, I would prefer to click "Apply the subdivision" 10 times and wait, instead of clicking "mesh from curve/meta/surf/text " for just once time. Thank you again!
P.S. Blender is changing rapidly, and each new version of Blender may vary on the functionality. The "easter egg" techniques may work in the older version, but there is no guarantee to work in the newer version if the official document does not say so.
nnaiad Your question hits on a bigger subject I think: Software reliability / backward compatibility as well as software stability within a multi-year project. The former is just something that comes with the territory of software and I've never heard of an app that stays perfectly backward compatible over the course of a decade or more.
Thankfully Blender has a big benefit in always letting us access previous versions. So if your year-long sculpt doesn't open or perform properly in a new version, just go back to the version you created it with.
As for using Blender on a multi-year project, I've been a part of such projects and the general rule is to stick with the same version of Blender throughout. If there's significant tool improvements worth switching, the new version needs to be testing and eased into to be cautious of serious compatibility issues. Blender is quite good about backward compatibility but still it's something to be mindful of.
No matter what there's some risk involved with working digitally (though a lot less than physically). So long as you save often and/or backup your files, you really shouldn't have trouble mitigating these risks enough to complete projects effectively. Just don't be paralyzed by the fear of such risks. Truly one of the most valuable skills I've developed is adaptability and problem solving. Soooo much of computer graphics is problem solving. Those unable to roll with the punches don't make it far.
It is undeniable that problem solving and adaptability are extremely important. Without these skills, no one can be successful in 3D art.
However, I do not want to overestimate my ability of problem solving. There is always a limit on how many problems I am able to solve. Let's take an example to illustrate what I mean:
On this post, you are having a difficult situation, in which you can not change the value of "Quality" in the multiresolutions modifier without deleting the skin detail. That is the limit I am talking about. You have to give up something, in order to achieve other things.
Of course, if my ability was strong enough, I would have just dived into the source code of Blender and changed it so that the value of "Quality" could be adjusted at any stage. But to do so, I still have to give up something, which is many years of time - I would have to spend many years to learn coding and data structure to change the source code. This is a simply unrealistic plan.
Another example:
In this world, we just can not find two leaves which are exactly in the same shape.
In my sculpt, I just can not sculpt two heads which are exactly in the same shape, unless I just copy and paste or use Shrinkwrap. And in many situations I have encountered, using Shrinkwrap is just not enough to solve the problem.
I am mortal, not a god, and there is always an upper limit on my ability. I should be fully aware of myself. Thank you!
The context of this thread is expanding into the bigger subject about the nature of learning complex skills.
I am mortal, not a god, and there is always an upper limit on my ability. I should be fully aware of myself. Thank you!
You're absolutely right. This is true of you and me and everyone. But I feel like you're asking questions as if I'm not limited in experience and memory. In the question you pointed me to, I simply don't know the ideal value of the multires quality setting. It's one of thousands of settings in Blender and I've not tested for an "ideal" in that setting nor have I ever been in a situation to need it. The important thing is that I am aware of the setting and its purpose so that in a situation where it is needed, I will be able to experiment with it in that moment.
The tone of your questions read anxious to me. Like I'm afraid that me answering with "I don't know the ideal multires quality value" will disappoint you or leave you scared to use that setting. Also tone of this thread's original question:
The official user manual has never said that the two operations are exactly identical. So are you 100% sure that: mesh from curve/meta/surf/text = applying the subdivision ?
Well...now that you phrase it that way, I'm really only 90% sure about this method. While I've used it for years with no issues but I also haven't tested it from every angle according to the manual like you're suggesting to know 100%.
Now my question for you: Is that OK not being 100% sure? If not, then my suspicion is that you're limiting yourself way more than a healthy awareness of your limitations. This is where an attitude of problem solving is crucial not only to applying 3D skills but also learning 3D skills.
We need to be willing to try and experiment with tools rather than thinking we need a definitive answer about a tool's ideal use. The reason being the promise of 3D is infinite creative possibilities! Which makes nailing down "ideal" values a fool's errand. Every value and tool in Blender is different depending on the situation. Therefore it's irrelevant to even try to establish an "ideal". I know from experience that I like the subsurface radius material setting to be 1(R), 0.5 (G), 0.2(B) for human skin. I always start around these values but I rarely leave it there. With every portrait I inevitably play around with these values to get a desired effect. So I can't think of them as "ideal". I can only think of them as a starting value that's likely to need modification.
I know we're going back and forth here at length. I just hope we're on a good page because I truly am trying to give you mindset advice. If you're open to it, it could profoundly change the way you learn lasting skills for anything.
@theluthier , thank you very much for your effort to continue this conversation! Regardless of the content, the simple action from you to continue to write your response in this thread means that you are a brilliant instructor, because you are open-minded and do allow the diversity of opinions from students.
Like I'm afraid that me answering with "I don't know the ideal multires quality value" will disappoint you or leave you scared to use that setting.
No, not disappointed. I am very happy to read your answer, because a honest answer reveals so many truths within 3D art design and learning process. Also, being honest is a basic requirement to be an instructor.
Yet, am I scared to use that setting?
I am very sorry that if I had misled you to believe that I was over-cautious to handle any of my projects. Here, please allow me to put it clear: I am bold and like to experiment all my projects with different settings, except on one project. By playing with the settings and using different techniques, I always can learn something new. However, that one project, which is called "Porject Naiad" and has already taken me for more than one year, is a different story. After more than one year, the project is currently and still in the sculpting phase and the change of the basic facial structure, which may or may not finish anytime soon. If I am bold to play with settings for the "Porject Naiad", then maybe it will take an even longer time to finish, because I had already learned several hard lessons.
Let's look at one of my lessons:
To build some believable skin material for the "Project Naiad", initially I was playful and decided to use the node of the Ambient Occlusion (AO). I do not really understand how the AO works, even now. But after my initial experiment, I was exciting at my rendered result, like the following comparison from my screenshots:
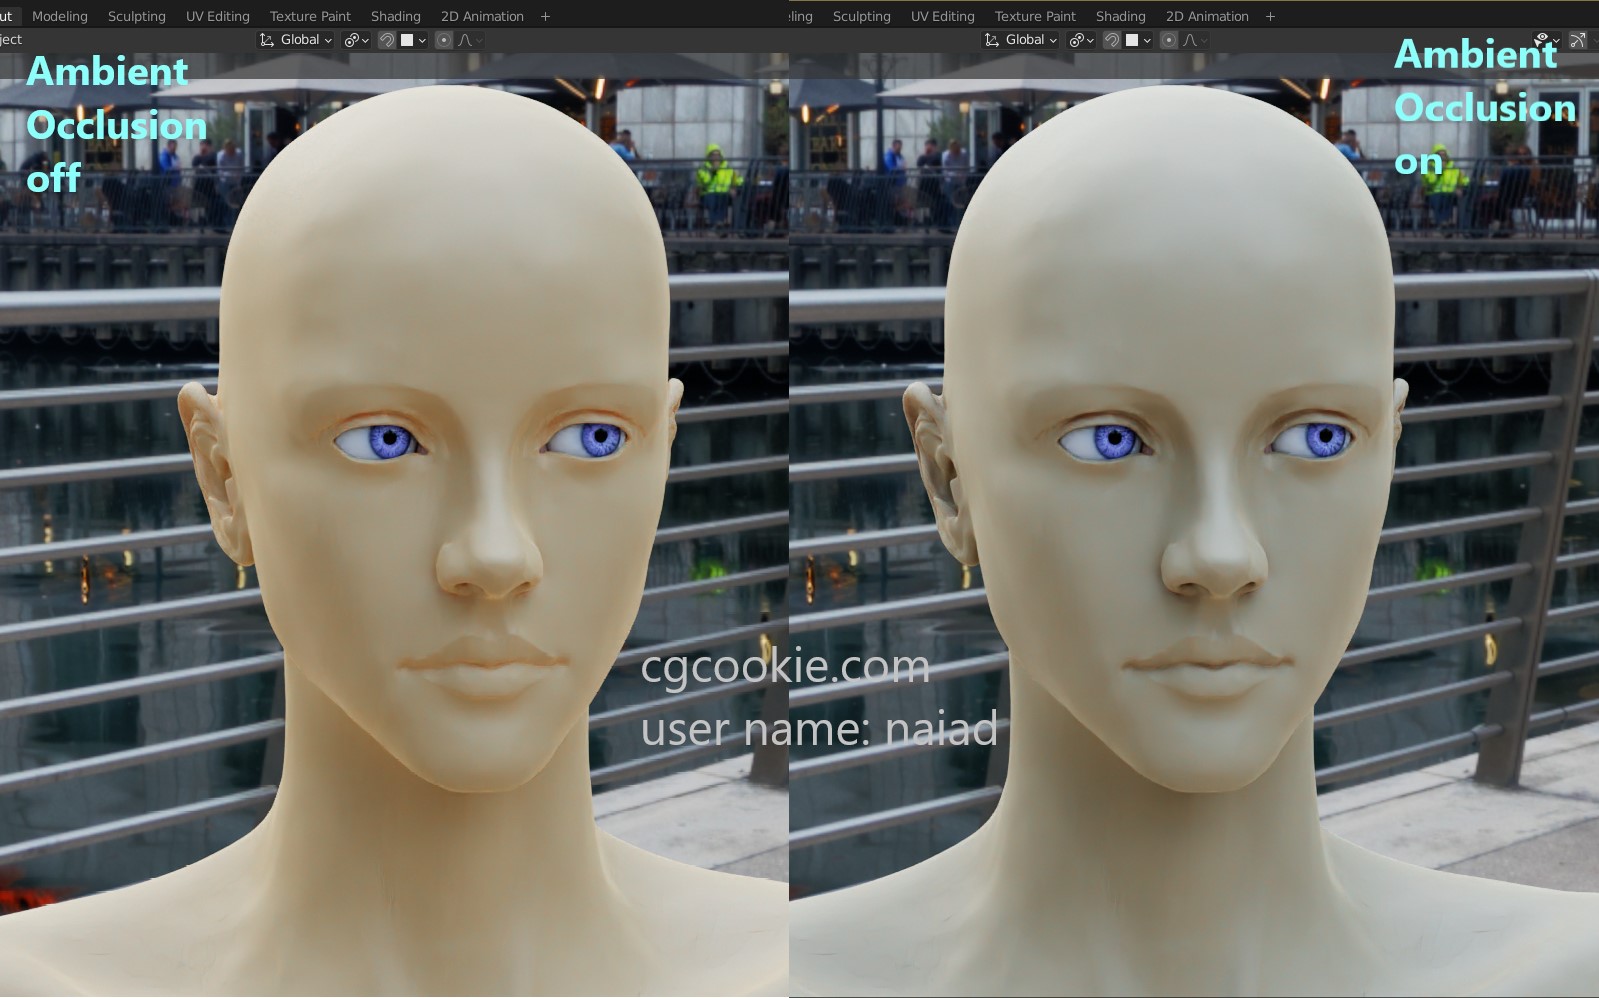
However, the AO can also increase the intensity of the shadow, which under certain lighting condition is unwanted and ugly shadow. But I was not aware of this problem. Instead, I suspected that the unwanted and ugly shadow was caused by my poor sculpting skills. So, for those following 3 months, I was desperately busy to change her face in the Sculpting mode. Everyday, I came to my office and sculpted days and nights. I strongly believed that sculpting a better base mesh could remove the unwanted and ugly shadow. It turned out that I was wrong - turning off the AO immediately removed the ugly shadow. After turning off the AO, all faces I had sculpted during these 3 months were actually worse in the shape and looking than the one when the problem was firstly spotted. By experimenting the AO on the "Project Naiad", I had wasted 3 months, which may not be a long time to some people. But to me, wasting 3 months was disastrous since at that time, my income was low due to COVID 19, until I decided to borrow money.
The AO can also cause another problem, which even baffled a technical artist (7+ years experience):
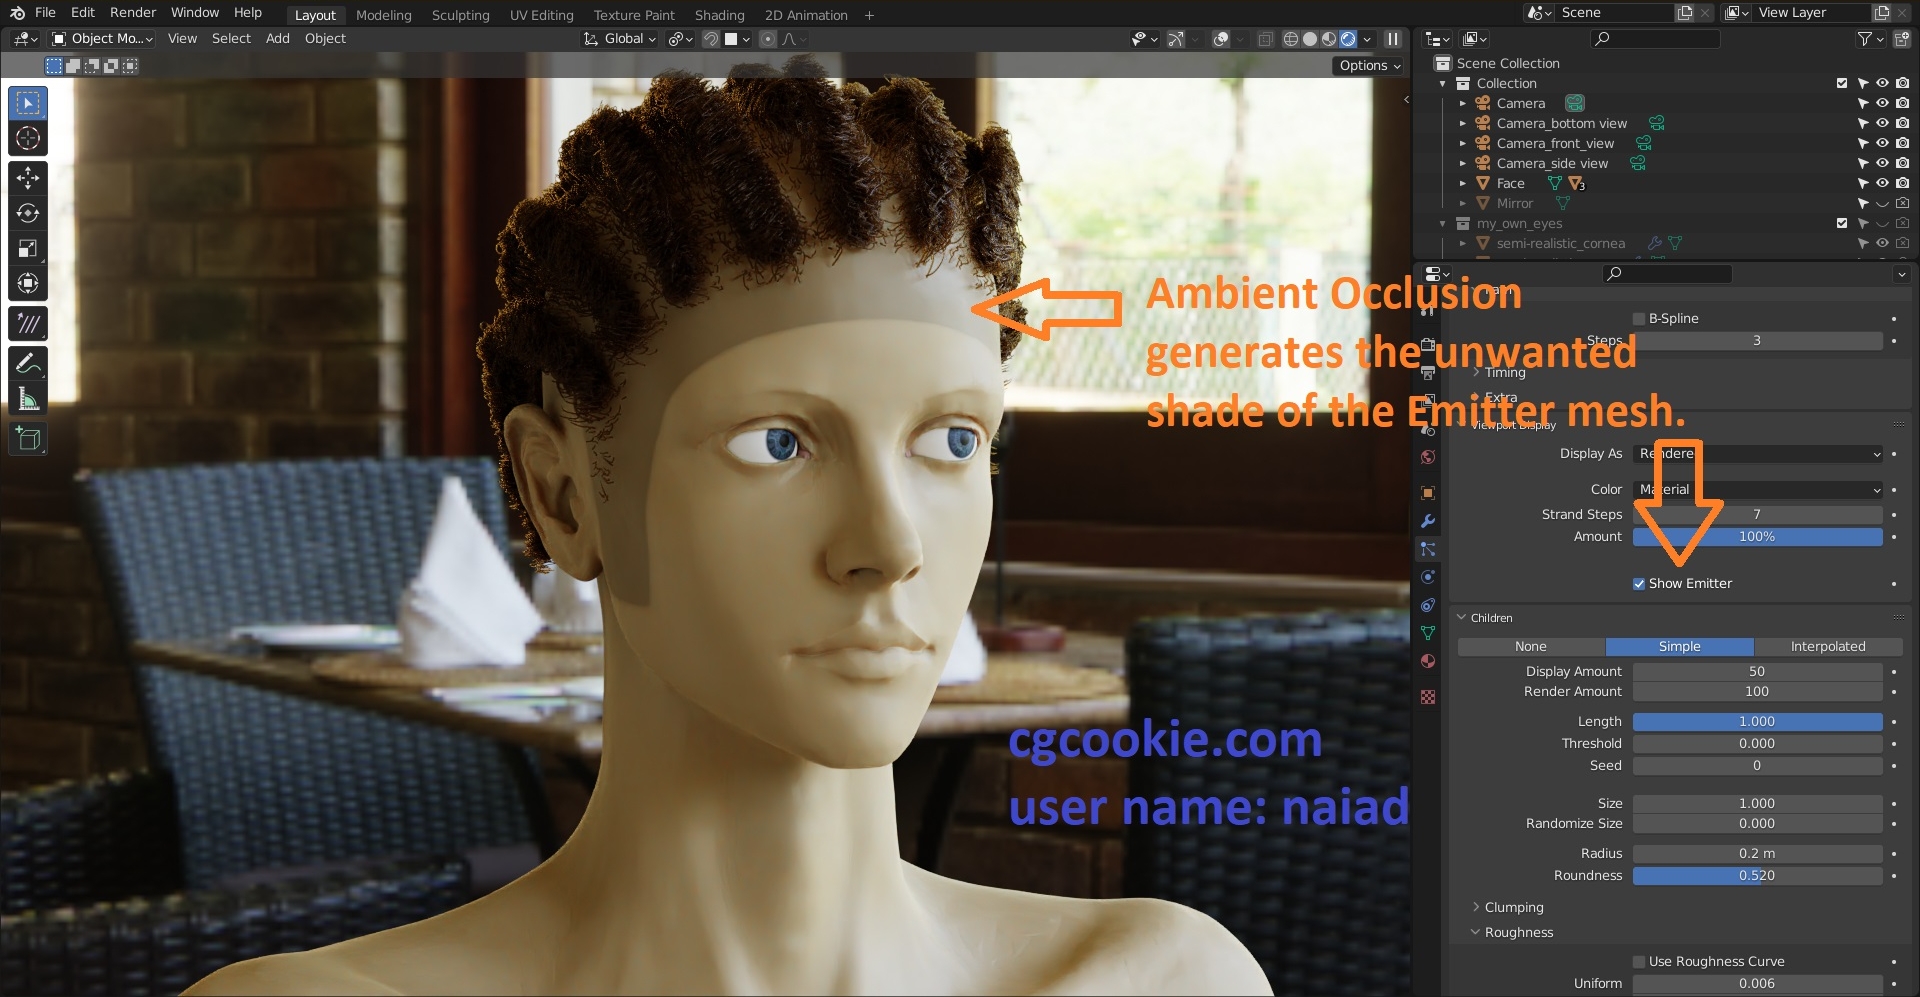 Without the AO, the unwanted shade from my screenshot will not be shown in the viewport. Of course, the shade can be hidden by unchecking the "Show Emitter" if the AO is used.
Well...now that you phrase it that way, I'm really only 90% sure about this method.
Based on my hard lessons, if you are only 90% sure AND the user manual does not say so , then I will not use this method on the "Project Naiad". But I may use it on my other projects which can be finished within a month. Seriously, let's consider the following statement:
The rendered result from the "Project Naiad" looks bad, because I have used "mesh from curve/meta/surf/text", instead of "applying the subdivision".
Can anyone prove the above statement is false? Can anyone prove the above statement is true?
I believe no one can disprove or prove it, until the one seriously compare the source code, and really understand what these two options do in the source code level.
However, the reality is that in many causes I will not even know the true cause of the bad rendered result. I will be very busy to ask other experts to help me find the cause. Nonetheless, asking in a forum may end up with wasting more time. According to my observation, at least 60% questions from Blender Stack Exchange are unanswered or unsolved. If the true cause can not be found, then the "Project Naiad" may take one more year or many years.
I know from experience that I like the subsurface radius material setting to be 1(R), 0.5 (G), 0.2(B) for human skin. I always start around these values but I rarely leave it there.
Thank you! Very useful information!
That being said, I love to do experiments for those projects which can be finished within one month. By experimenting, I always learned something new and valuable. Thank you again!
Interesting read!
One thing I would like to mention is: Ambient Occlusion is not a realistic effect! When used on a human head, you are darkening some parts of the ear that happen to be thin and those thin parts let light through from behind (subsurface scattering), so you are making something that has more light, darker...You can see that very clear on the ear of your head model. The SSS and AO are fighting each other.
Maybe I'm wrong and the AO is simply too strong in your case..
I also appreciate the back-and-forth with you nnaiad! I think I'm understanding better where you're coming from. Clearly you're willing to boldy experiment and figure out things. Maybe even more than me:
By experimenting the AO on the "Project Naiad", I had wasted 3 months, which may not be a long time to some people
That's waaay too long to be stuck on AO, especially when the problem is likely material or render setting and not resculpting. But like you said, how does one know that...I will say that usually you want a hair emitter mesh unchecked at render time. That being enabled is probably causing the unwanted AO. I go over this in the hair chapter.
Try another render with the hair emitter disabled at render time to see if that solves the darkened scalp border.
There's no way "mesh from curve/meta/surf/text" is causing your issues, even though I said I only know what it does with "90% certainty" 😅
The SSS and AO are fighting each other.
![]() spikeyxxx , maybe drawing an AO map could help. The AO map will tell Blender where AO should be applied and where AO should not. But I do not know how to make and use AO map, and never used it before.
spikeyxxx , maybe drawing an AO map could help. The AO map will tell Blender where AO should be applied and where AO should not. But I do not know how to make and use AO map, and never used it before.
But like you said, how does one know that...I will say that usually you want a hair emitter mesh unchecked at render time. That being enabled is probably causing the unwanted AO.
@theluthier , on my last post, I have stated two problems regarding the AO:
1) the AO can increase the intensity of the shadow, which under certain lighting condition is unwanted and ugly shadow.
2) the AO can generate a unwanted shade when a hair emitter mesh is used.
Hiding or unchecking the hair emitter mesh can only solve the 2nd problem. Even if no hair emitter mesh is used, the 1st problem remains unsolved.
It is difficult to find the true cause for the 1st problem, because the increased intensity of the shadow can also be caused by the increased depth of the mesh. Therefore, decreasing the depth (i.e. making the holes shallower and smaller, making the concave surface less concave, and making the convex surface less convex) can decrease the intensity of the shadow. Bad geometry can indeed cause unwanted shadow. This led me to believe that it was my poor sculpting skills to cause the unwanted and ugly shadow, rather than the AO.
To completely solve the 1st problem, in my opinion, the best solution would be "don't use any AO", or "only use AO after all sculpting process is finished and finalized".
To completely solve the 1st problem, in my opinion, the best solution would be "don't use any AO"
Yes, this is true. I never use AO as a universal render component or compositing pass. As Spikey said it's inherently unrealistic, especially when Cycles delivers physically based Global Illumination. AO is only one part of the GI equation but.
I only use AO as a utility in textures / shaders. For example, I like to use it as a mask to populate crevices of an object with dust/grime.