I'm doing this a bit backwards because I already finished my submission, but @adrian2301 encouraged me to post a WIP thread anyways. So, here is my completed submission.
I didn't have a very clear plan going into the project, I just started modeling and included ideas as they popped up. Things developed as I went through the process. All I really knew at the start is that I wanted to do a diorama style sci-fi room, I like the "window into another world" feel of dioramas.
I decided I wanted everything to look prefabricated, like this is a standard issue living space, where everything is designed to fit into the small space, so most of the things in the room are connected, just extrusions from the floor.
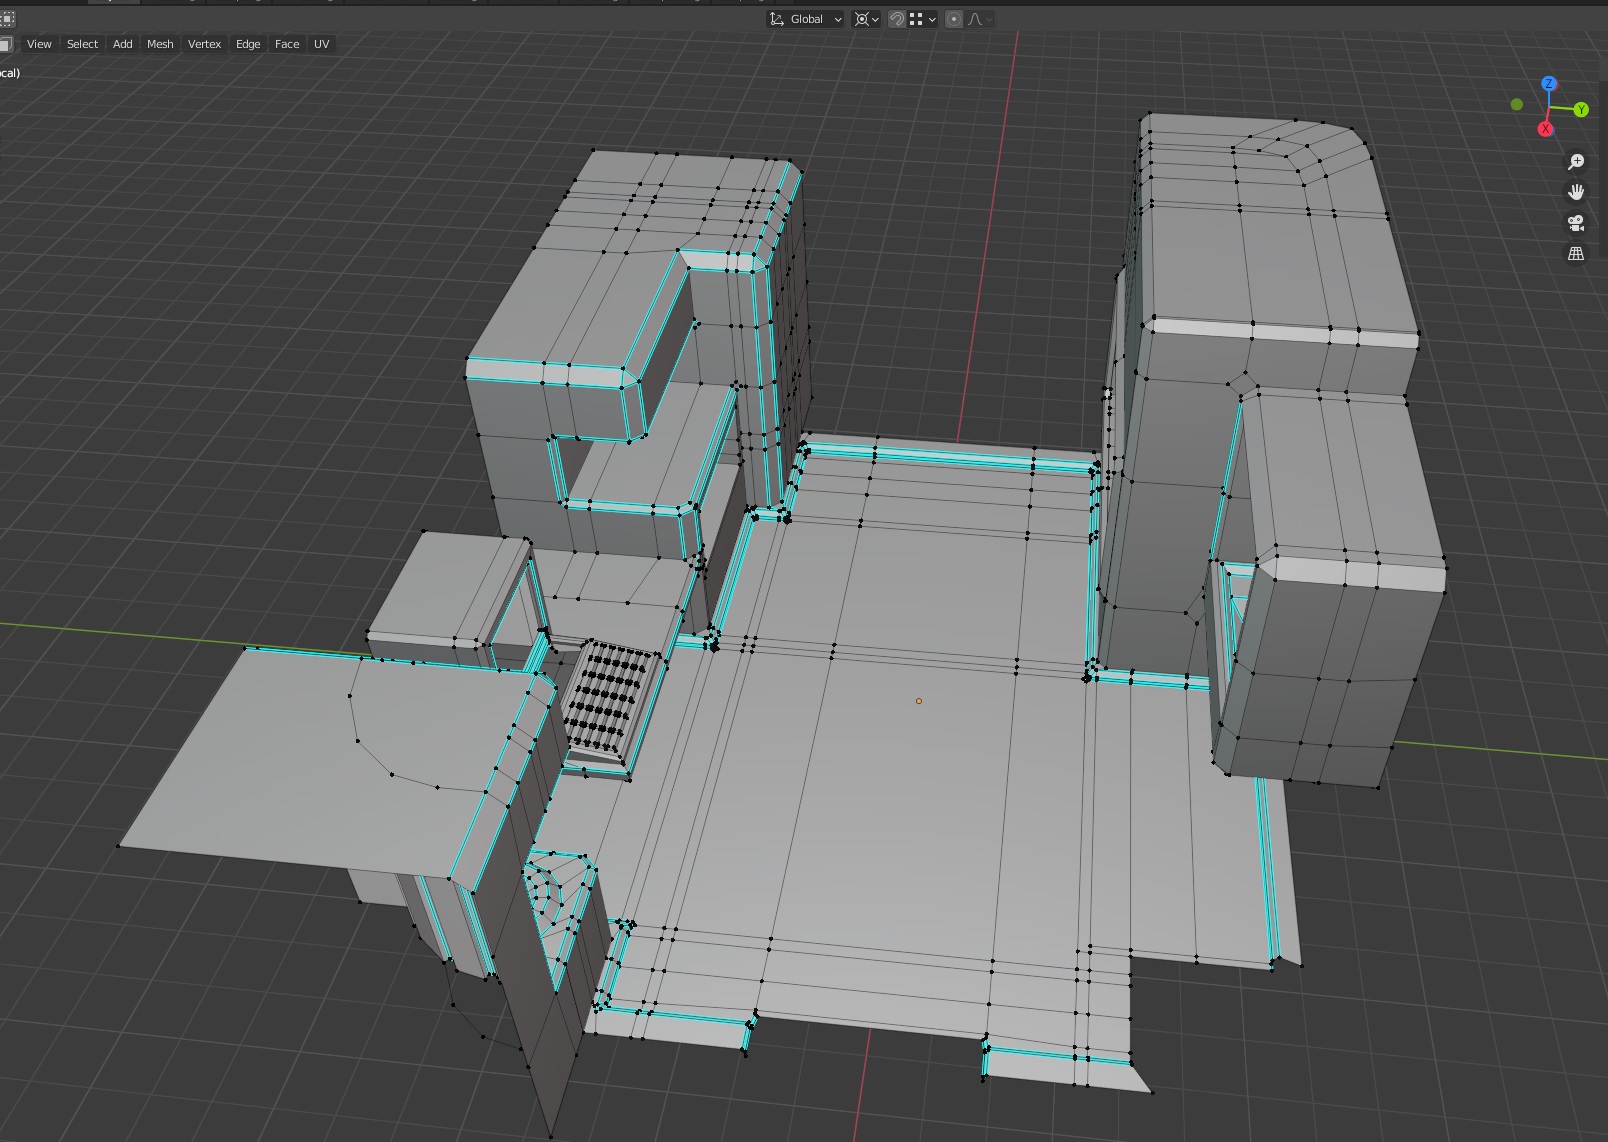
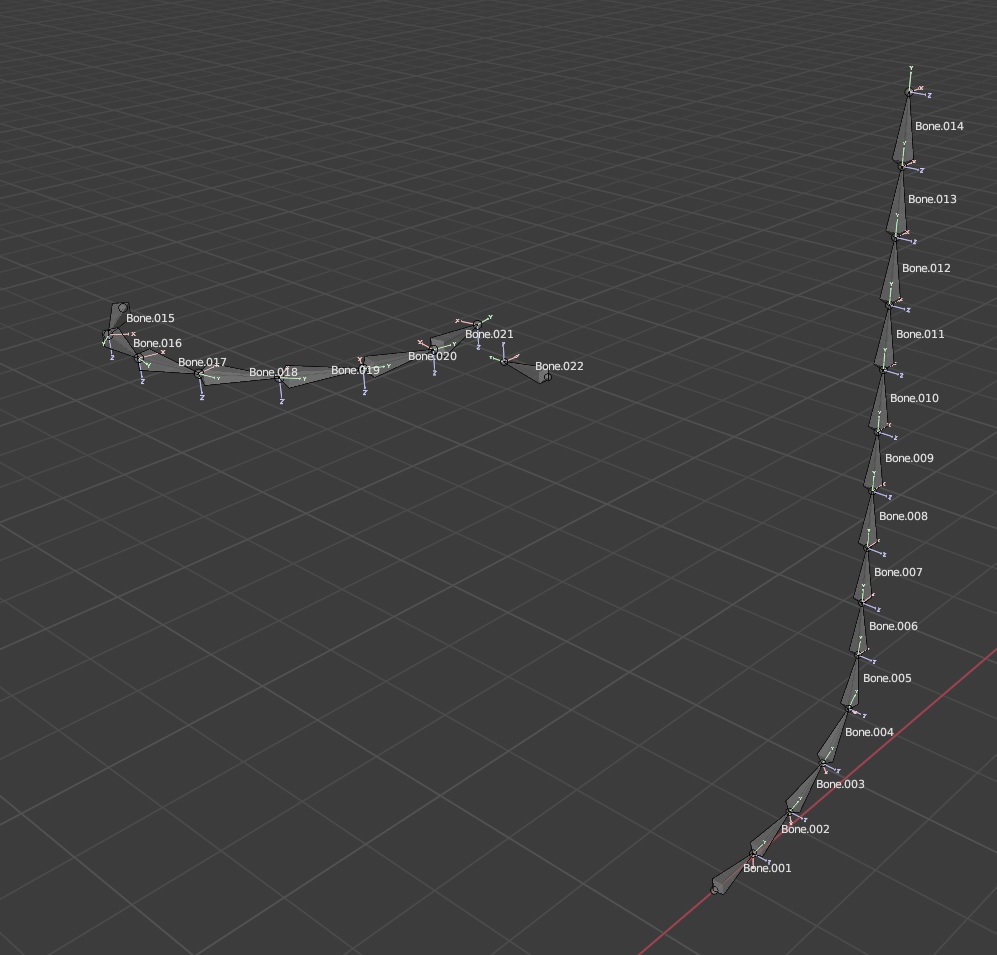
I'm happy with how the doors turned out and I feel like I got a little lucky with them. I knew what I wanted to end up with, but I didn't really know how to get there. I thought maybe the Spline IK Constraint could do what I wanted and I started playing around with that and was able to get it to work. A bone controls a shape key value on the spline, and then the door is deformed by a line of bones.
The hologram follows follows this lesson pretty closely, just some animated primitives with that material. I put some cones with a similar material in white around the hologram primitives to give it the effect that the hologram was being generated from the hole in the counter. I could only figure out how to make that work in Eevee. In Cycles I couldn't get the density of the cones to reduce, but also still emit bright white (I realize that might not be clear, I can provide more detials if people are interested).
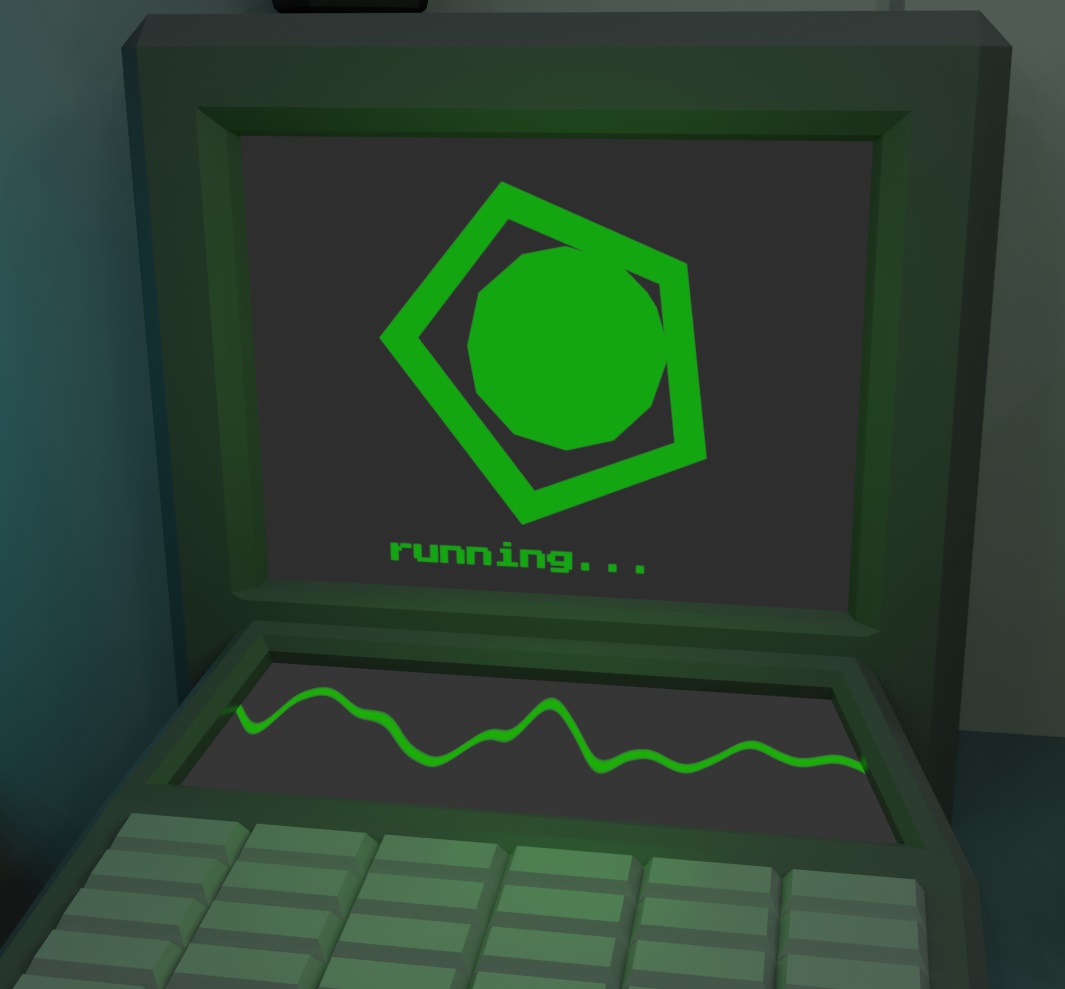
I thought it would be cool if it looked like the computer was controlling the hologram, so I rendered out the primitives animation and an animated text object below it with a white emission shader in a black environment and then used that video as a mask for the screen of the computer.

I did something similar to put a gradient around the room in compositing.
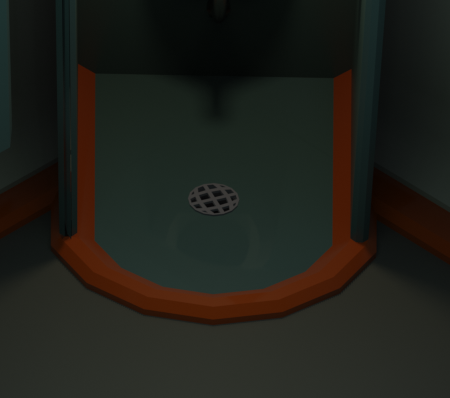
I didn't originally plan on making the shower spray some water, but my wife said she wanted that, so here we are 😅. I used a particle simulation with small icospheres that had a partially transparent material. I used a spherical gradient texture and animated the roughness decreasing to give the effect that the ground is getting wet. It's pretty subtle but hopefully it comes through.
I am not super happy with the window shots. The space environment is some voronoi textures for stars and noise textures for nebulas, and I think it looks alright, but not great. I played around with adding a planet, but I couldn't get it to look right. This is one place I would want to improve for sure, maybe put a spaceship flyby in or something, but I decided to call it as is mainly due to time.
I spent what felt like a silly amount of time playing with lights. Adjusting one by a watt or less, rendering out a shot, and then deciding if I liked it better or not. In the end I'm pretty happy with how the lighting turned out but would appreciate feedback for sure. I think using some bloom could have been good, but with my lighting as is, the values are pretty close to one another, so if I turn it on and adjust the threshold to match, lots of things start to bloom, and I didn't want to changed the lighting values to make it work, so I just turned it off. Also, turning off and on ambient occlusion made no difference that I could see, and I don't understand why that is.
I grappled with keeping a consistent level of "low-poly" across the scene, so that nothing stands out as over or under detailed. And similarly, I tried to keep the number of colors used pretty low and the materials simple to go with the low-poly style and tie everything together. Again, I'd appreciate any feedback on this.
I think the audio really helps tie it all together and I am super glad I found the site freesound.org to make that possible.
I'm surprised by how much time I spent doing little tweaks, I feel like I spent 50% of my time getting things 90% done, and then the other 50% of my time doing the last 10%. And, I'm curious if those little tweaks really were worth all the time. I'm also surprised by how much time I spent on the project overall, it took a lot longer than I would've expected. I think that's partially explained by just there being a lot involved in creating a 3D scene, but also explained by me being inefficient and too much of a perfectionist.
My final render took more time than I thought a low-poly scene would take. I rendered out the 1,968 frames in Eevee at 2560x1440, using 200 samples, and it took a total of 9 hours and 52 minutes, or about 18 seconds a frame on a computer with a 1080ti. Does that render time seem high? I'm asking because I want to make sure I don't have some inefficient render settings ballooning my render time.
I'm a little disappointed that when I uploaded it to YouTube it was compressed a little bit resulting in some loss of quality. Even with the resolution turned all the way up on YouTube I can see a difference from it and the original video file.
Overall, I'm really happy with how it turned out, and even more happy with the journey of the project. This is probably the most complete self project I've ever done. Concept/design, to modeling, to shading, to rigging, to animating, to simulating, to lighting, to rendering, to compositing. I feel like I did a little bit of everything in order to create this project, which made for a great holistic learning experience. It also gave me a lot of appreciation for other 3D creations. If this basic low-poly scene took me this much time and effort, it's crazy to think about high-level stuff.
Really well done. I love it!
Also a very interesting read :)
I don't know about the render time (I don't use Eevee myself and my GPU doesn't even come close to yours), but those 18 seconds are not only the render time per frame, but also the time to save the rendered images...
Those cones should be doable in Cycles, but I can't test it now, because I am rendering at the moment and that is taking a lot longer than 9 hours and I don't want to risk a crash by opening another instance of Blender...
Thanks ![]() spikeyxxx , I'm glad you liked my submission and write up!
spikeyxxx , I'm glad you liked my submission and write up!
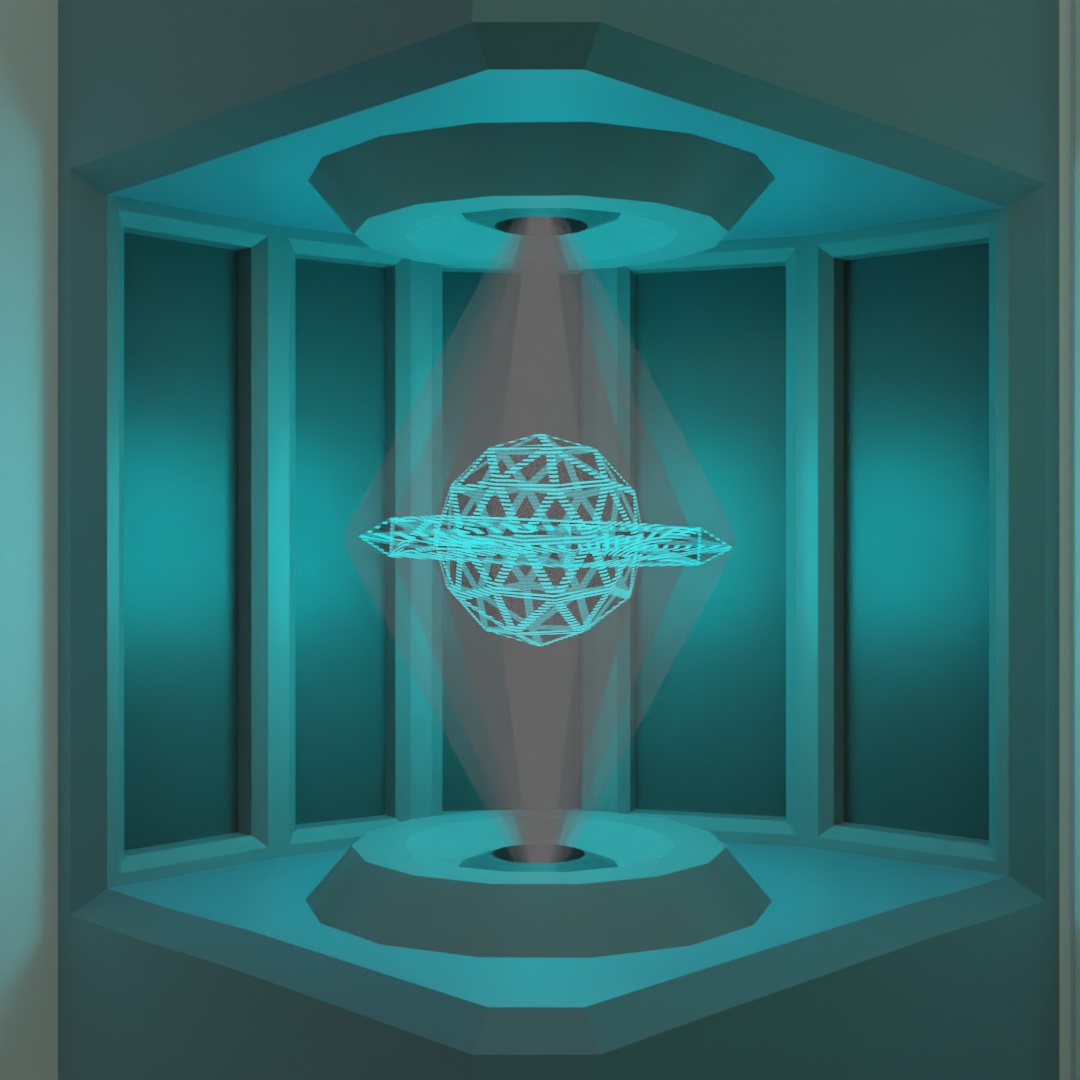
As to the cones, here they are in Eevee,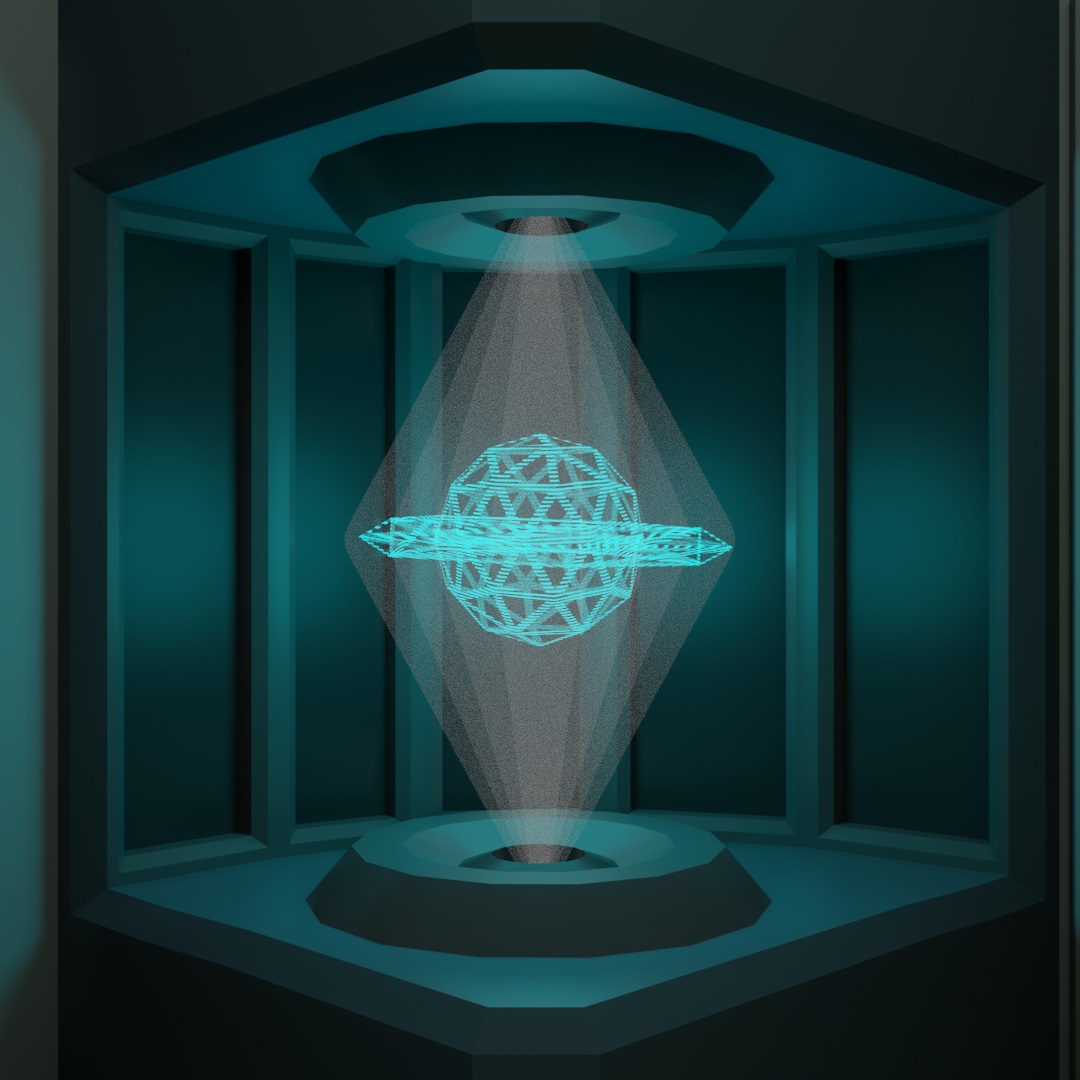 here they are in Cycles,
 and here is the material setup.
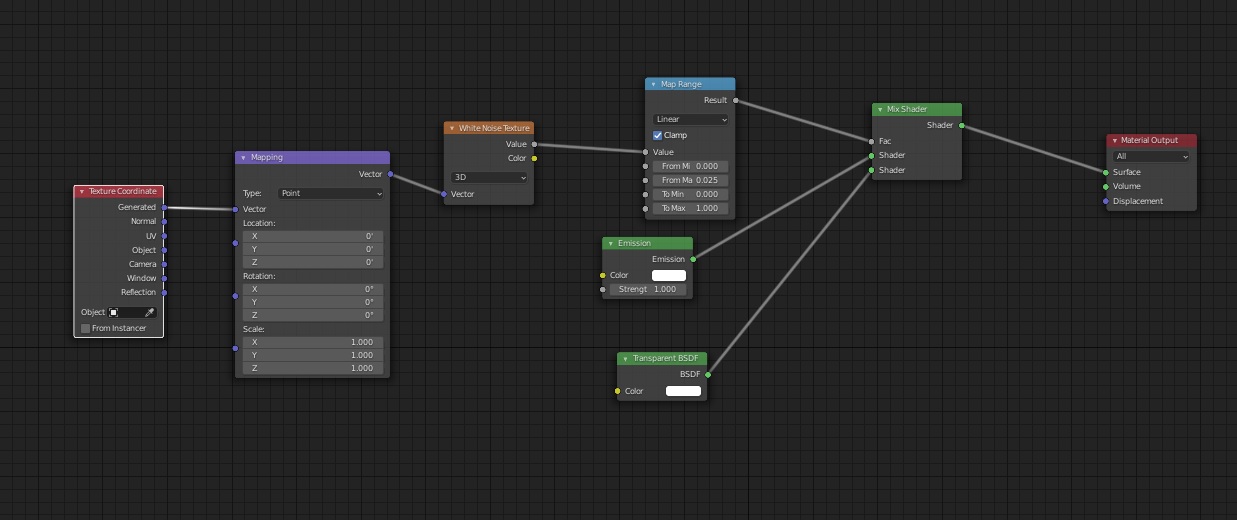 As you can see, the Cycles version looks more like smoke or something, more grey in color, and finer. On Eevee, if I lower the "From Max" value the hologram looks to less "dense", more granular, but on Cycles it just looks as though it gets darker. I played around with values, swapped the white noise texture with a high scale noise texture, even played around with a volume shader instead, but I still couldn't get the more granular but still white in color look that I can get in Eevee.
Thanks ![]() slenaerts ! One thing I would maybe do differently is spacing out the animated details a little more, or adding more so that they continue through the whole video. As is, I think they are too front loaded, they all happen within the first third, potentially making the rest of the video feel empty by comparison.
slenaerts ! One thing I would maybe do differently is spacing out the animated details a little more, or adding more so that they continue through the whole video. As is, I think they are too front loaded, they all happen within the first third, potentially making the rest of the video feel empty by comparison.
That is a bit weird...
I think I copied your Shader and get this:
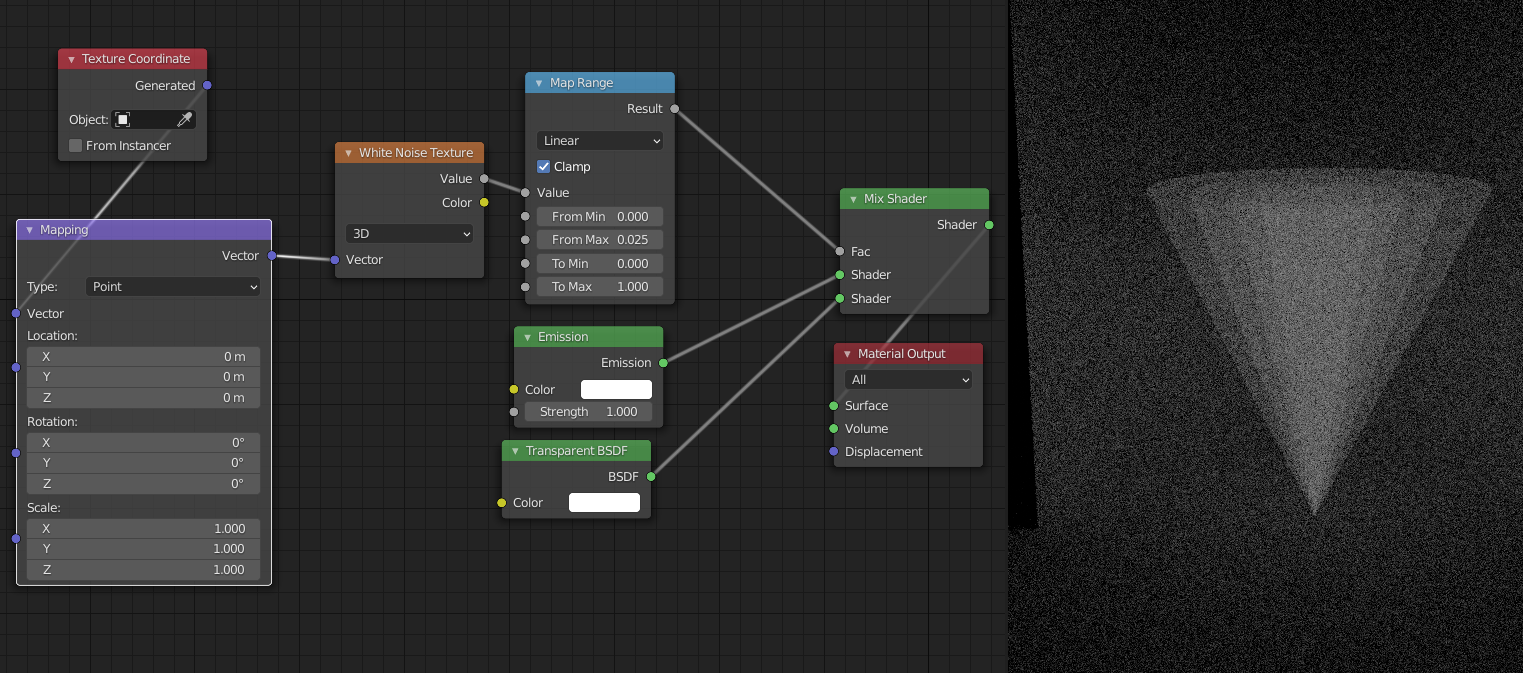 Also works when giving the Emission Shader a color.
It could be that the hologram is affecting the cones material....and if you increase the strength of the Emission in the cones, to make it brighter, more white, then it will indeed look denser, because the Emission Shader in Cycles actually emits light...
Still, can't get the effect you are having. It's not important, because you probably wouldn't have been able to render everything with Cycles anyway, but if you want to post a link to your .blend file (via Dropbox or so), I will have a look at what is happening. (I'm curious...)
@drakewho Could you please explain how you created the shower door animation with shapekeys on the curve? I'm asking because the bones seem to me behaving rather like in a path animation whereas shapekeys create animations along a straight vector:
Thanks for taking an interest ![]() duerer ! But, know that I kind of just played around with things until I arrived at something that looked how I wanted it. I'm not sure if this is the most efficient way to accomplish what I did, nor do I understand all the specifics on why/how it works.
duerer ! But, know that I kind of just played around with things until I arrived at something that looked how I wanted it. I'm not sure if this is the most efficient way to accomplish what I did, nor do I understand all the specifics on why/how it works.
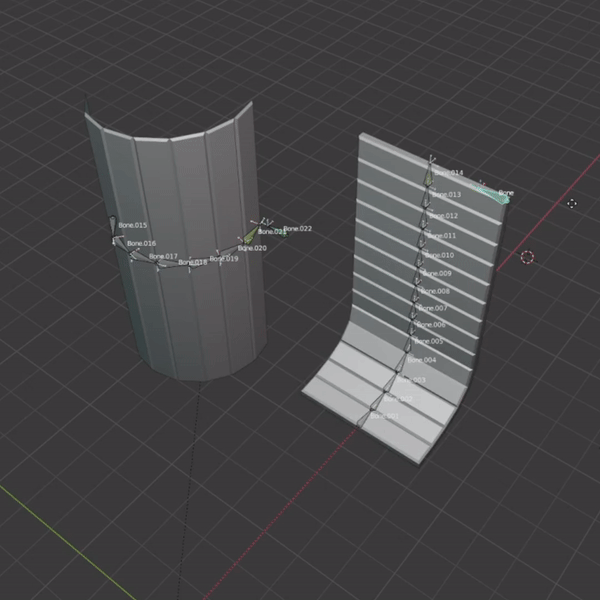
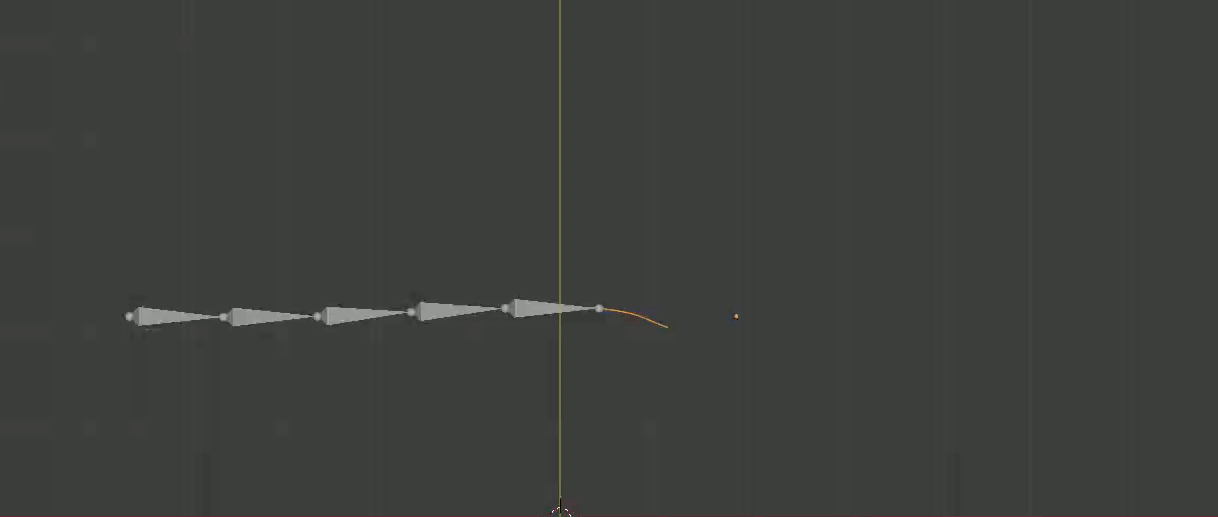
First, I created the curves by just taking an edge from the from the mesh of the doors and converting it. So, I am using poly curves.
Here are the base curves.
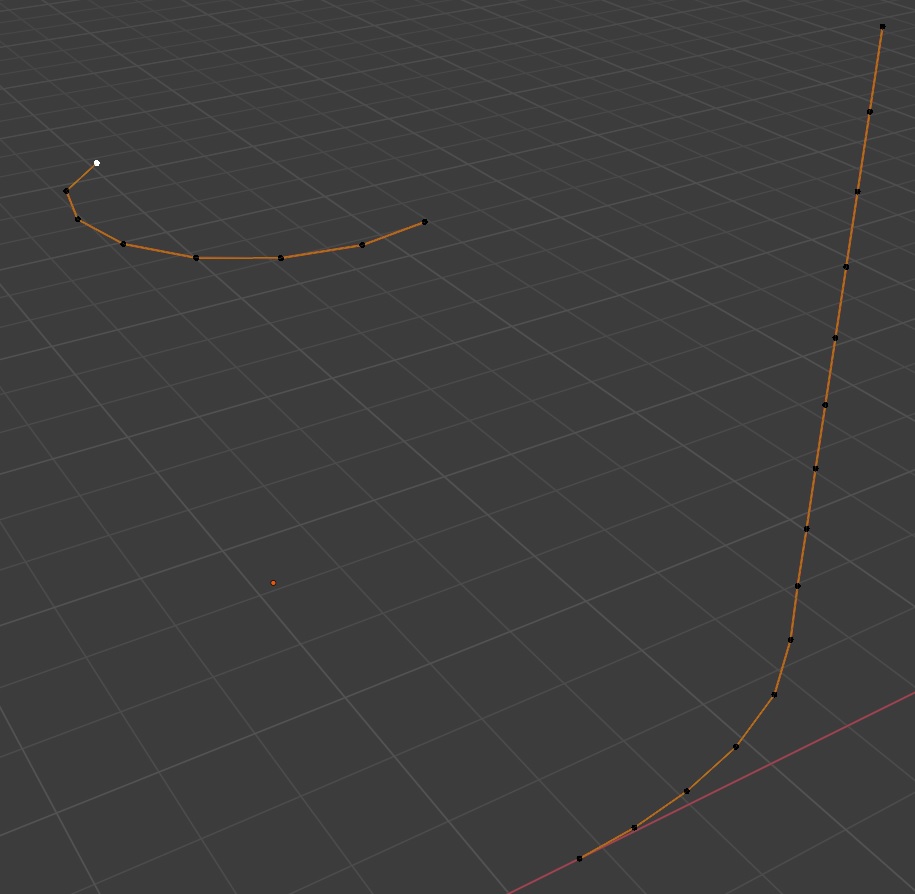
And, here are the curves shape keys.
 Note that only one control point is transformed on the shape key.
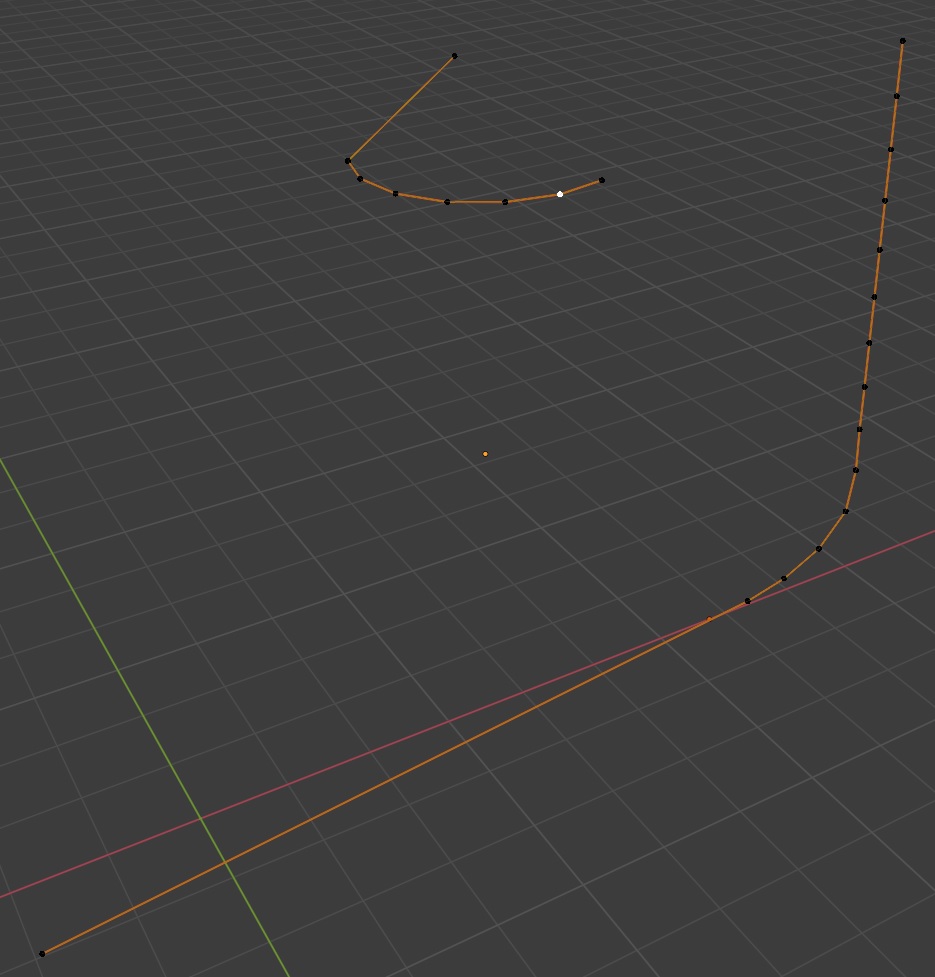
Here are the bones.
 Note that they align exactly with the curves base, and that the head of the bone chain aligns with control point on the curve that is transformed in the shape keys.
And, here is the setting on the Spline IK constraints, which are placed on the tails of the bone chains, Bone.014 and Bone.021. Switching between Bone Original and None for the Chain Scaling settings had the same desired effect of preventing the mesh of the doors from stretching, whereas the other options did deform the door meshes in undesired ways. I'm not sure which one is more appropriate since they seemed to do the same thing for me, but I'm sure there is some reason/cases to use one over the other, so you may need to play around with those settings to find the one that fits best.
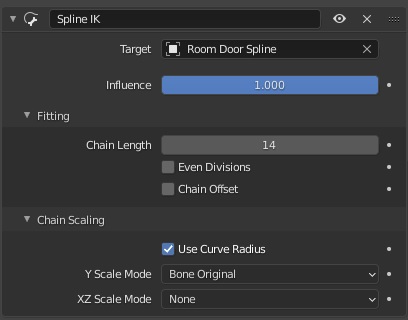
(The chain length should equal the number of bones in the chain.)
Hopefully this helps. Again, I'm not exactly sure of all the specifics on why this works. It is a little counterintuitive to me that moving just the single control point on the curve that is at the head of the bone chain pulls the whole bone chain along the shape of the curve, but thankfully I just kinda stumbled upon that while messing around.
Let me know if you have anymore questions and I'll do my best to answer.
Thank you @drakewho !
Here is an alternative way, that might be easier to understand (not necessarily a better way...):
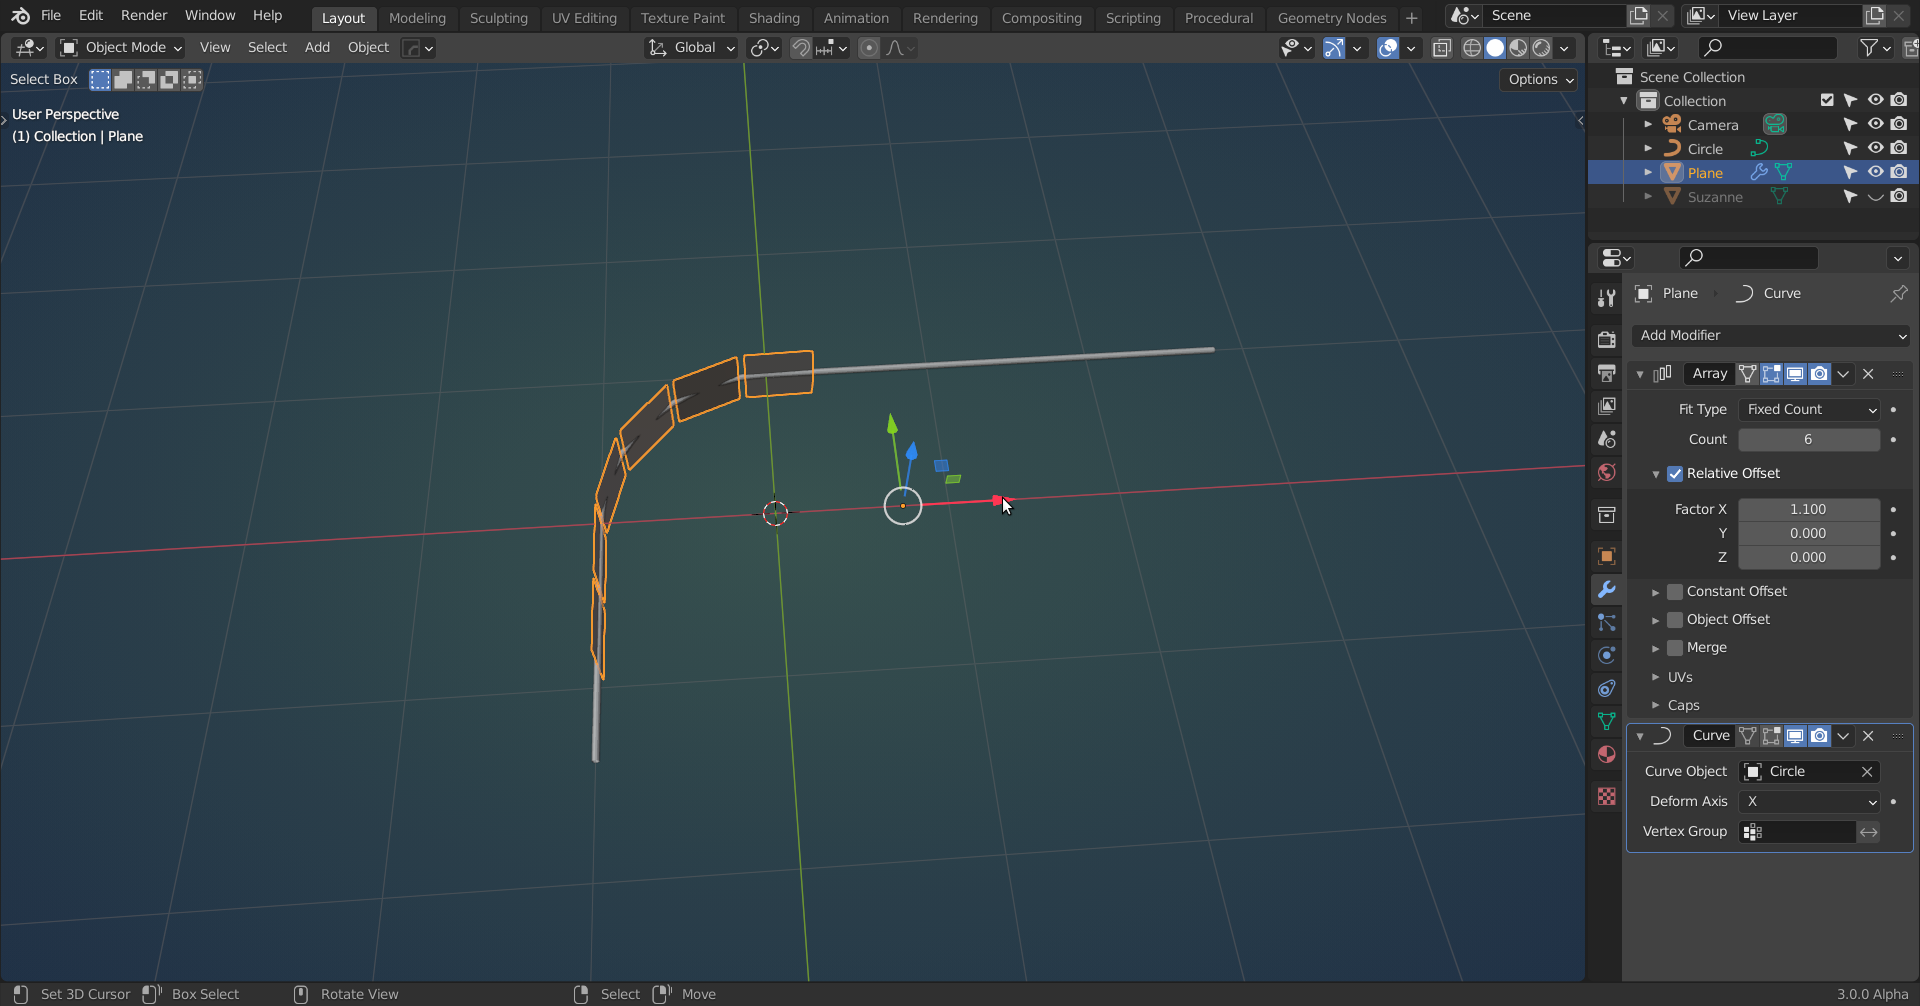
Make a curve, just like you did and add a Plane with an Array and Curve Modifier:
 (I gave the Curve a Bevel, just so it is easier to see in the screenshots)
You can now move the Plane in the X-axis (or whatever Deformation Axis you are using in the Curve Modifier), but they are deforming. But that is why we use Planes; they are flat, so we can simply rotate them:
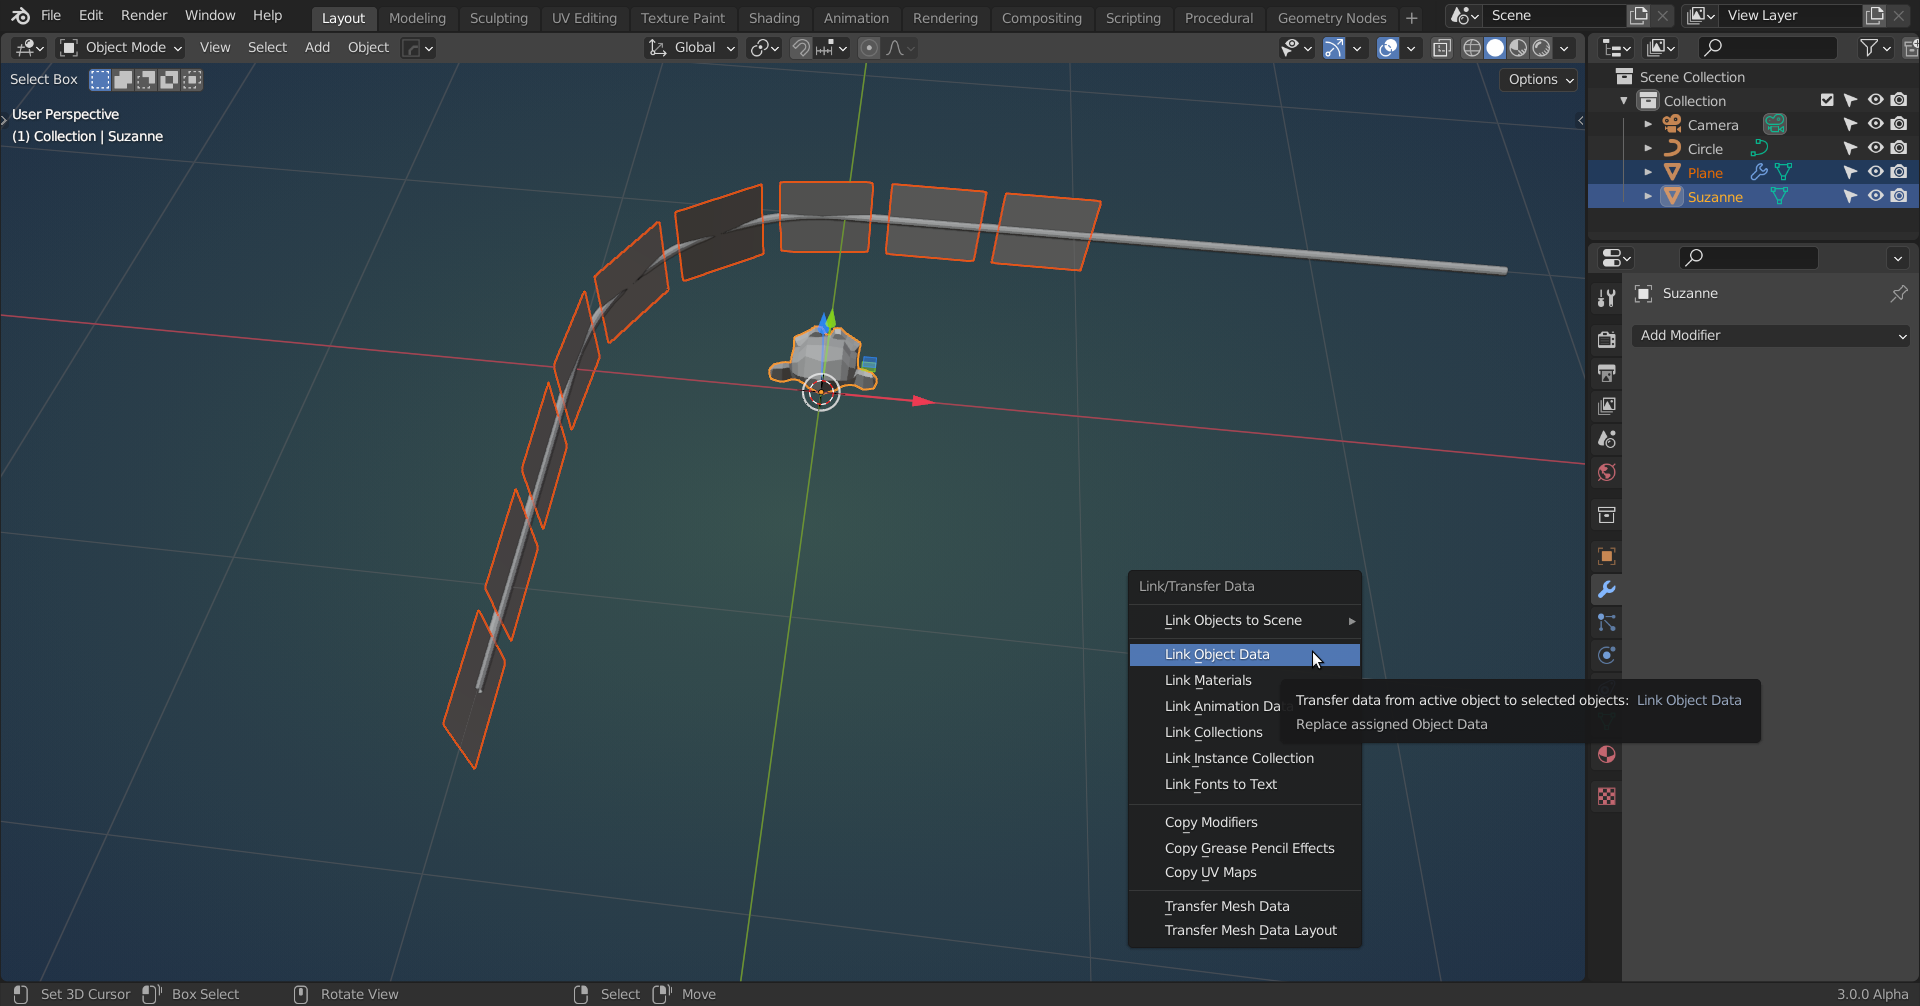
 Now add your door panel (or any Object) and select the plane and then SHIFT select the panel and press CTRL+L:
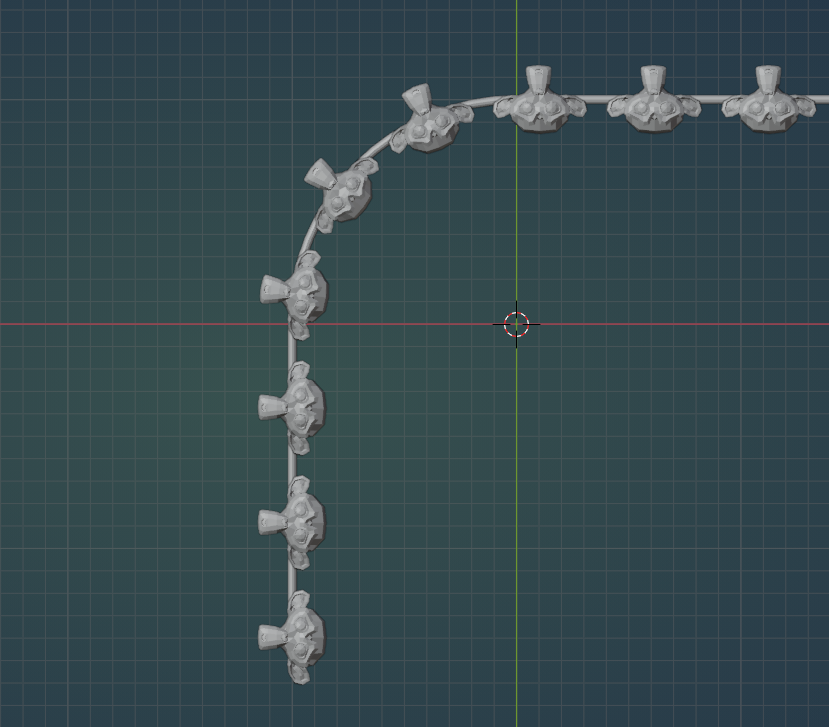
 That's it, because the Plane isn't deforming, neither is the (in this case) monkey:
There are of course still (a lot of) other ways to do this, but I like this method :)
Edit: I am really sorry, posted this during my first coffee of the day...
This unfortunately does not work; there is still deformation!
Something that does work is the method explained here: https://cgcookie.com/lesson/building-the-tread-curve-system