What's new in Blender 2.90?
Aug 25th 2020

The pace of Blender's development seems to be speeding up. There are some big improvements packed into this latest version! Here's everything new you will find in Blender 2.9.
Download the latest version of Blender here.
New Modeling Features in Blender 2.9
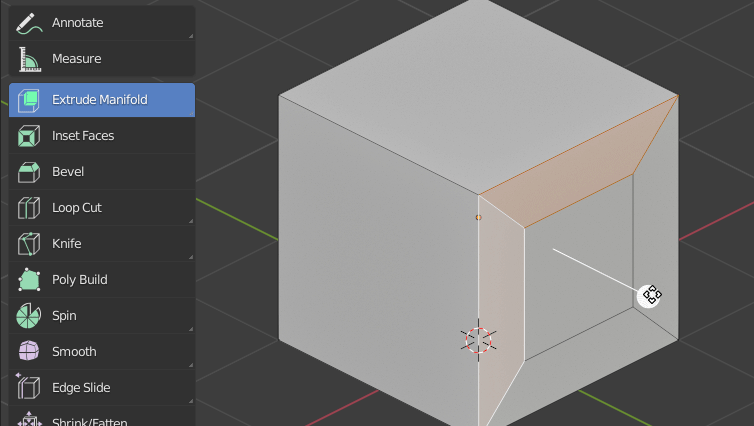
Extrude Manifold is a new tool for extruding faces inwards while deleting overlapping faces and dissolving overlapping vertices. You can’t use it to punch holes straight through objects yet, but its initial implementation is already very useful.
Vertex Slide now supports snapping!!!
(I’m adding extra exclamation points because this simple change will save me quite a lot of time when modeling.)
The Bevel Modifier’s custom profile curve can now be controlled with Bezier handles. It also has a new Width Type called Absolute, which lets you specify the exact distance along the edges of the bevel. That often results in bevels of uneven width when two connected edges are at different angles, but it may be helpful in some circumstances when Offset or Width doesn’t cut it. 
A new 3D View Transform option, called Correct Face Attributes, allows the transform tools to edit the UV’s and vertex colors of your mesh while you manipulate the model.
You wouldn’t want this checked if you’ve carefully laid out a custom UV map for a hand-painted or baked texture, but this is perfect for objects using tiled textures!

The UV Editor also got a slew of new commands which we’ve had in the 3D View for a long time - Edge Ring Select (CTRL+ALT+LMB), Select Shortest Path (CTRL+LMB), and Rip (V).
Curve editing has a few changes as well. If you reset your settings, viewing the normals is disabled by default in the Overlays popover. This is great for getting rid of clutter in the viewport but makes it less obvious which direction the curve is going. There is also an option to display only the handles for selected points, similar to Illustrator and other vector software. 
Watch our Blender course: Fundamentals of 3D Mesh Modeling
New Sculpting Features in Blender 2.9
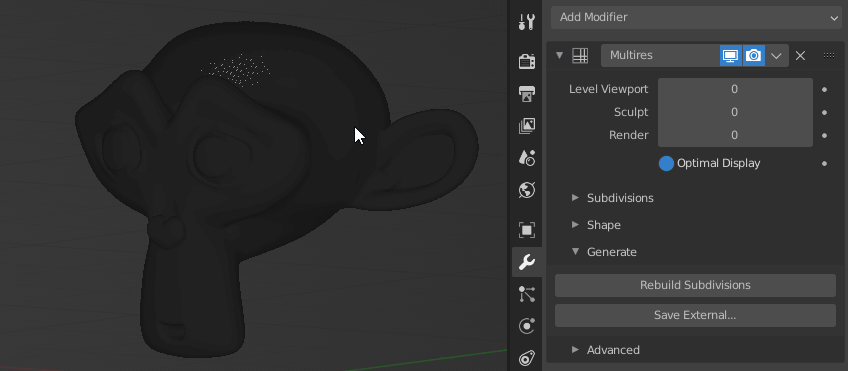
Much to the joy of our very own Kent Trammel, the Multiresolution modifier is back, baby!
You can subdivide, sculpt on higher or lower levels of subdivision, and it all just works beautifully. This workflow is essential for extremely high resolution sculpts like the one Kent is working on for his super-secret next course.

The updated Multires modifier can also now Rebuild Subdivisions, which can be used to take a high res ZBrush sculpt export (for example) and recreate each subdiv level so that the low poly base is now editable and it works with the modifier. Alternatively, you can choose Save External to bake out the high resolution details as a texture.
The Cloth Brush has spawned off a second tool called the Cloth Filter, which simulates the entire mesh at once. It’s much too fun to mess with!
Read: Top Blender Sculpting Add-Ons (including FREE ones)

The Pose Brush also has a few new updates. Deformation modes for scaling, moving, squashing, and stretching have been added, a new Face Set FK mode uses the boundaries of Face Sets to determine the joints of a simulated FK rig, and a new Connected Only option allows you to not mess up surrounding geometry that’s not directly attached to the part you’re grabbing.
The Slide Relax tool has two new modes as well - Pinch and Expand. These are great for spacing out or concentrating the topology while changing the shape of the model as little as possible.
The Hardness brush property (how smooth or sharp the falloff is) can now use pen pressure or inverted pen pressure.
Watch our Blender course: Fundamentals of Digital Sculpting
New Animation Features
Library Overrides have been improved in Blender 2.90, and are much more useful than their initial implementation. All constraints, modifiers, custom properties, and more types of object data can be overridden.
Scrubbing the Graph Editor using the top region won’t make the cursor jump to the top anymore.
Constraints evaluating objects with negative scale values will now interpolate correctly.
Watch our Blender Course: Fundamentals of Animation
New Physics Features
The Fluid simulator’s gravity now matches the scene’s gravity, caching has been simplified, and you can offset the timing of the cache.
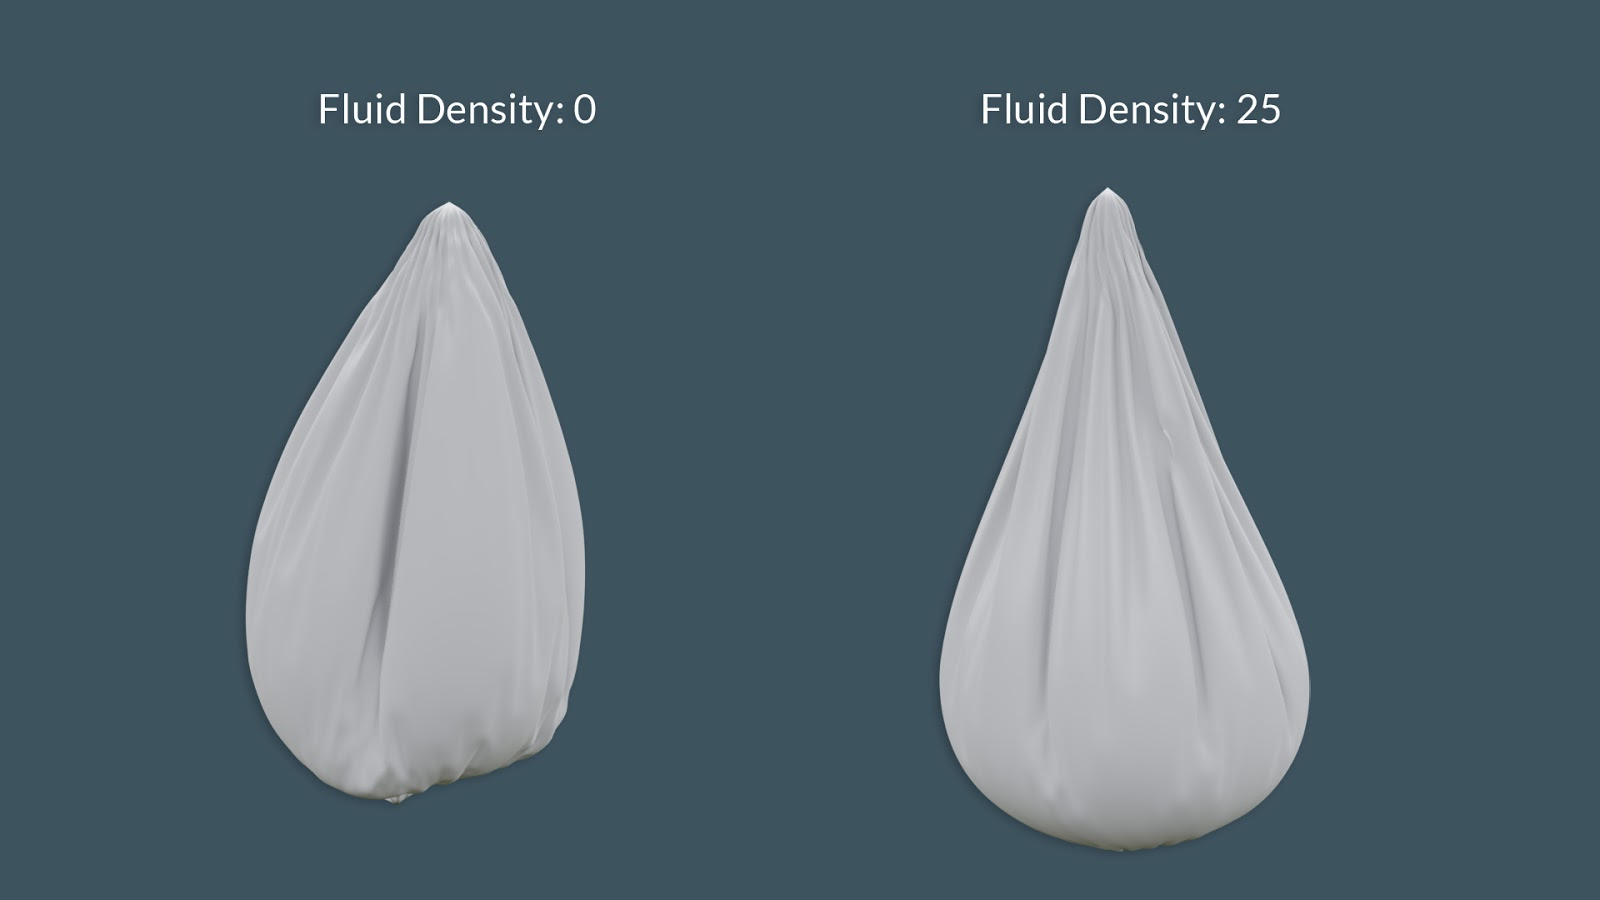
The Cloth simulator has a new Fluid Density pressure option, which adds gravity to the simulated pressure. If you’ve always wanted to simulate a bag full of water - now you can!
The Ocean modifier has a new option for generating a vector for the speed and direction of spray particles. This is a great option for the future, but the current particle system can’t use vertex color data to influence particles, so there’s not an actual use for it at the moment.
Grease Pencil
You can now quickly switch between Grease Pencil active materials while drawing, with the hotkey U, or with the new dropdown menu in the right click context menu.

Converting Grease Pencil objects to Curve objects now has Bevel options so that you can really quickly make 3D shapes out of your drawings.
(By the way, if you love Grease Pencil, learn how to animate a bouncing ball in this classic CG Cookie tutorial.)

Speaking of conversions, you can now convert Mesh or Curve objects into Grease Pencil ones! Any edges (or optionally only seams) become strokes and faces become fills. Even animated meshes work as the movement will become keyframed GP animations!
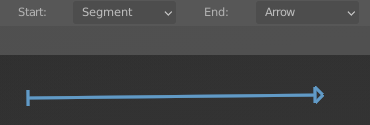
The Annotate Line tool can create different kinds of arrows with Arrow, Open Arrow, Segment, or Square start and end caps.
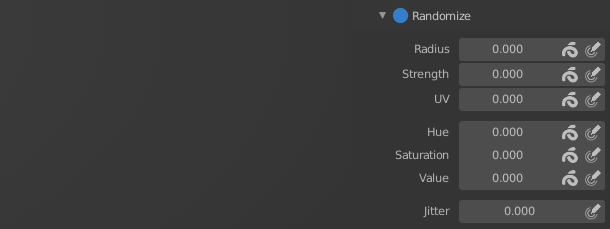
The new Randomize options in the Brush Settings are also fun to mess with. Those might help your drawings look a little more messy (hopefully in a cool way)!
A new Texture Mapping Grease Pencil modifier allows you to change UV coordinates for the strokes on the fly.
The Pixelate Effect has a new Antialiasing option in case you want to make your strokes look more like classic Playstation graphics.
Cycles
Embree is a collection of ray tracing algorithms developed at Intel, and it’s now being used by Cycles when rendering on the CPU.
It’s ever so slightly slower for simple scenes and a bit faster for complex scenes, but for scenes with motion blur (pretty much any production animation), it can be up to 1,000% faster to render.
You read that right!
For example, the Agent 327 test shot with motion blur that used to take almost 55 minutes to render now takes 5 minutes. “What a time to be alive.”
The switch to Embree also changes how hair is converted to geometry for rendering. For both CPU and GPU rendering, hair can either be Rounded Ribbons or 3D Curves.

The denoising settings have moved to the Render properties under Sampling and the old Cycles denoiser was renamed to NLM. Intel OpenImageDenoiose now works in the 3D viewport or in the final render without you needing to set up the compositing node, if you’re using CPU rendering.
GPU rendering has changed a bit under the hood as well. OptiX can be used on more NVIDIA GPUs, Cycles can use NVLink to share memory across bridged GPUs, and NVIDIA GPU rendering for macOS has been dropped after Apple stopped supporting CUDA.
There’s a cool new Sky Texture type, Nishita, that is a bit more physically accurate than the previous sky models since it takes into account altitude and ozone absorption, plus it actually shows a sun which can cast shadows. It’s also much easier to control since it uses input values for elevation and rotation rather than the finicky normal ball thing. Nishita only works in Cycles at the moment.

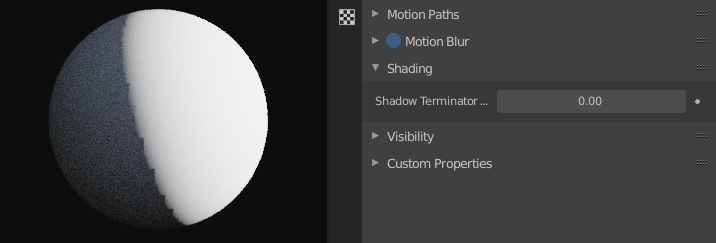
There’s a nasty path tracing artifact that you’ll see if you set a lower poly object to be flat shaded and give it a sharp falloff of light. It’s plagued Blender and other renderers like Cycles for quite a while, but no longer! You can now set a Shadow Terminator Offset in the object properties to shift the shadow and cover over any jagged edges.
Read: Cycles vs Eevee - 15 Limitations of Real-Time Rendering
Eevee
Eevee motion blur has been completely redesigned and now works with object, deformation, and even hair movement.

While the new Nishita Sky Texture model might not work in Eevee, the Preetham and Hosek/Wilkie options now do!

Read: Eevee Essentials - Basic and Advanced Tips You Need to Know
Visual Effects
Blender’s motion tracking now includes a method to solve for lens distortion the same way that Nuke and Natron expect it to. To use it, set the movie clip’s Lens option to Nuke. This is especially helpful for shots that are tracked in Blender but composited in other apps.
Workflow
Instancing or full copying objects, scenes, and collections has been changed to let the new objects share the same actions and other data, which results in fewer useless data-block duplicates.
Virtual Reality support for Blender is still a work in progress. In 2.90, the Landmarks feature, which created cameras for predefined locations and orientations, has been upgraded so that you can create new landmarks to save for later, update the current landmarks, or snap the cursor or scene camera to a landmark.
While not eye catching features, improving importing and exporting 3D file formats helps to keep professional users, who often need to transfer things from one app to another, happy. In Blender 2.90, Alembic, USD, and glTF 2.0 were all improved.
User Interface
Blender’s F3 operator search box now works a little bit differently in that it searches through all available menu items for the mode that you’re in.
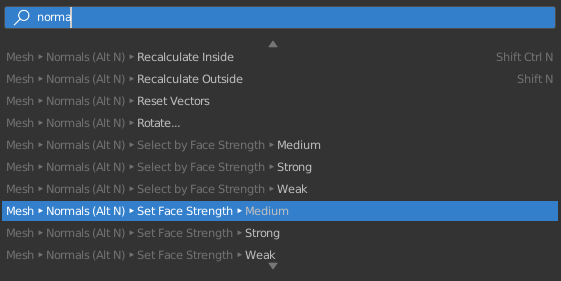
This helps to give more relevant results. It also allows the search to display where you can find each command in the menus as well as the hotkey for the menu and the hotkey for the specific command. You can also now right click and add any search result to your quick favorites (Q) menu!
Modifiers and constraints can now be dragged and dropped to reorder! To speed things up even more, hotkeys can now be used while the mouse is hovering over the modifier to apply (CTRL+A), duplicate (Shift+D), and delete (X).
Checkboxes have been updated so that they’re centered and have labels that more clearly describe what they are for. In some places it makes the lists longer and in some areas it makes them shorter. Overall, it’s more consistent and aligned with the rest of the UI!
Shader node input sockets are now shown in the UI with the correct color and have moved to the left side to match the node in the shader editor.
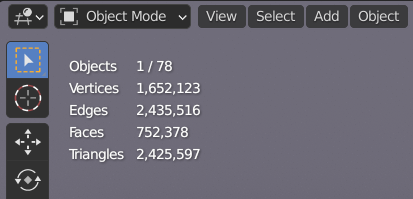
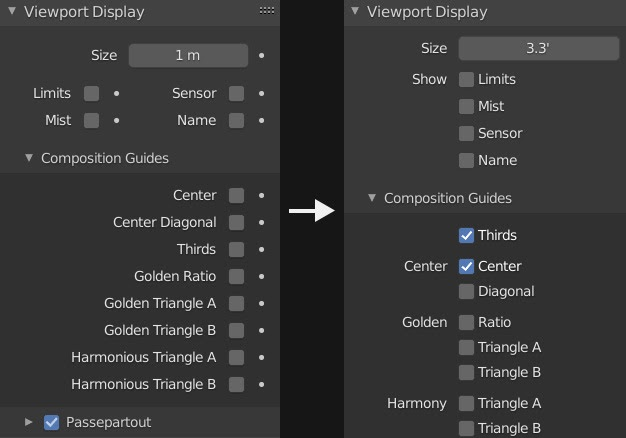
Scene statistics can now be displayed in the 3D Viewport if you enable them in the Overlays popover. They’ve moved out of the Status Bar by default, but you can enable them again in the Status Bar by right clicking (near the version number) and choosing Scene Statistic.
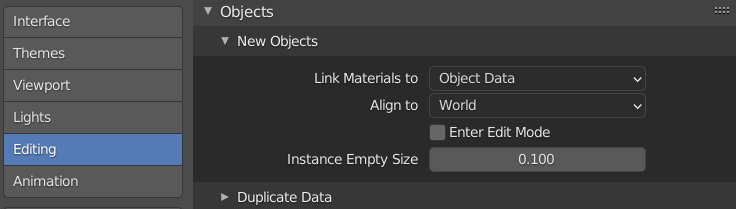
There’s a new setting in the Preferences to change the default size of the empty which shows the center point of collection instances. Hooray, I can set it to (almost) zero!
Text input boxes now have their own undo stack while you’re typing. That means less trying-to-fix-a-typo-but-accidentally-erased-progress situations!
Deleting stuff in the Outliner now works predictably and deletes anything you have selected.
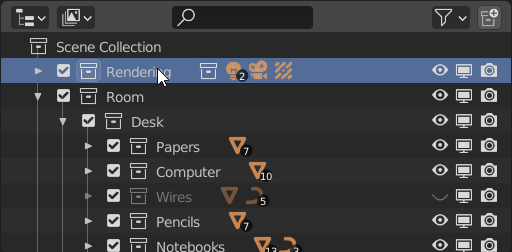
Plus, dragging things in the outliner now scrolls when you reach an edge. Same goes for any other drag and drop elements (like modifiers) in Blender. Slick!
Which of these features are you most excited about?
Let me know in the comments! For the full list of every single small change, you can read the complete release notes.
I haven't fully understood the new "Width Type" "Absolute" of the "Bevel Modifier", since the type "Offset" already defines with an absolute value how far the newly created edges slide along the adjacent edges of the beveled edge. With the default cube the effect is only visible and that relatively subtle if I scale the edge opposite to the beveled edge so that the edges converge along which the sliding happens during the beveling.
The speedup for CPU rendering and new sky types are of particular interest, but the grease pencil enhancements are where it's at for me...
"Those might help your drawings look a little more messy" - nor sure I needed help with this, hough - it's already a core competency...
@jlampel Fantastic informative article, Jonathan! All of the features are amazing, but I'm really looking forward to trying the Correct Face Attributes option. Magic UV had its "Preserve UV" feature, which was good, but sometimes it misfired. Really useful for lengthening some wood siding that's already been unwrapped. :-) Vertex slide with snapping is also super great!!
“NVIDIA GPU rendering on macOS is no longer supported. Apple dropped support for CUDA drivers in macOS 10.14, and no recent Apple hardware uses NVIDIA graphics cards.”
OK, but what about those of us on 10.13 that still have nVidia cards??
jjeepster It is! You can download any of the Blender splash screens here: https://cloud.blender.org/p/gallery/57e507b80fcf29412d1f1e53
One thing, Default Cube and other primitives object will stay at top of origin now, which is good by the way, no need to move default cube by 1 unit every time
"You can now set a Shadow Terminator Offset in the object properties to shift the shadow and cover over any jagged edges."
Very glad about that.
Also, apple users losing cuda... thats going to be controversial :D
So glad to see multires is back!
Also, the painting at the top of the article is beautiful. Where can I find out more about this artwork? I've been trying to make something similar
"Vertex Slide now supports snapping!!!"
I shed a tear when I saw this.