Blender Showdown: Cycles vs. Eevee – 15 Real-Time Rendering Limitations Explained
Mar 7th 2019

I get super excited when a new feature comes to Blender that makes my work faster, better looking, and more fun. As you would imagine, I’m hyped about Eevee in Blender!
There are so many gorgeous demos floating around online that it’s clear that Eevee is a real game changer.
However, seeing only the results that look incredible can give the impression that it can be used for everything. I’ve even seen it mentioned as a replacement for Cycles!
I certainly hope to see real-time photo realism as much as the next computer graphics nerd, but that is not a reality.
Getting started with Blender? Watch our Blender Basics tutorial series, the fastest way to start creating in 3D. Less than 60 minutes, over 1 million views from Blender artists like you.
Path Tracing, Rasterization, and Ray Tracing in EEVEE
Cycles works by casting rays of light from each pixel of the camera into the scene. They reflect, refract, or get absorbed by objects until they either hit a light source or reach their bounce limit.
Following just one ray of light from one pixel is not that accurate since many objects or texture details can be smaller than one pixel, so Cycles fires additional randomized rays (samples) from that pixel and averages the result over time.
This brute force approach of averaging randomized samples is called a Monte-Carlo simulation, and when applied to paths of light it is called path tracing.
While path tracing is not entirely accurate to the real world (it has a bounce limit and works backward since it can’t possibly simulate every photon), it results in the best-looking images we can get in computer graphics. As you can imagine, it can be quite slow.
The rendering method used by most 3D game engines and application viewports is called rasterization.
It’s one of the oldest methods of rendering computer graphics, and it’s fantastically fast when it comes to simple scenes.
It works by projecting the faces of a model onto the pixels that make up the 2D image you see on your screen.
Those pixels can then have their colors tweaked according to the object’s shader, the normals, whether or not the face is in a shadow, and so on.
Eevee uses rasterization via OpenGL 3.3, which is why it can be blazing fast in comparison to other types of rendering. The key thing to remember is that this speed comes at the cost of accuracy because it works with pixel information (i.e. a compressed single view of the scene) instead of paths of light interacting in the full 3 dimensional space.
NVIDIA RTX, Ray Tracing, and Hybrid Rendering
You may have heard the buzz about real-time ray tracing and wonder how that fits into all of this.
Some games have started to take advantage of the new RTX cards from NVIDIA that have specific architecture that is built to trace rays of light. These games are not actually fully using one rendering technique or the other, but are instead doing what they’ve termed hybrid rendering.
They’re using a version of path tracing with only one sample and very few bounces (only one bounce of one ray per pixel is needed to technically call it ray tracing) to render only reflections and shadows, running that through a machine learning denoiser, and combining that result with rasterized diffuse and other passes to get the final result.
I would recommend watching this video on how this technology might affect games and render engines like Eevee:
It’s an incredibly clever technique, and I’m super excited to see that kind of thing running in real-time, but it’s not going to enable rasterization to replace path tracing any time soon. Rather, that deep learning denoiser is a step toward path tracing replacing rasterization.
Key Shading Differences between Eevee and Cycles
It’s tempting to think of features as a checklist (ambient occlusion, refraction, etc.…), see that they are present in both engines, and assume that they are both capable of the same things. However, because of their differences in rendering methods, Eevee renders can get convincingly close to Cycles in many areas, but still struggles in the following ways:
Ambient Occlusion

Cycles ambient occlusion is based on the distance between surfaces in 3D space. Eevee AO is based on the distance between surfaces according to the 2D image the screen sees.
It manages to still look quite good because it uses a depth pass to determine where to fade out the AO so that it doesn’t cast on objects far behind it (you’ll notice this in 2.79’s viewport AO).
However, you’ll often see occlusion attach itself to objects before the depth cutoff takes effect.

Eevee can only occlude a set distance away from an object. In the first Cycles render above, notice how the sides of the box have large gradients and the surfaces where the monkey heads sit have small gradients.
The combination of sharp and broad transitions between light and dark looks natural. In Eevee, both areas of gradients are the same size, causing the sides of the box to look flat and the occlusion beneath the monkeys to look overly dark.
Update: Ambient occlusion is much better in Blender 2.93 and later, but still doesn't hold up to Cycles for the same reasons as listed above.
Want more Blender tips? Browse our collection of 30+ free tutorials for Blender
Global Illumination

Cycles has global illumination (a.k.a indirect lighting, radiosity, etc…) baked deep into how it works. Light paths pick up data (like what color has already been absorbed) from each time they bounce and uses that information to determine what to do when it hits the next surface.
Eevee definitely can’t get that bounce information, so it uses light probes to approximate it. Light probes essentially take snapshots of the scene from their point in space, and project the appropriate colors onto objects in their vicinity.
This is called baking; the data is stored and not updated every frame. Therefore, objects with baked indirect lighting should not be animated.
An massive amount of light probes would result in the scene looking about the same as in Cycles, but of course that would take an eternity to bake. The limited amount of light probes means that the space between them must be approximated, which can result in artifacts.
In the render above, notice the faint dark splotch on the blue cube, and the uneven occlusion where it meets the ground.
Create something awesome today. Modeling, Texturing and Shading a Treasure Chest in Blender is a beginner-friendly tutorial series with top techniques for 100s of your future projects.
Reflections

At this point you can safely assume that any feature of Cycles works by bouncing rays of light, so great reflections are not surprising. Eevee uses a couple tricks to try to mimic this, but of course it still ends up a ways away from accuracy.
Screen space reflections work by taking the resulting image from the camera and flipping it around. This is fast and looks great in most circumstances, but cannot work with anything not seen by the camera such as the backs or bottoms of objects.
Eevee can also use reflection probes, which are planes, cubes, or spheres that act like virtual cameras. They render what is around them and then map that image onto the object.
Since planes are quite simple they can be updated in real time, but cube and sphere maps need to be baked and therefore the objects they are getting data for will not look right when animated. It’s also rare that an object is a perfect cube or sphere, so the mapping will also introduce some imperfections.
Transparency

Both render engines support transparent materials, but that’s not something any render engine loves to handle. Cycles transparency is limited by the number of bounces, after which the material will render as pure black.
Eevee’s Alpha Blend material setting works by layering the materials on top of each other, from back to front, and it needs a limit in order to not slow to a glacial crawl. After it hits that limit it will just not draw any more faces, resulting in a mushy render if you have too many layers.
Eevee’s Alpha Clip on the other hand, layers materials from the front to the back, and looks nice and crisp. The trade-off here is that the material is either fully opaque or transparent, and can’t handle any blend between the two. They also tend to get more transparent as you move away from them. You can see in the example above that the tree in the back has its branches clearly showing through the leaves, even though it should be almost completely occluded.
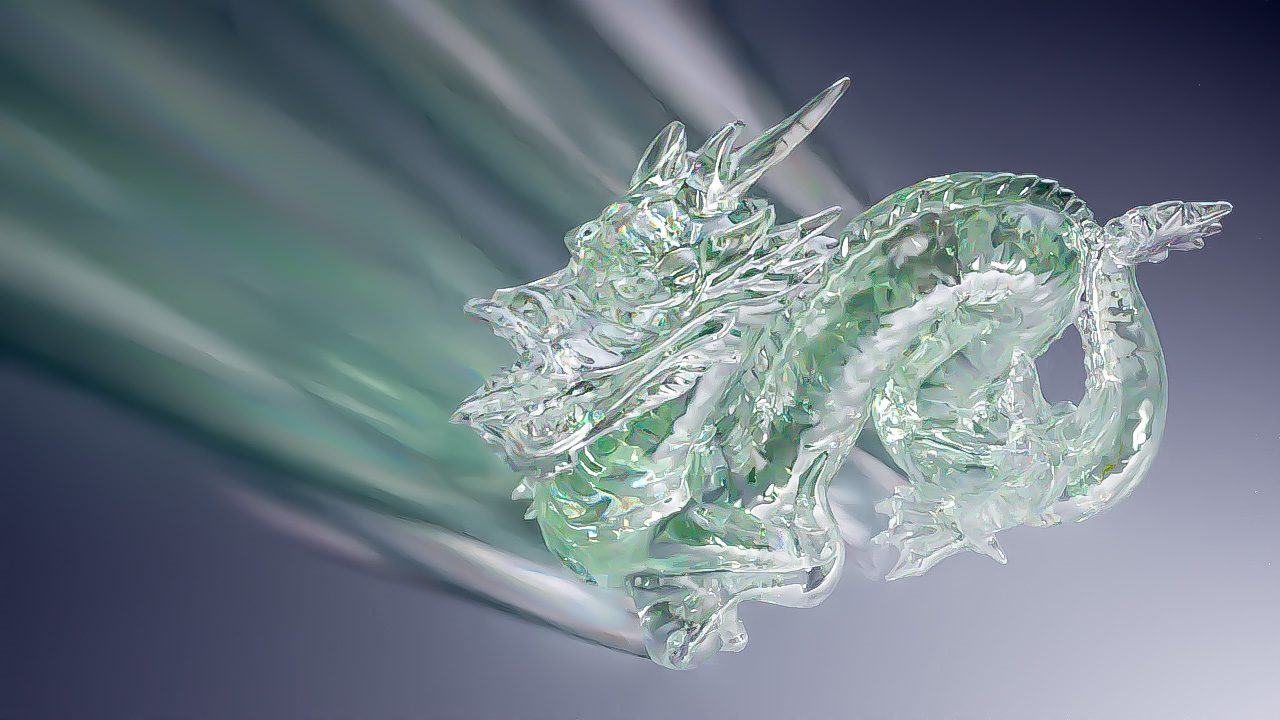
Refraction
Refraction in Eevee is done by warping what is behind the object or is seen from a cube map according to its normals and thickness. This means that the light is not bouncing around inside the object like in Cycles, and is not aware of the light entering from all angles. This can result in a fantastic looking glass ball, bubble, or puddle of water, but it’s not quite up to par when it comes to complex objects. Even ray traced refractions like we had in Blender Internal can’t hold a candle to the result we get from full path tracing in Cycles.
For a deep dive on how to work with transparency and refraction in Eevee, watch the Fundamentals of Shading lesson on creating glass in Eevee or pick apart our advanced Eevee glass shader.
Shadows

Shadows in Eevee essentially work by capturing an image of what each light sees, and checking each pixel to find if it is included in that light or not. The higher the resolution of the shadows, the more pixels they have to check against and the more accurate the result will be. Soft shadows and contact shadows help make up for the usual visual limitations of shadow mapping techniques, but without the light bounces that Cycles has it can be hard to get a natural looking result.
Cycles is not limited by resolution or mapping techniques, and the difference a couple bounces makes is crucial for things like compositing for VFX.
Learn more about how to perfect shadows in Eevee in the Fundamentals of Digital Lighting course.
Volumetrics

The thing Eevee kicks Cycles’ butt at is rendering ‘god rays’, where light is projected through a volume. While Eevee is less accurate, it looks good enough for most cases and is completely noise free. You can even add 3D textures to make it even more interesting.

Complex volumes, however, are another story. Actual ray scattering is needed for dense looking smoke, light emission, or casting shadows from the volume onto other objects.
Subsurface Scattering

Eevee uses the thickness of an object along with its normals to approximate light scattering under the surface. It looks quite good when used in subtle amounts, which is what you would want for things like skin.
What it struggles with are thin surfaces and sharp details as compared to Cycles, especially when using the Random Walk SSS method. In the render above, notice the lack of definition around the chin and roof of the mouth. The tail, on the other hand, looks about spot on.
Hair and Fur

Hair in Eevee looks better than real time hair has any right to look, and it can handle a pretty ridiculous amount of strands. Just look at this tiger demo by Daniel Bystedt to see what’s possible!
The limitations on Eevee hair come into play when you look at the shadows they cast and the lack of scattering through groups of strands that we would get by using the Cycles Principled Hair BSDF. In the example above, look at where the hair meets the neck and shoulder, the shadow on the forehead, and the gradation of color along the hair across the side of the head.
For a great tutorial series on hair, check out Creating Hair Cards for Realtime Characters! Jake and Leo will help us with their lush locks...
Complex Materials

Eevee can handle some extremely complex node setups! The image above shows Kent’s completely hardwood shader pack. Just don’t get too crazy - Eevee has a hard limit of 24 textures per material. You’re not likely to run into that in a regular PBR workflow, but it’s something to be aware of as it’s certainly possible to hit while mixing new materials.
You can’t be able to use True or Vector displacement in Eevee, though this may be updated later on.
It also has a hard time rendering complex bump details. In the image above, notice the wood grain on the spoon. Because Cycles is averaging many samples, it looks much more detailed than the real time version which uses relatively few screen space reflection samples. Improved bump mapping is on the road map for Eevee after 2.81, and the developers have stated that the new method should look close to Cycles quality.
Update: Eevee's bump rendering has been improved and it does look quite close to Cycles. Go Blender devs!
Motion Blur

Cycles supports motion blur from most sources, while Eevee currently only supports camera motion blur. Objects moving or armatures deforming won’t have any effect. It also doesn’t support fancy effects like rolling shutters. This is not an inherent limitation of rasterization though, so it’s likely to be updated in the future. Cycles started out the same way and has had its motion blur drastically improved over time. It’s not a trivial problem and can take quite a while to implement.
Update: Motion blur now works very well in Eevee, even for rigged characters, though it does not support rolling shutter (a fairly niche use case I've never actually needed).
Getting into animation? No problem: start with this Blender tutorial series and let's make stuff move.
Depth of Field

Eevee supports depth of field, and it looks quite good! It’s still approximated though, whereas Cycles is physically accurate. The difference really only shows in the transition between sharp and blurred areas (notice the spikes along the chin in the example above) and the lack of bells and whistles like polygon shapes and anamorphic distortion. For the majority of cases though, it’ll work great and be way, way faster. Big improvements in Eevee DOF are on the way for Blender 2.81 or 2.82, which should make it more comparable to Cycles.
Update: Eevee's DOF now looks impressively close to Cycles when using the High Quality Slight DOF and Jitter Camera options.
Light Ray Data
Path tracing gives us interesting data about the light as it travels around, which enables us to create cool but unnatural effects like over the top caustics or objects that are invisible to certain passes. This information is simply not possible to get in Eevee.
Polygon Count
Eevee is always going to be faster than Cycles for rendering, but in a contest of how many polygons can they render without crashing, Cycles will win by a large margin. This is due to its use of instancing and how path tracers handle polygons differently than rasterization engines.
Compositing Passes

This last one is a big deal when it comes to VFX work. Eevee has the major ones like Mist, Normal, and AO, but it’s still missing important things like Vector, Object and Material Index, Shadow, Emission, and Cryptomatte. These may also be improved over time, but will never allow the same amount of fine tuning based on the lack of ray information.
Update: Eevee now also supports diffuse, specular, volume, emission, environment, shadow, bloom, and cryptomatte passes. Vector is the only major one that is currently missing.
Conclusion
My goal with these comparisons is not to dampen the enthusiasm about Eevee, but rather to allow you to make an informed decision regarding which renderer to use for each particular project. Remember - deadlines are closer than they appear! It’s entirely valid to choose speed over quality in many situations. The more great options we have, the better!
Thank you for this post, it is very informative. However, I wonder if things have changed with Blender 4.2 (with EEVEE Raytracing) in 2024, and to what extent? Is there a post that discusses these new features?
This is very informative, and I'll keep in mind that if full realism is a must there's no subsitute for Cycles, but since I'm usually a non-photo realism guy (I love my celshading and toon materials), and long rendering times can be excruciating I'll probably be favoring Eevee (good to know the differences, though).
thank you for this overview. as a new blender user it shines more light onto the way the rendering works in Blender
Cycles will always give a more realistic render but EEVEE is game changer for my purposes. Finding how to use it effectively is critical. Thanks for the article! This is a fabulous website.
I don't have enough experience to say, either way, ask me a few months from now.
iindigowarrior9 Indeed, I used Blender's particles with the display set to Path, but this is not something I'd recommend since it won't render in Cycles or Eevee, and it doesn't follow the particles' paths very accurately. It just happened to work decently for this example.
bbloozguy It definitely does not have to be one or the other! That's what makes it so useful. If I'm using a PBR workflow with the principled shader, I'll likely do my material work in Eevee and then switch over to Cycles once I get into lighting, if I happen to be using Cycles for the final render.
Thank you very much for sharing the "Beyond Turing" video Jonathan, it is very informative!
QUESTION:
Did you create the "Suzanne with the little bounicing balls spray image" at the start of this tutorial yourself?
If yes
- How did you do it?
- Did you use Blender's build-in physics / particle systems?
- https://docs.blender.org/manual/en/latest/physics/introduction.html
_- https://docs.blender.org/manual/en/latest/physics/particles/index.html
The current big Eevee killer for me is the lack of 180/360 VR rendering.
There is one thing that isn't entirely clear to me.
In some ways developing a model under Eevee seems "easier" (Confession, I haven't tried it) because of the (almost) instant feedback.
What is involved in, then, finishing it off in Cycles? What are barriers? What's the best stage to make the switch?
Is it really one or the other like the comments imply?