Since the release of version Blender 2.8, Blender's Sculpt Mode has been rapidly expanding with many improvements and additions. This makes Blender an increasingly interesting free alternative to the formerly undisputed sculpting king -- ZBrush.
CG Cookie author Metin Seven has been working with both ZBrush and Blender for years, and compares ZBrush features to Blender equivalents.
So should you be using Blender or ZBrush?
Jump to Section
- ZBrush Dynamesh vs Blender Voxel Remesh
- ZBrush ZRemesher vs Blender QuadriFlow
- ZBrush Subdivide vs Blender Multires
- ZBrush brushes vs Blender's Sculpt Mode brushes
- ZBrush Decimation Master vs Blender Decimate modifier
- ZBrush vs Blender: what are some other differences?
- Should you be using ZBrush or Blender?
ZBrush Dynamesh vs Blender Voxel Remesh
ZBrush Dynamesh is mostly used in the concept stage of sculpting.
Dynamesh allows you to automatically remesh your sculpture using a voxel-based volume that’s projected as a 3D grid of polygons onto your mesh.
This is a very useful feature that helps you avoid stretching of polygons as you keep sculpting new volume.
Blender offers the Voxel Remesh tool as a Dynamesh alternative.
In Sculpt Mode, click on Remesh and adjust the settings. The Voxel Size determines the resulting polygon detail, Fix Poles generates a slightly neater quadrangular topology, and Preserve Volume avoids details being smoothed out, although this can cause polygon artifacts in areas with sharp edges or crevices.
To avoid this, uncheck Preserve Volume and remesh using a slightly lower Voxel Size value to maintain detail.

Once you’re satisfied with the Remesh settings, you can continue sculpting and press Control + R to remesh again using the same settings.
ZBrush ZRemesher vs Blender QuadriFlow
One of the most-praised star features of ZBrush is ZRemesher.
ZRemesher allows you to auto-retopologize a mesh with a more sophisticated result than a voxel remesher can.
Blender doesn’t natively come with a tool that is on par with ZRemesher, but it offers an alternative to the Voxel Remesher called QuadriFlow, which can yield quite nice quad-retopology results that take the mesh curvature into account.
QuadriFlow can be activated via the Object Data Properties tab ➔ Remesh rollout ➔ Quad button. Experiment with different settings and values until you’re satisfied with the result.

You can keep sculpting and press Control + Alt + R to remesh again using QuadriFlow.
If you don’t want to settle for less than ZRemesher’s unequalled auto-retopology results and you’ve got some budget, I heartily recommend investing in Exoside’s Quad Remesher add-on for Blender.
It’s created by the same developer who’s responsible for ZRemesher, and the results are exactly the same as ZRemesher’s impressive results in the latest ZBrush versions.
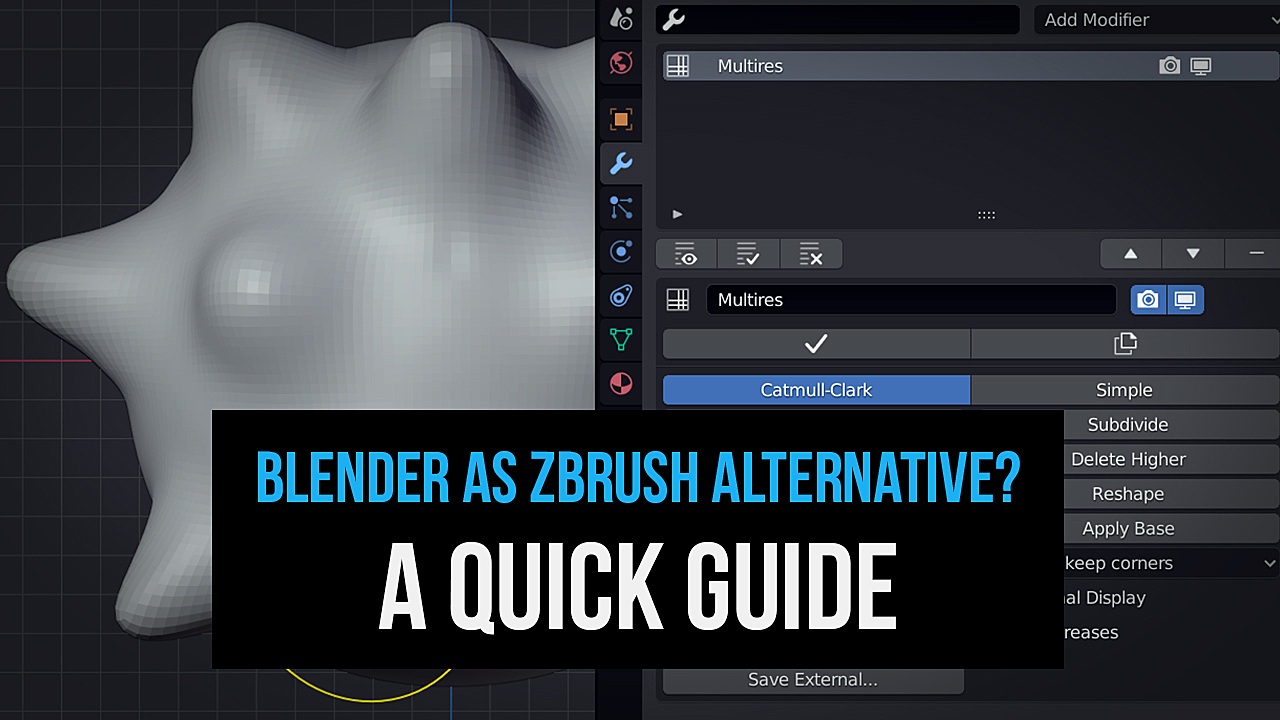
ZBrush Subdivide vs Blender Multires
The oldest way of sculpting in ZBrush: subdividing a quad-polygon mesh to add ever-higher levels of detail is also present in Blender 3D, in the shape of the Multires modifier.

The Multires modifier has been plagued by some serious performance issues the past couple of years, but at the time of writing, the Blender developers are working very hard to correct this, which will be apparent in Blender 2.83, and can already be tested if you install the latest daily alpha build of Blender 2.83.
💡 If you’re wondering about the Blender modifier interface in the screenshot: it’s the free Modifier List add-on, which provides an enhanced Blender modifier stack UI / UX.
ZBrush brushes vs Blender's Sculpt Mode brushes
Brushes are the most important sculpting tools, and luckily there are lots of similarities between the common ZBrush brushes and Blender’s Sculpt Mode brushes that can be found in the left-side toolbar.

Here is a side-by-side naming convention of sculpting brushes in Zbrush and Blender
(Left side = ZBrush, right side = Blender)
- Clay ➔ Clay
- Clay Buildup ➔ Clay Strips
- Dam Standard ➔ Draw Sharp or Crease
- hPolish ➔ Flatten
- Inflate ➔ Inflate
- Layer ➔ Layer
- Move ➔ Grab or Elastic Deform
- Pinch ➔ Pinch
- Slide ➔ Nudge
- Smooth ➔ Smooth
- SnakeHook ➔ Snake Hook
- Spiral ➔ Rotate
- Standard ➔ Draw
- Trim Dynamic ➔ Scrape or Multi-plane Scrape
ZBrush Decimation Master vs Blender Decimate modifier
The effective polygon reduction ZPlugin called Decimation Master also has a comparable counterpart in Blender, in the shape of the Decimate modifier.
The polygon reduction algorithms and efficient results are quite on par with each other.

The only thing the Decimate modifier is still missing is control over decimation based on polypaint.
Vertex colors are being preserved in Blender’s Decimate modifier, but you can’t control the importance of vertex paint in the decimation process, like you can in the Decimation Master options.
ZBrush vs Blender: what are some other differences?
Although ZBrush and Blender have fundamental differences in their user interface and user experience, a lot of functionality can be compared between ZBrush and Blender.
Some examples:
- Left side = ZBrush, right side = Blender
- ArrayMesh ➔ Array modifier
- Best Preview Renderer (BPR) ➔ Eevee renderer
- Dynamic Subdivision ➔ Subdivision Surface modifier
- Extract ➔ Mask Extract
- FiberMesh ➔ Hair particles
- Live Boolean ➔ BoolTool add-on (included with Blender)
- Mask By Cavity / Mask Peaks And Valleys ➔ Dirty Mask
- MicroMesh / NanoMesh ➔ Tissue add-on (included with Blender)
- Polygroups ➔ Face Sets (implemented in Blender 2.83)
- Sculptris Pro ➔ Dyntopo
- Subtools ➔ Objects
- Subtool Folders ➔ Object Collections
- Project All ➔ Shrinkwrap modifier
- ZModeler ➔ Edit Mode
- ZSpheres ➔ Skin modifier

Should you be using ZBrush or Blender?
Final verdict: although Blender can compete with ZBrush, it is not (yet) a full replacement of ZBrush.
ZBrush is still more advanced in some areas, such as the extremely high amount of polygons it can handle without significantly slowing down. This allows sculptors to add the finest of details to a surface.
This is possible because ZBrush uses a special approach -- it redraws only the area of the UI where brush strokes are placed, while Blender refreshes most of its UI with each action.
Then there’s the fabulous UV Master in ZBrush. There is still no other tool that makes complete, stretchless UV mapping that easy.
On the other hand, although ZModeler is a versatile tool, it can’t match the power of Blender’s extensive polygon modeling toolset. And when it comes to rendering, Blender also wins! In ZBrush, you need to export a scene to an external renderer like Keyshot or Marmoset Toolbag for realistic results, while Blender includes the powerful Cycles renderer.
And let's not forget the cost...
ZBrush has a price tag that’s very high for most 3D hobbyists, starting at just under $30 per month for an individual license.
Blender 3D, on the other hand, is completely free - both for private and commercial use, and 100% open-source.
In the end, the choice is up to you and you can decide to use both ZBrush and Blender
In that case, check out the GoZ for Blender add-on, also known as GoB, establishing a convenient bridge between both applications.
Happy Blending!
Metin Seven -- metinseven.nl
_______________________________________________
You might also like...
| Course: Digital Sculpting in Blender | Course: Model and Animate a Rocket |
|---|---|
 |
 |
| Blog: 10 Tips for Best Blender Preferences | Course: 3D Mesh Modeling in Blender |
 |
 |