Starter Guide: Task Automation in Python (Demonstrated with Minecraft)
Nov 15th 2018
*Editor's note - this article by Ben Simonds was first published on CG Cookie blog in March 2015 and is back due to popular demand!*
Have you ever found yourself tackling a boring, repetitive Import-Export task in Blender and felt like you were manually re-entering the same data? I know how mind-numbing this can feel. And I know a way to make it much quicker and simpler...how? With a little help of Blender’s Python API and just a bit of code.
Who is this technique for?
I will demonstrate the technique using Minecraft worlds as an example, but it is incredibly useful for anyone dealing with a scenario that involves repetitive steps. In this specific case, we will be opening our Minecraft worlds in a standalone application first, to export them as objs. From there, we’ll bring them into Blender with the default obj importer, followed by using Python to tidy them up and get them ready for rendering.
What do you need to know before getting started?
If you’re completely new to Python, you might want to check out Bassam Kurdali’s Introduction to Python scripting for Blender Artists, Jonathan Williamson’s Task Automation with Python Scripting in Blender or even try out a couple of exercises on CodeAcademy.com. If you’ve experimented with the basics of Python in Blender but don't have much experience, then you should be able to follow along just fine. So let’s roll up our sleeves and get to grips with simple scripts!
Gathering our Inputs
- First, download and run Jmc2obj.
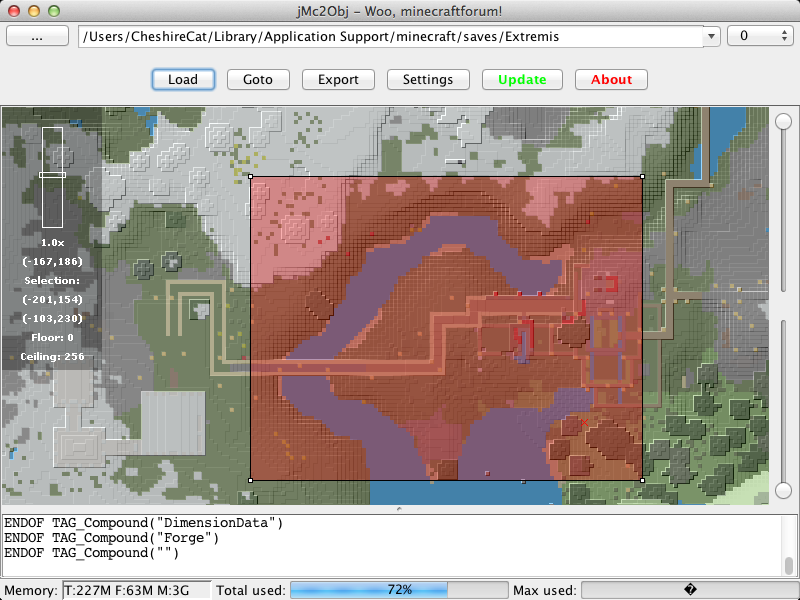
- Next, select your Minecraft world save folder from the file select dialog at the top of the application window. This is the folder that contains your level.dat file. On Mac, the default for this is [User]/Library/Application Support/Minecraft/saves/[your level name here], on Windows it’s [User]/AppData/Roaming/.Minecraft. Once you’ve set the path to your world save folder, click Load to load your world.
- An overhead map of your Minecraft world will appear. Here, you can mark the region to export. It will be highlighted with a red box.
- The sliders on the right of the map allow you to set a floor and ceiling height to export to: Minecraft worlds extend from bedrock at height 0 all the way up to the top of the world at 256 blocks high. Sea level is at 62 blocks which means that if you only want to render the above-ground parts of your map you shouldn’t need to export much below this level. Experiment with the sliders to see what effect they have - if you cut above ground level you’ll notice black holes appearing in your map.
-
Tip: Make sure you’re not exporting too big a region: start small and see how big an area you can reasonably handle in Blender.

- Once you have selected your desired region, your are ready to export an obj file and your textures. Click Export to bring up the export dialogue. We’re going to leave things set to the defaults for the most part, but an important option to enable is the Create separate object for each material option under Show Export Options. We’ll be using this later to make it easier to assign materials to our scene.
- Set a new save folder for the obj file to be exported to.
- Under Show Texture Options we also need to set a destination folder to export textures to. We will use a subfolder of the folder we used for the obj file called “tex”.
- You can then click the buttons to export textures. These can either be from Minecraft for “vanilla” Minecraft textures, or from a Custom Texturepack. I like the Sphax texture pack, which features nice cartoony textures. This brings up a file select dialog, which you need to point at the zip folder containing the relevant texture pack.
- You’re almost done! Click Export to export the obj file of your Minecraft world.
To Blender
- The “Split” option of the obj importer (on by default) has split all the different block types into separate objects, each named after its material.
- Also, while we’re still in Blender Internal, we even have basic materials set up for rendering in BI.
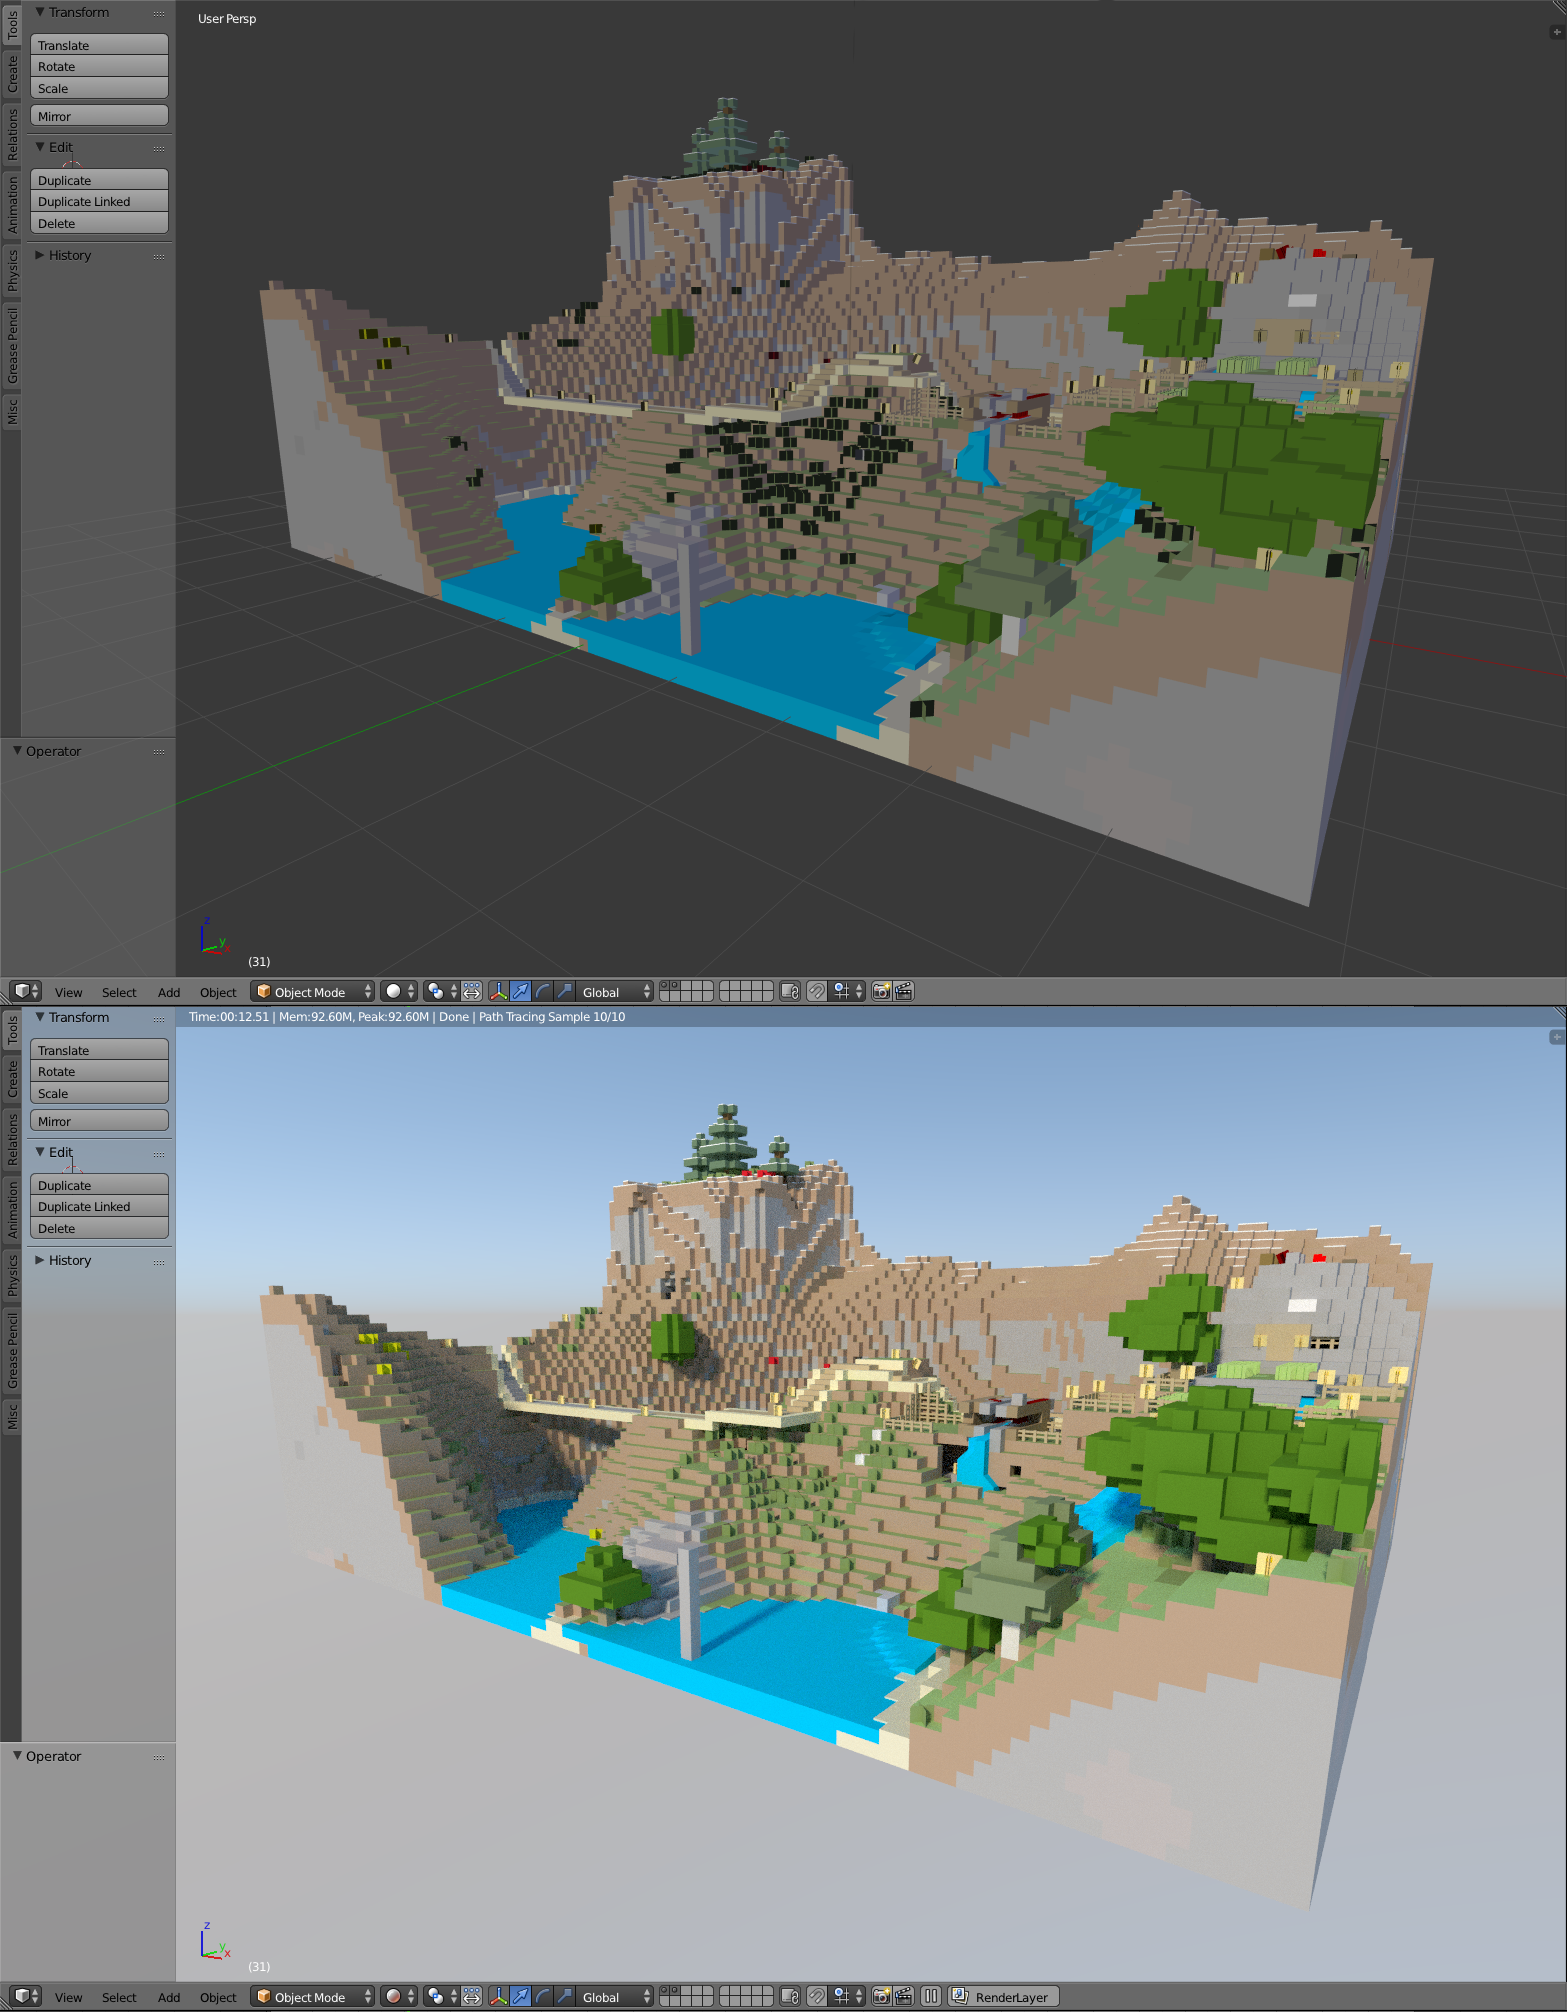 This, on the other hand, is not so great. In Cycles, we’ve just got some basic block colours for our blocks. Objects like torches and grass that require alpha maps to look “right” are in an even worse shape - our materials aren't set up at all for rendering in cycles. Here is where you may be thinking: “Oh no, I have a lot of tedious work ahead, creating a whole bunch of new materials.” But do you really?
Python to the Rescue
This is where Python comes in. Blender’s Python API is perfect for automating repetitive tasks just like this and with the information we already have it should be possible to write a script that does almost all the hard work for us. Let’s consider what we have already:
- A bunch of objects, one for each material we need to create.
- Each object is named after the image it needs to use for it’s material - for example, the object called “dirt” uses the image “dirt.png”.
- All the image textures we need are already loaded into Blender as image texture blocks (the obj imported them when it set up our BI materials for us).
Let’s also consider what the requirements are for our final materials:
- A basic shader. The classic mix of diffuse and a little bit of glossy finish might look good.
- Some of our materials need transparency, such as those for grass, leaves, water and other natural objects.
- We might want to make more modifications to certain specific objects, such as adding emission to torches or refraction to glass and water. However, these are tweaks we can make by hand later, once the repetitive work is done.
As you can see, most of our materials have pretty much the same requirements, so why not just start with the same basic shader for each material? Then, we can add the correct textures for the diffuse and alpha channels which should give us a pretty good start. In short, here is what we want our Python script to do:
- Take a list of objects from our Minecraft scene that need materials.
- For each of these objects:
- Delete/Overwrite the current material (which was set up for BI anyway).
- Apply a copy of a basic template shader (which we can create in advance).
- Set up an image node for the new shader with the correct image textures.
- Apply these image textures to the diffuse and alpha channels of our material.
And that’s it! We can then make our own tweaks later.
Script Requirements
We have almost everything we need for our script already, but there are still a couple of things missing. First, it would be handy to have a simple way of defining a list of objects that need assigned materials. Why? In case there are non-Minecraft meshes in our scene (like lamps or cameras) the script won’t need to waste time on them. This can be accomplished pretty easily by assigning our Minecraft objects into a Group which we’ll call “Minecraft” for simplicity’s sake. We can then make our script only work on objects that belong to this group. Second, we need our template material. This is going to be used as the basis for all of our other materials so it needs to be both versatile and as simple as possible. Here’s how I laid it out.  The material uses the classic mix of Diffuse + Glossy shaders, blended with a layer weight node. The image texture node (which will later be assigned one of our many Minecraft texture images) is plugged into the Colour Node of the Diffuse Shader. For the transparent parts, we then mix the result with a transparent shader, according to the alpha value of our Image Texture node. Note that we can use this for all our materials; for ones with no transparency, the alpha will just default to white. For now, the Image node is left empty (hence the purple), but you can test the setup with some Minecraft textures to check whether it works. Naming tip: Because we’ll need to replace the Image used by the Image node, it helps to give it a name you can easily reference. I set the images name to “MC_Image” in the sidebar of the Node Editor and set the label to the same so that the node’s name is visible on the node itself too. What's next? This is a useful time to set up some basic lighting, a camera and anything else we might want to help us preview our scene as we work. I added a background shader with a sky texture node and a sun lamp for some simple outdoor daytime lighting.
Writing the Script
Now that we have a basic scene set up, a template material and our minecraft objects grouped together, it’s time to write our script! Switch to the Scripting layout and create a new text data block for our Python script. Naming tip: Again, remember to give your script a practical name that will help you remember what it is. I named mine “MC_Obj_to_Cycles.py”. First, we import the obligatory bpy module:
import bpyNext, we can add in some useful variables that we’ll use repeatedly. We’ll comment our lines with # symbols to make our code easy to follow.
# Some useful variables.
images = bpy.data.images
mats = bpy.data.materials
template = mats['Template'] # This is our template material.
objects_mc = bpy.data.groups['Minecraft'].objects
# This is the list of all the objects in our 'Minecraft' group.# Some useful variables.images = bpy.data.imagesmats = bpy.data.materialstemplate = mats['Template'] # This is our template material.objects_mc = bpy.data.groups['Minecraft'].objects # This is the list of all the objects in our 'Minecraft' group.# Some useful variables.images = bpy.data.imagesmats = bpy.data.materialstemplate = mats['Template'] # This is our template material.objects_mc = bpy.data.groups['Minecraft'].objects # This is the list of all the objects in our 'Minecraft' group.
With those variables in place, we can start working through our list of objects, using a for loop function. A for loop takes an iterable (for example, our list of Minecraft objects), and runs the code within the loop for each item in that iterable. For our list of objects, this allows us to set up a copy of the template material unique to each object.
for ob in objects_mc:
    # The code we add here inside the for loop will be run for each object ("ob") in the list.
    # First we get the required image for the object. We can work this out from it's name.
    image_name = ob.name + ".png"

    # This gives us a string to look for in images (bpy.data.images):
    try:
        block_image = images[image_name]
    except KeyError:
        print("No image found for object: {0}".format(ob.name))
        continue #Skips to the next object if the corresponding image is not found.
The try statement enables us to do some basic error handling. What does that mean? Whilst we expect our script to be complete and correct, if by some chance there’s an object in our Minecraft group that doesn’t have a corresponding image datablock named “object_name.png”, our script will throw up a KeyError. The except clause of the try statement lets us deal with that error by printing a notification of this problem to the terminal, skipping this object and moving on to the next one with the continue statement. Let’s move on. Note that we are still within the “for loop” as you can tell by the continued indentation:
 # Next we create a copy of the template material and assign it to the object.
    ob.material_slots[0].material = template.copy()

    # We now have a copy of the template called "Template.001" or something similar.
    # Lets rename the material helpfully.
    mat = ob.material_slots[0].material
    mat.name = "MC_" + ob.name
    # The "MC_" at the beginning will group our objects together and distinguish
    # them from non-Minecraft materials when looking through them later.

    # Now we modify the image node from the template material to use the correct image.
    nodes = mat.node_tree.nodes #This gives us access to the materials nodes.
    image_node = nodes['MC_Image']
    image_node.image = block_image #Set's the node to use that block's image.

#We can now jump back out of the for loop, but there's not much else we need to do.
print('Finished!') #Prints a notification to the terminal.
That’s pretty much it (those last two lines are actually completely optional, but they help distinguish the end of the “for loop” for those following along). Hit Run Script to see the results (and check for bugs if it fails).  Here is the script again in its entirety:
		import bpy

# Some useful variables.
images = bpy.data.images
mats = bpy.data.materials
template = mats['Template'] # This is our template material.
objects_mc = bpy.data.groups['Minecraft'].objects
# This is the list of all the objects in our 'Minecraft' group.

for ob in objects_mc:
    # The code we add here inside the for loop will be run for each object ("ob") in the list.
    # First we get the required image for the object. We can work this out from its name.
    image_name = ob.name + ".png"

    # This gives us a string to look for in images (bpy.data.images):
    try:
        block_image = images[image_name]
    except KeyError:
        print("No image found for object: {0}".format(ob.name))
        continue # Skips to the next object if the corresponding image is not found.

    # Next we create a copy of the template material and assign it to the object.
    viewport_colour = ob.material_slots[0].material.diffuse_color
    # ADDED! Stores the materials original diffuse colour for use in the
viewport as it's helpful for navigation.
    ob.material_slots[0].material = template.copy()

    # We now have a copy of the template called "Template.001" or something similar.
    # Lets rename the material helpfully.
    mat = ob.material_slots[0].material
    mat.name = "MC_" + ob.name
    # The "MC_" at the beginning will group our objects together and distinguish
    # them from non-Minecraft materials when looking through them later.
    mat.diffuse_color = viewport_colour
    # ADDED! Sets the diffuse colour for the viewport back to the stored colour.

    # Now we modify the image node from the template material to use the correct image.
    nodes = mat.node_tree.nodes # This gives us access to the materials nodes.
    image_node = nodes['MC_Image']
    image_node.image = block_image # Sets the node to use that block's image.

# We can now jump back out of the for loop, but there's not much else we need to do.
print('Finished!') # Prints a notification to the terminal.
You might notice that I’ve added in a couple of lines here as a final tweak to the script. If you have been following along, you know that when you run the script, the viewport colours of your objects switch to all grey. This isn’t particularly helpful when trying to distinguish a dirt block from a water block! To tackle this issue, I inserted the lines (with the comment “ADDED!”) to the script to preserve the original colour of the material. What specifically did I add?
- Line 22: a variable called “viewport colour” that grabs the original colour of the BI material before we overwrite it with the template.
- Line 28: I’ve set the viewport colour of the new material back to the stored value.
Tweaks and Conclusion
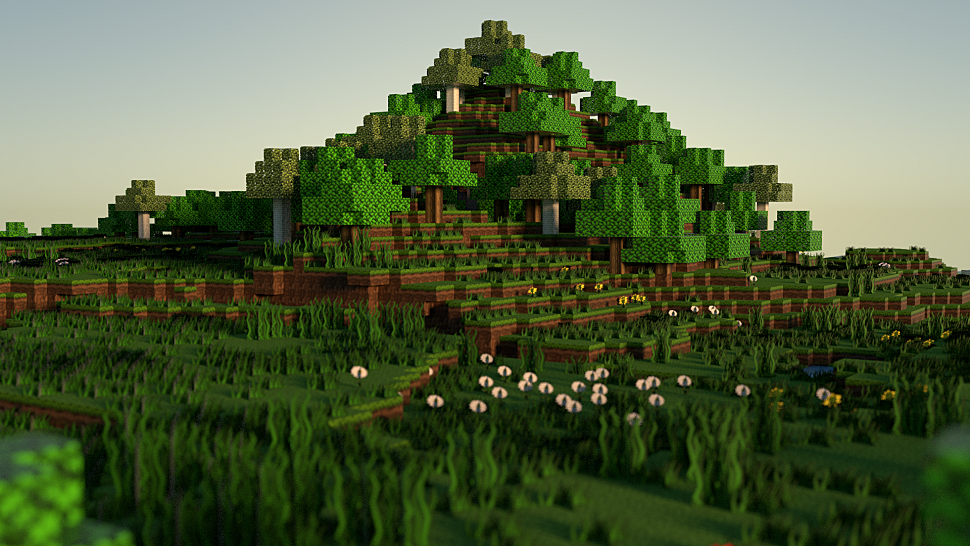
Now that our Python script has done all the hard work of setting up a basic shader for all the materials we need, we can make a few changes to our scene and start finding some cool camera angles. I chose to switch the “MC_torch_flame” material to use an Emission shader in place of a Diffuse shader and added a refraction shader to the water materials (there are two shaders - one for still water and one for flowing). I’ll leave any other tweaks as an exercise for you, but here are some renders to get you thinking. 


Let's Recap
So what did we achieve? We started out with an obj file exported from our Minecraft world which came with lots of useful data (the names of our materials and images), but wasn’t set up for rendering in Cycles. With our Python script, we started with one basic template material and created a unique copy for each of the many materials in our scene, with the correct textures plugged into each one. Hopefully, this shows you how a bit of simple Python can make boring, repetitive tasks much quicker and allow you to get to the fun parts of creating an interesting render sooner. Remember: this technique doesn’t just apply to Minecraft renders. Anytime you’re working with a pipeline and have a creeping feeling that you could be using data to achieve a result in an automated way rather than manually, it’s likely Python is a good way to go.
Will you be giving this technique a try? Let us know in the comments.
As an extension, you might want to take the script a bit further. Here are some ideas:
- Incorporating the obj import and grouping steps into the script.
- Adding some exceptions to the script for certain materials, so that they can use a different template.
Ben Simonds, is a Blender Artist based in the UK and the author of Blender Master Class. In the past he’s worked on ads, product visualisation and a couple of TV shows, all using Blender. You can find his personal work at BenSimonds.com.
Thanks for re-sharing this Pavla. This is very useful when learning to automate the things which can be automated.. After all that is what computers are for right ;-) so one has enough time left to do the manual stuff by hand(s-on approach)
I got exited as soon as I saw "Minecraft" in the title. (I am a Minecraft player who mostly does survival.)
Thanks^^
nice
This blog is impressive and informative. It clarly explains about the concept and its techniques. Thanks for sharing this information. Please update this type of information
http://www.thinkittraining.in/linux-training" rel="nofollow">Linux Training in Chennai
Great for a python example, but insanely inefficient method if you actually want to set up a Minecraft scene in Cycles. (There is a much easier, albeit non-python, way of doing this.)
nice love the topical example
ho i am mendee
Very cool, will definitely give this a try. Thanks for the tut!
Fantastic! Nice topical example as well, thanks a lot.