Since the early days of Blender, the 3D cursor is a distinctive feature that has often puzzled new users. What is its purpose? How can it aid your creation process?
CG Cookie discusses ten valuable applications of the 3D cursor to speed up your workflow.
01: Use the 3D cursor location for adding objects in 3D space
The most basic use of the 3D cursor is to determine where a new object is positioned in Blender’s 3D space.
By default, the cursor is located at the center of the 3D world, but by holding Shift and clicking the right mouse button anywhere in the 3D view, you can reposition the 3D cursor.
Once you add a 3D object using Shift + A, the new object will automatically be added to the current 3D cursor location.

If you rotate the view, the cursor will shift according to the current view plane when you Shift + RMB click, but the orientation of the objects remains the same: aligned to the world axes.
If you want to place the 3D cursor at an exact location (and/or rotation), head to the Sidebar panel’s View tab and adjust the 3D Cursor coordinates. If the Sidebar is not visible, press ‘N’ on your keyboard to toggle it on.

02: Use the 3D cursor to add objects to the surface of another object
If you Shift + RMB click on the surface of an object, the 3D cursor will move to that point, and new objects will be added to that exact spot.
The newly added object will still have the world’s 3D space orientation though unless you choose Align ➔ 3D Cursor in the options dialog. This will give the 3D Cursor orientation to your new object.
But beware, when you Shift + RMB clicked on an object, the 3D cursor did not adjust to the object’s surface normal orientation, but still to your view plane.
The next part will discuss how to align the 3D cursor to a surface normal.

03: Use Blender's 3D cursor to add and align new objects to the surface of another object
To make the 3D cursor align to an object’s surface normal, you need to activate the Cursor tool in the Toolbar.
Once the Cursor tool is activated, you can simply left-click on the surface of an object, and the 3D cursor will align to that polygon normal.

Now, when you add an object and choose the 3D Cursor option in the options dialog, the new object will have the orientation of the clicked polygon normal, because the 3D cursor orientation adapted to that when you clicked.

04: Use the 3D cursor orientation as the 3D view orientation
Once you’ve set the 3D cursor’s orientation, for example, aligning it to a polygon normal, you can change the 3D view orientation to use the 3D cursor’s orientation for moving, rotating, and scaling objects, instead of the world orientation.
![]()
05: Use the 3D cursor to move one object to another
The 3D cursor is also a great tool to make objects interact with each other.
The key menu to this is the Snap menu, which you can activate by pressing Shift + S. The Snap menu offers a number of options, including the possibility to move a selected object to the current 3D cursor position.

06: Change an object’s pivot point to the 3D cursor position
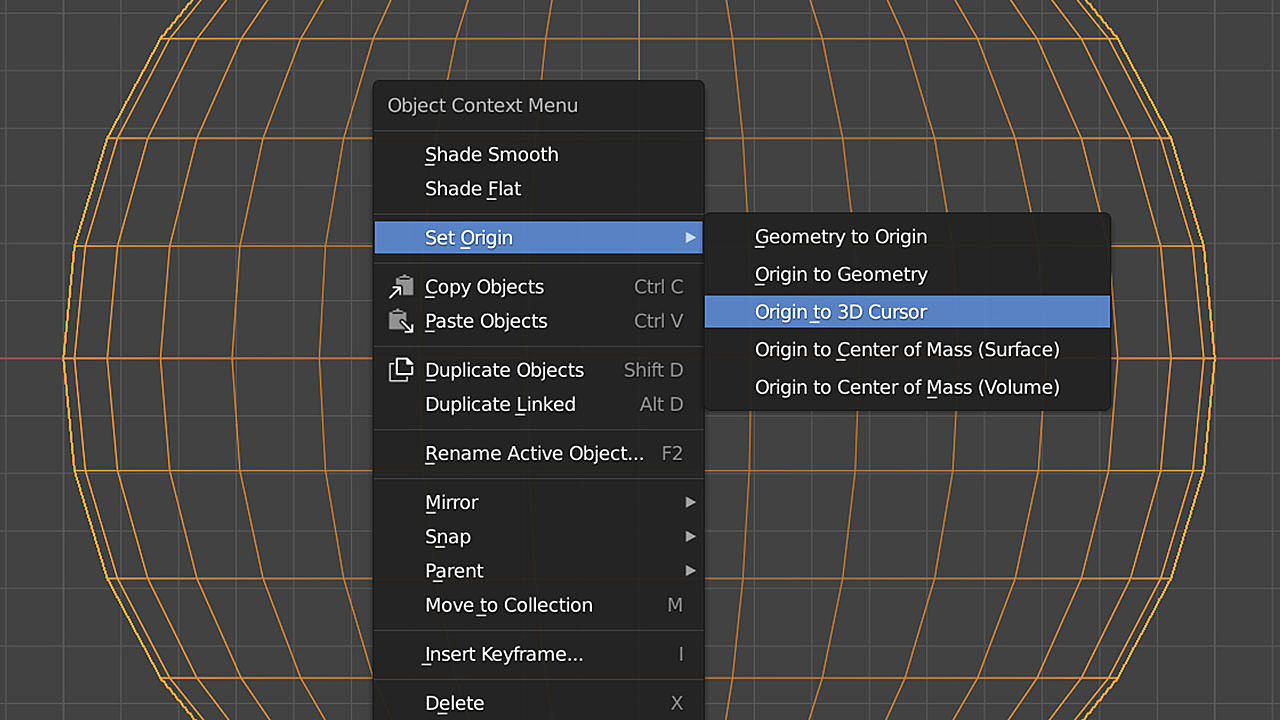
Once you’ve made a selection in Edit Mode and used Shift + S to snap the 3D cursor to the selection center, you can exit Edit Mode and right-click for the Object Context Menu, then select Set Origin ➔ Origin to 3D Cursor to change the object’s pivot point position.

07: Use the 3D cursor as a (temporary) pivot point
The Snap menu (Shift + S) offers more useful options.
You can also move the 3D cursor to a current selection in Object Mode or Edit Mode. This can be used for different purposes, such as turning the 3D cursor into a (temporary) center point for scaling and rotating.
To make this work you need to set the 3D view orientation to Cursor first, by holding down the comma key for a pie menu.

08: The 3D Cursor is the Spin tool’s rotation point
The cursor is also used as the rotation point of the Spin tool in Edit Mode, forming a hinge center point for circular extrusions.

09: The 3D cursor is the Bend tool’s base point
The Bend tool in Edit Mode is a powerful modeling aid, and the 3D cursor is useful again. To operate the Bend tool:
- Place the 3D cursor where you want the base for the bend to be.
- Select all vertices (or a limited selection).
- Place your pointer at the top side of the part that should be bent.
- Press Shift + W to start bending.

As the Bend tool works in screen space, it’s good practice to use it in an orthographic view, such as the front view.
💡 Bonus tip: hold down Alt while using the Bend tool to bend symmetrically, at both sides of the 3D cursor.
10: Lock the view rotation to the 3D cursor
If you want to manually determine the point of rotation for the viewport, position the 3D cursor and activate the Sidebar panel (‘N’ key to toggle on if necessary). Go to View ➔ View Lock ➔ Lock to 3D Cursor. Now the 3D cursor will determine the focal point around which the viewport will orbit.
Happy Blending! 🐵
Additional Reading:
Very helpful.
kkarushistuckered Sorry, forgot to add that. You can call the menu by pressing the period ('.') keyboard key.
How do you access the menu depicted under this?
"Once you’ve set the 3D cursor’s orientation, for example aligning it to a polygon normal, you can change the 3D view orientation to use the 3D cursor’s orientation for moving, rotating, and scaling objects, instead of the world orientation."
Oh #10 demistified that for me. It's a focus point for roating the 3D view around something?!? Man where have I been all this time!? Thanks metinseven
Yeah I am finding myself using the 3D cursor A LOT in the Heavy Equipment Modeling workflow. It works well to act as a center point on circular cross sections where I want multiple cylinders concentric to one another.
nice one many thanks :)