Introduction to Game Asset Creation: Learning Flow Overview
Jan 7th 2016

Working in a real-world studio means you never create alone. To succeed, you must not only excel in your own specialized field, be it Game Design, Modeling or Concept art; you must also understand the big picture of the production pipeline.
How does your work fit in? How do others depend on what you create?
For the first time ever, the CG Cookie crew came together to replicate a production pipeline of a game-ready asset. The result? Our Learning Flow on Game Asset Creation. Read on for an overview of what awaits you if you enroll...
Step 1: Creating the Concept

Our team has a clear goal: create a game-ready natural asset, a boulder with foliage on it. The boulder should be modular, meaning it can be used in multiple places within the game, without looking like a copy & paste job. It’s now up to the Concept Artist (in our case, Tim von Rueden) to rise to the challenge and deliver visuals: these will define the work of all the other team members involved in the pipeline. "As a concept artist in the industry, it is essential to keep communication with the team open throughout the process. Don't over-detail your concept too soon; that can come later. Your initial job is to come up with a few concepts that the team can select from," explains Tim. In the sketch-up process, Tim creates 6 iterations of the concept, after doing his initial research and gathering references. He organizes the iterations in a way that makes it easier for the team to make the final choice and numbers them sequentially.

Tim's 6 iterations of the boulder concept. Once the concept is chosen by the rest of the team, he prepares a turnaround sheet: "This is a great way to help the modeler get a good idea of what the asset looks like from various views," says Tim. Tim's final product is a clear sheet with the chosen concept art and its turnarounds.
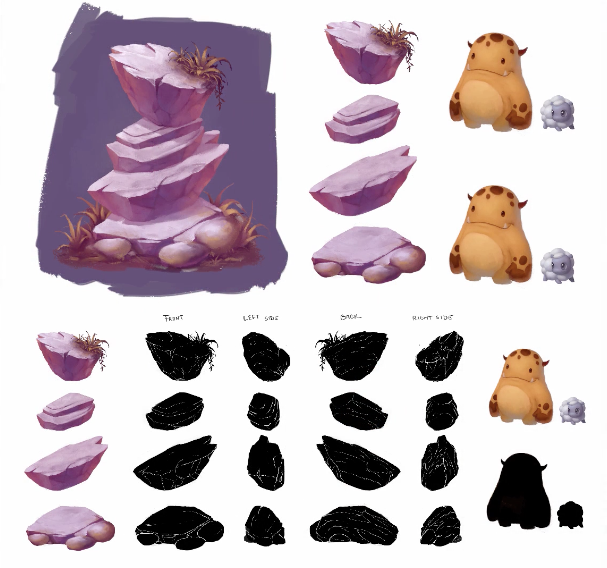 Concept art sheet with turnarounds and game characters to show dimensions.
Step 2: Modeling, Sculpting and Retopology
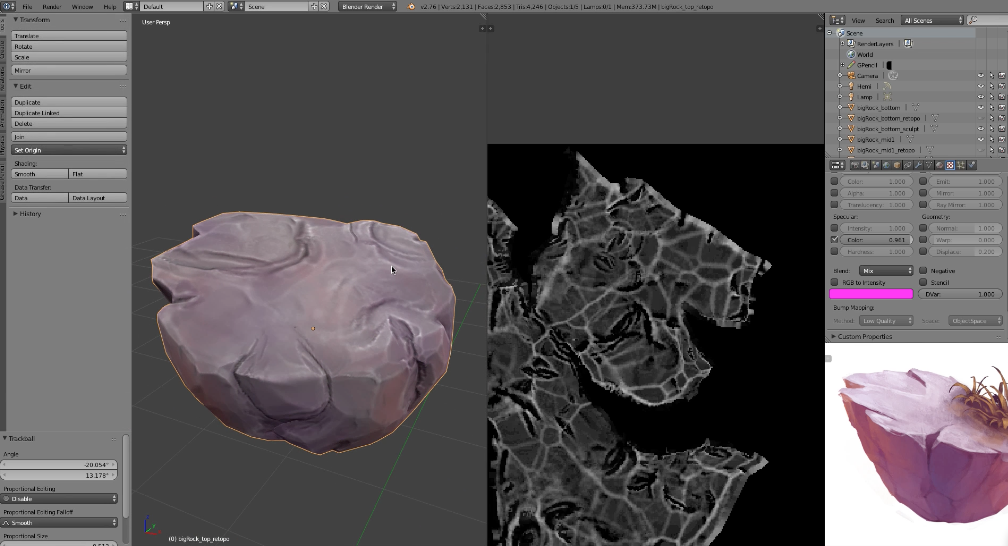
With the concept art complete, Jonathan Williamson and Kent Trammell now get to work using Tim's final .jpeg. They will be creating a prototype; a reference point for anybody who may need to use the asset at any point within their pipeline. This will serve for testing the model's real-world scale, level prototyping or even testing the import-export interchange between Blender and Unity. Jonathan studies the object's real-world size based on the concept sheet Tim provided, as well as its individual components (the four boulder layers). He uploads the turnarounds (front, back, left and right view) into Blender and proceeds to model the prototype.
A low-poly asset model in Blender[/caption] Once completed, Jonathan's prototype is true to the original concept in proportions but lacks any detail. That is where Kent comes in to do high-res sculpting with Blender's dynamic topology tools. These are useful for capturing details on the rock's surface. Receiving the low-poly prototype from Jonathan allows Kent to create the detail to match the original concept artwork with all the cracks and facets. Once the sculpting is completed, Kent passes the torch back to Jonathan who tackles retopology of the model to create a more optimized low-res version of the mesh that can be used within Unity.
 The retopologized asset (top rock only)
Step 3: Texturing
At this point in the process, Kent Trammell focuses on the surface quality of the asset, deriving some from the existing high-res sculpt and the process of baking, while painting some by hand. “Textures are powerful and they play a vital role in game-asset creation,” explains Kent.
Like laying our a fresh canvas to paint on, Kent lays out the model's UVs, baking out maps that will mimic the detail of our sculpture and painting a color map with Blender's 3D paint tools. He completes his part of the pipeline by exporting the textures in Unity.
Step 4: Asset Integration
The process of modeling and texturing the asset took some time; in order not to hold back work in other areas, game designers usually use stand-ins. When the final asset arrives, Jonathan Gonzalez updates the stand-ins and applies them with the final texture maps. He also creates colliders to make the asset act as a solid object.

I'm definitely going to try this soon... =D
I've worked through this flow. It is very thorough and excellently done. I've identified some trouble areas for myself that I need to work through. Having a flow like this I can easily go back to trouble areas that need ironing out in my current skill set.
I'd be excited to see another cross discipline flow like this. I understand that this is no small task and I appreciate the efforts that went into this flow.