Blender 3 is here already! Wondering what's new in the user interface, modeling tools, or even virtual reality? Here is everything you need to know...
Download Blender 3.0 here: download link
What's new in Blender 3.0?
Wait... why did they skip 2.94 - 2.99?
It’s because Blender has switched over to using semantic versioning, which is considered good practice for software development.
This new version of Blender isn’t as big of a jump as the 2.4 to 2.5 or the 2.7 to 2.8 overhauls, but it does mark a new era for Blender and there are quite a few new features worth talking about.
New to Blender? Get Started with our BASICS course
Made for Blender beginners - or those needing a refresh - our Blender Basics course is free for everybody.
Start the course here.
User Interface
The default theme got a few updates and is looking pretty slick, thanks in part to more padding around panels and rounded panel corners.
Splitting and joining editors is now much easier with a new Close Area operator in the right click context menu and the ability to drag from a corner to split other editors.
The header and tool settings are swapped (which I think makes a lot more sense), blend file thumbnails are improved, Ctrl+F will open search when hovering over lists, UI text rendering is drastically faster, the custom properties popup has a lot more customizable options, gizmos no longer flash when using modal operators, instanced objects don’t have a different outline color anymore, and the Outliner has a new filter option for View Layers that allows you to see all of them at once.
If you’re using Windows, you can now make a certain version of Blender the default for your system in the user preferences and the console will no longer flash when you start Blender. On MacOS, you can now input Japanese, Chinese, and Korean characters into text fields.
The Freestyle UI was overhauled to better match the rest of Blender and make it easier to add and edit the lines drawn on top of your renders.
Over in the Node Editors, the grid has been replaced with an array of dots that reminds me of notebook paper and the links are drawn with the same color as whatever socket they’re connected to. A nice additional feature is that the Node editor now pans the view if you drag a connection to a side of the editor, similar to dragging and dropping something in a long list.

Modeling
The most notable modeling change in Blender 3.0 is the huge update to the Knife tool, thanks to a Google Summer of Code project by Cian Jinks. When you snap to an axis with X, Y, or Z, it now will snap to the local or global axis like any other tool rather than the view. Pressing S will toggle the display of the angle and distance measurements of the cut, Ctrl+Z will undo a previous cut, and the angle constraint option can now be used relative to edges rather than to the view. It also now works across more than one object in edit mode. Amazing! The hotkeys are slightly different, so be sure to check the status bar for the full set of available features.
The Weld modifier has a new option to weld only loose edges, the Surface Deform modifier has a new Sparse Bind option that only evaluates vertices in the vertex group while binding for faster performance, and the Mesh Cache modifier now supports vertex group blending which is nice to have when importing cloth simulations from other software.
The Statistics overlay that shows object and vertex counts in the viewport now shows the correct local statistics when in local view.
Geometry Nodes
Blender 3.0 is the third release that has included Geometry Nodes. It was decided, after the initial design was put through its paces, that the system could be made much more user friendly if attribute data and functions could be passed along with the node links. This change (referred to as the Fields update) drastically simplifies setups, but it does mean that you may need to re-learn how the nodes work if you were used to working with them in previous versions.
The Fields update introduces new types of node sockets and node links. Dashed lines now represent the flow of functions while solid lines represent regular data being passed along. Circle shaped sockets can only accept data (solid lines) while diamond shaped sockets can also accept functions (dashed lines).
I generally go over every new node and feature, but the pace of development is so fast here that there are about 100 and it’s way too big of a topic for this article. Instead, I’ll list the highlights.
The Noise, Gradient, White Noise, Voronoi, Checker, Magic, Wave, and Musgrave textures from the shader editor were added to geometry nodes.
The geometry nodes system is now a bit smarter about instancing, which really helps with performance. In addition, instances won’t be converted into real geometry behind the scenes, so you’ll need to use a Realize Instances node to convert them explicitly.
Speaking of performance, the evaluation system under the hood was greatly improved, so you should notice a nice boost in how fast the nodes are to work with.
Curves have been added to geometry nodes! There are several curve-specific operations that are available, and they can be freely converted to meshes and back. New curve primitives such as stars and spirals were even added.
As if that wasn’t exciting enough, text nodes were added as well! The String to Curves node converts text into curves, which can be used for all sorts of great motion graphics effects.

Geometry nodes can also set and replace materials as well as work on volume objects. Some other noteworthy additions include the Raycast, Switch, and Convex Hull nodes.
Animation and Rigging
Location, Rotation, Scale, and Custom Properties is a new keying set that includes custom properties along with the usual transform data. It can be used to replace the Whole Character keying set which only works in Pose Mode. Along with that, removing keyframes now respects the active keying set.
The In-Between section of animation tools has been improved with all of the operators (plus a new Blend to Neighbor one) now using a new sliding tool with the following features:
- Actual visual indication of the blending/pushing percentage applied.
- Mouse wrapping to allow for extrapolation without having to worry about the initial placement of the mouse. This also means these tools are actually usable when chosen from the menu.
- Precision mode by holding Shift.
- Snapping to 10% increments by holding Ctrl.
- By default the tool doesn't allow overshoot (lower than 0% or higher than 100%), but it can be enabled by pressing the E key.
- Bones are hidden while sliding, so the pose itself can be seen more clearly. This can be toggled by pressing the H key while using the tool.

Animation curve and NLA strip modifier properties can now be overridden, and animation curve modifiers not working well with Restrict Range Borders has been fixed.
Animation curve selection has changed slightly as well. Selecting the curve itself will select all of its keys. Here’s how the Blender manual describes the new hotkeys:
- Box selecting a curve selects all the keyframes of the curve.
- Ctrl + box selecting of the curve deselects all the keyframes of the curve.
- Shift + box selecting of the curve extends the keyframe selection, adding all the keyframes of the curves that were just selected to the selection.
- In all cases, if the selection area contains a key, nothing is performed on the curves themselves (the action only impacts the selected keys).
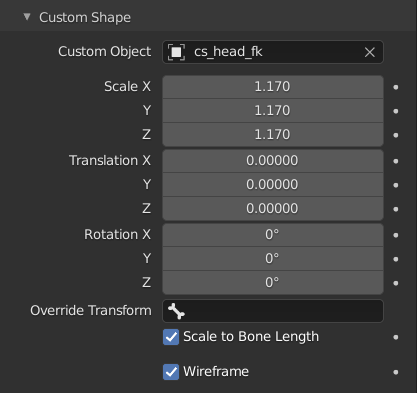
One change that I’m particularly happy about is the new custom bone shape transform properties. I’ve spent WAY too much time trying to get my custom shapes into the right position in the past, and this should make that process much more intuitive.
There’s a new option to recalculate all motion paths so you won’t need to do it for each bone individually.
A potentially important change for working with animated instances is that vertex group names are now part of the mesh and not the object, so it is impossible to have different names in different objects using the same mesh.
Constraints now have Apply Constraint, Duplicate Constraint, and Copy To Selected operators, similar to modifiers.
There’s also a new target space option for constraints, called Local Space (Owner Orientation), which copies the local transformation of the target bone in the constraint owner's local space. The use case for this is transferring the local (i.e. excluding the effect of parents) motion from one bone to another while ignoring the difference between their rest pose orientations.
The Limit Rotation now handles shearing correctly (by removing it before processing), the Copy Transforms has a new option for that as well as several new mix modes, and the Copy Rotation constraint has a new option for selecting the Euler order. The default Rotation Type for newly created constraints has been changed to Swing, which was introduced in 2.82 to replicate the behavior of the common Damped Track + Stretch To combination using just the Stretch To constraint.
Bendy bones have been improved a bit with improved labels and some new toggles that can remove the need for several drivers.
Grease Pencil
Blender’s Line Art modifier for grease pencil objects improved pretty significantly in 3.0 Large speed improvements, camera selection, camera overscanning, automatic crease detection, stroke offsets, and several masking options were all implemented.
Grease pencil objects can now be baked into new grease pencil objects, effectively applying any modifiers and transformations. Text objects can now be baked to grease pencil strokes as well. When converting a mesh to a grease pencil object, the vertex group weights will now be copied over.
Multiframe support has been added to Reproject and Move to Layer, the bracket keys now control the brush size, Select Random and Normalize Thickness/Opacity operators have been added, and automerging strokes with different thicknesses has been significantly improved.
The Fill brush’s Leak Size parameter in the tool settings has been replaced by a new Dilate parameter which helps to better fill small gaps. Leak Size has been moved to the Advanced panel. The tool settings area also has a new option for choosing between round and flat caps.
The Vertex Weight modifier can be used with grease pencil objects now, the Offset modifier got new options for randomizing the result, a new Length modifier can extend or shorten strokes, and a new Dot Dash modifier can split the strokes into different segments and assign different materials or settings to each.

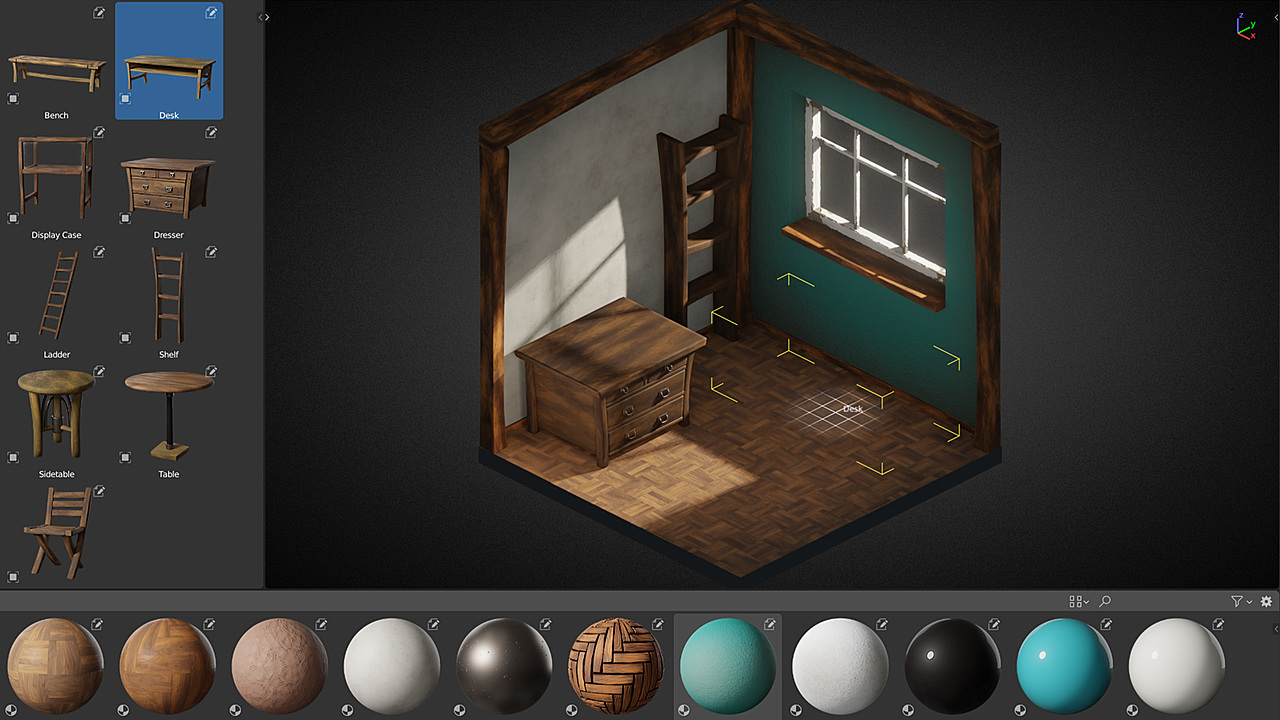
Asset Browser
Blender 3.0 added one entirely new editor: the long-awaited Asset Browser! It currently only supports objects, materials, poses, and worlds, but that's more than enough to start out with. Assets from the browser can be easily dragged and dropped into any scene. To quickly include something in the asset browser, right click on its data block and choose Mark as Asset.

The important thing to know about the Asset Browser is that it does not save things to a central location. Instead, assets are sourced from the file that you marked them as assets in. If you delete the original file, the asset will disappear as well.
The Asset Browser is also a new replacement for Pose Libraries since it can store poses as well. It should be much more useful since it can include preview thumbnails and will allow you to blend between poses interactively.
Eevee Rendering
There are not many flashy new features for Eevee in Blender 3.0, but there are three important improvements. Custom mesh attributes can now be used via the Attribute node, the Wavelength node is now supported, and editing dense meshes while in material or rendered view may be up to 2 or 3 times faster!
Cycles Rendering
Core parts of Cycles were entirely rewritten for Blender 3.0, and the result is a shocking jump forward in speed and potential future functionality. In short, GPU rendering has been sped up anywhere between 2x to 8x depending on the scene, thanks to NVIDIA and AMD improvements. Combined with a new display pipeline, the Cycles rendered preview is now truly usable as an interactive viewport.
 Demo by Statix / redhoot
New sampling features allow for a totally different workflow. Instead of setting a specific sample count, you can now set a noise threshold that Cycles will stop at, and a maximum and minimum sample count range for it to operate in. This is pretty intuitive, since we care about smooth images much more than the numbers. Cycles will try to detect which parts of the image have more noise and spend more time working on those areas. I’ve found that the noise detection is not particularly accurate, but it’s generally close enough. If you’d rather, you can also set a time-based limit.
Rendering tiles are mostly a thing of the past in this new version of Cycles. The new architecture makes tiles irrelevant in terms of performance in most use cases, so the default tile size is now a whopping 2048px squared and you may never see it kick in unless you’re rendering in 4k or up. It’s great to be able to see the whole scene start to clear as soon as I hit F12! The Blender manual mentions two scenarios where tweaking the tile size may still be helpful:
- When there is not enough memory to fit both the scene and render result, reducing tile size makes more memory available for the scene.
- When a small object renders very slowly compared to other objects (for example transparent hair), rendering with smaller tiles can help keep the GPU busy.
You’ll also find a new Scrambling Distance option in the Advanced panel, and its use cases are, in fact, fairly advanced. It can help clear up scenes while rendering on the GPU and while adaptive sampling is disabled. The lower you set this option, the less randomization there will be between pixels. This can be great in some situations, but it’s an option to use with caution because it causes the result to be less predictable and could lead to incorrect values or flickering in animations.
OpenImageDenoise was upgraded to version 1.4 in this release, which helps preserve more detail in general but specifically helps scenes with volumes.
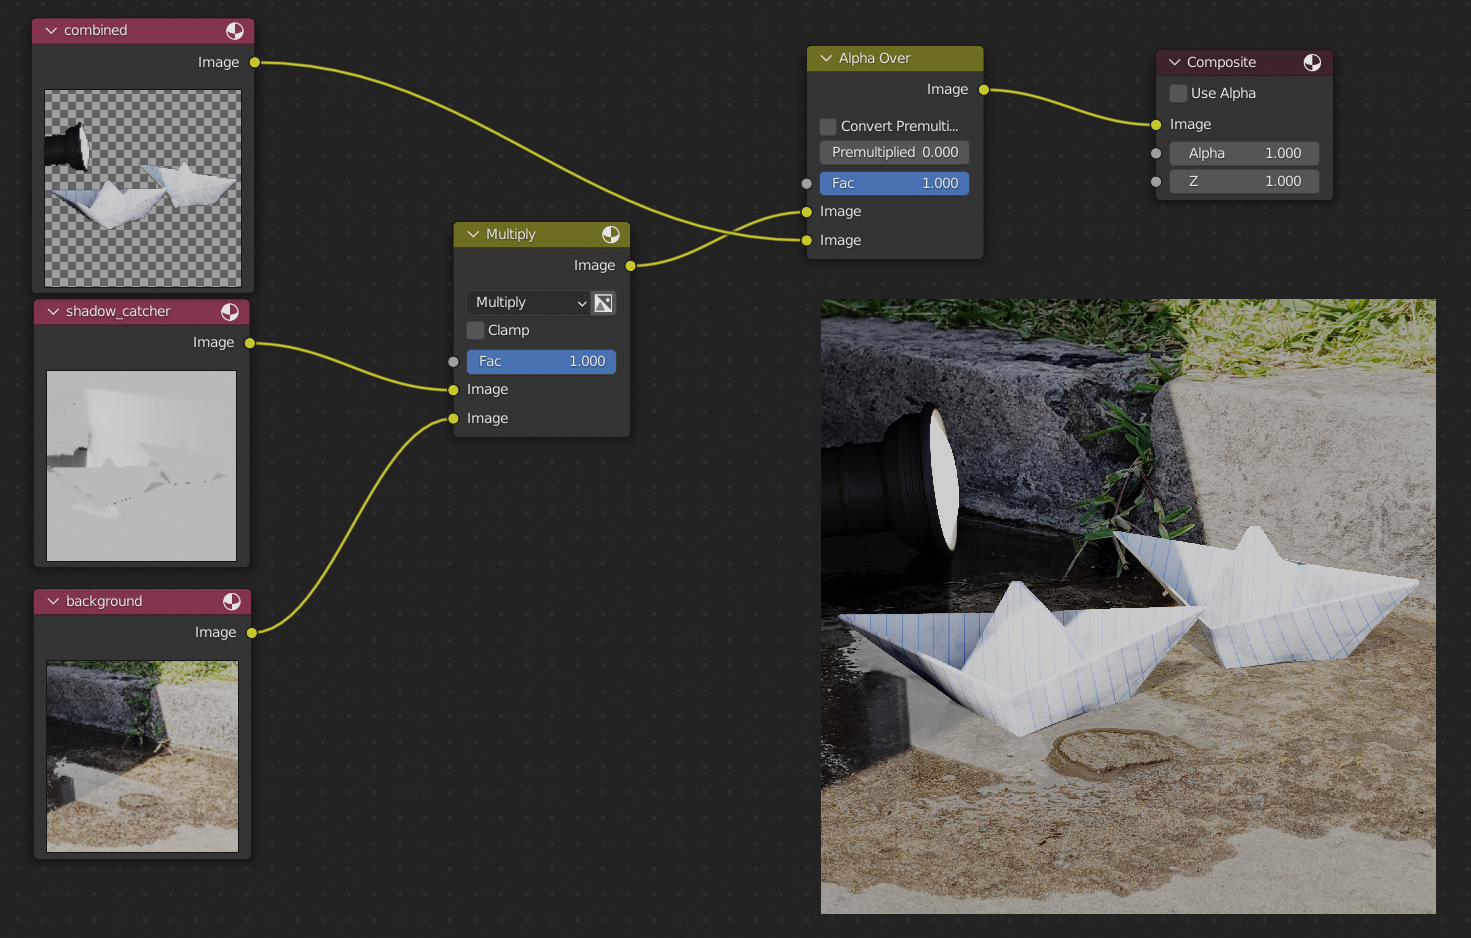
The Cycles shadow catcher was entirely rewritten and is even better for rendering visual effects! It supports indirect and environment lights and each light can be included or excluded from the result. The new shadow catcher only affects the alpha channel of the Combined pass by default. However, to fully handle colored indirect light and emission, the new Shadow Catcher pass should be used. The background should be multiplied by the Shadow Catcher pass, after which the Combined pass can be composited over it with alpha over.
 Demo by Joni Mercado
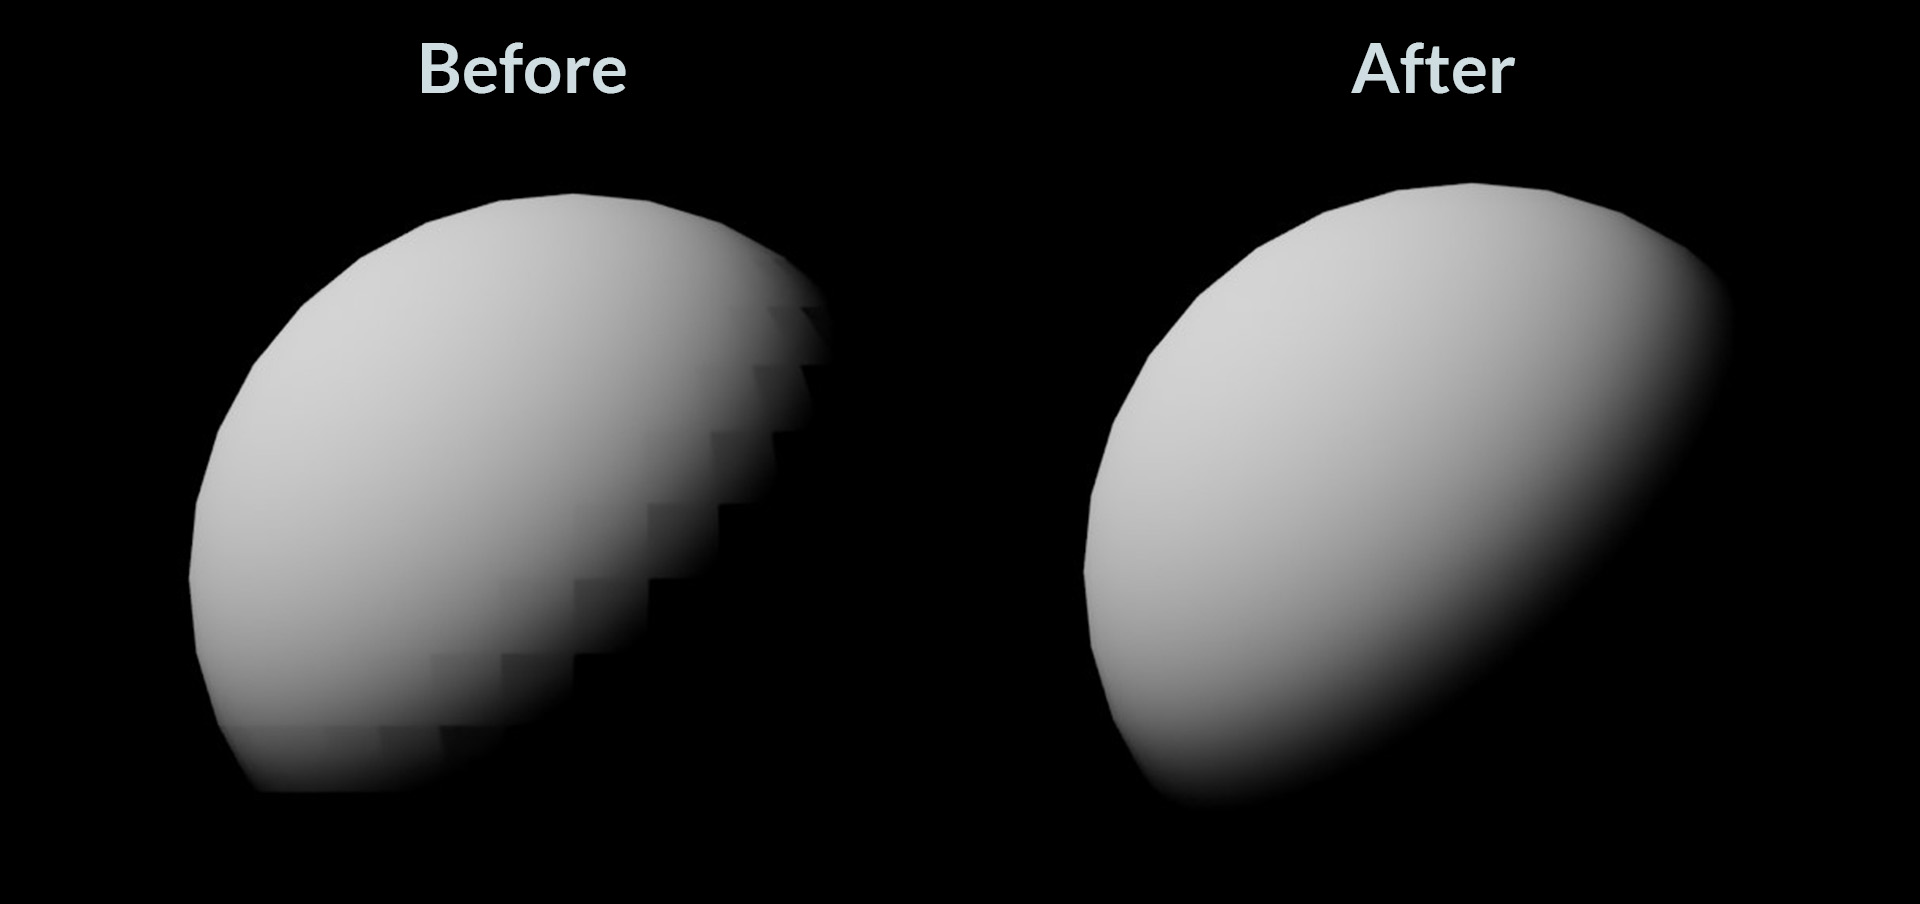
Speaking of shadows, the shadow terminator problem (less exciting than it sounds, it’s where harsh lines appear on low poly geometry in path tracers) can be mitigated with a new Geometry Offset option in the object properties. Unlike the previous solution, Shading Offset, this one won’t change where the shadow line is on the surface.
Subsurface Scattering is now set to the more accurate Random Walk by default, which can also now use anisotropy and IOR values for rendering more realistic skin. The Cubic and Gaussian SSS options were removed.
A few other features were removed as well: the NLM (non-ai based) denoiser, branched path tracing (adaptive sampling should replace that use case), and the CMJ sampling pattern.
As if all of that wasn’t enough, lights can now be visible to the camera, there’s a new position render pass, volume rendering is now consistent across GPUs and CPUs, and baking supports denoising.
VFX & Video Editing
The camera presets were updated for motion tracking, since the ones from 7 years ago were a bit out of date.
The Video Sequence Editor now supports 128 channels instead of 32. Effect inputs can now be blended if placed above the effect, snapping video strips was improved, a transform overwrite mode was added for dropping strips on top of each other, video strips can now have thumbnails and color tags, transform tools were added to the preview region, and the Offset/Power/Slope color correction method from the compositor was added.
Virtual Reality
Blender 3.0 adds a brand new set of VR controller-based functionalities, including the ability to visualize VR controllers in the viewport and the ability to navigate (teleport/fly/grab) one's way through a scene using VR controllers. This functionality is available via the updated VR Scene Inspection add-on that’s included with Blender.
Python Scripting
A whole lot changed in Blender 3.0! From now on, full number updates (3.0, 4.0, etc.) will indicate breaking changes. If you develop addons, keep an eye on the release notes during future development to see if you’ll need to change anything.
Which new feature is your favorite?
For more details on the new features, check out the full release notes from the Blender team: https://wiki.blender.org/wiki/Reference/Release_Notes/3.0